• The Roadster Factory Recovery Fund - Friends, as you may have heard, The Roadster Factory, a respected British Car Parts business in PA, suffered a total loss in a fire on Christmas Day. Read about it, discuss or ask questions >> HERE. The Triumph Register of America is sponsoring a fund raiser to help TRF get back on their feet. If you can help, vist >> their GoFundMe page.
  • Hey there Guest!
    If you enjoy BCF and find our forum a useful resource, if you appreciate not having ads pop up all over the place and you want to ensure we can stay online - Please consider supporting with an "optional" low-cost annual subscription.
    **Upgrade Now**
    (PS: Subscribers don't see this UGLY banner)
Tips
Tips

BJ7 Side Window Alignment

dougie

Luke Skywalker
Country flag
Offline
How do I fix my driver's side window sealing problem? Passenger side aligns perfectly, but the driver's leaves room for a flood to enter. I tried bending the vent wind frame inwards, but then the window wouldn't raise and lower in the track. Also tried re-aligning the door without any luck. Any ideas welcome.
View attachment 72505
View attachment 72506
You'll need to buy a German built vintage car if you're looking for a better fitting top or panels......
 

Patrick67BJ8

Obi Wan
Silver
Country flag
Offline
UPDATE
I managed to get my passenger side window finally adjusted properly so I have a good glass to weatherstripping seal.

I had the window frame assembly removed and laying on the bench when I noticed that the curvature of the window frame and the glass profile curve didn’t match. I put the frame assembly in a vice and gently pulled it in the direction that matched the window profile curve.

Before installing it again, I tried to slide the window in the U-shaped track. It was binding, but it was always binding in the past (my wife had a difficult time raising the window). I grabbed two pairs of pliers and used them to spread the U channel on the window frame assembly. Slowly but surely, the window became easier to slide in the U channel. When I worked my way up to the chrome area I couldn’t use anything that would mark up the chrome so I used brake spring pliers with some difficulty, but it worked. I looked for a “spreader tool” that I could insert into the U channel which is 1/2” opening, but I struck out there. I still want to find a tool that will do this for some more fine tuning! Anyone know of such a tool?

I installed the whole assembly and restarted my adjustments and the glass now fits against the weatherstripping with no gaps! The window is much easier to roll up/down now, but I need a few more fine tuning adjustments. A new window regulator was also installed to replace a much worn out one.
 

Attachments

  • 0ABD1522-DBFF-4DF9-8FFA-43C8AD896660.jpeg
    0ABD1522-DBFF-4DF9-8FFA-43C8AD896660.jpeg
    757.1 KB · Views: 77
  • FEC19FDC-064D-44A1-817A-3FA2ECC25604.jpeg
    FEC19FDC-064D-44A1-817A-3FA2ECC25604.jpeg
    767 KB · Views: 81
  • 72474372-67B7-47BF-8800-788C900713A6.jpeg
    72474372-67B7-47BF-8800-788C900713A6.jpeg
    738.6 KB · Views: 73
  • D2F611CA-B902-4E57-867A-1881A30AF6CB.jpeg
    D2F611CA-B902-4E57-867A-1881A30AF6CB.jpeg
    952.5 KB · Views: 71
  • 79AF9022-E28B-4320-8505-DB7B42505935.jpeg
    79AF9022-E28B-4320-8505-DB7B42505935.jpeg
    822.9 KB · Views: 76

AUSMHLY

Obi Wan
Country flag
Offline
Congrats! Nicely done.

"I looked for a “spreader tool” that I could insert into the U channel which is 1/2” opening, but I struck out there. I still want to find a tool that will do this for some more fine tuning! Anyone know of such a tool?"

As you mentioned, a pair of pliers (ends wrapped with tape) is also what I used. Have you tired putting an extension on the plier handles (like PVC or metal tubing) for more leverage?

When I think I'm done, I'lI slide a socket in the channel top to bottom to confirm the gap is uniform. Good luck.
 

Patrick67BJ8

Obi Wan
Silver
Country flag
Offline
Installing the weatherstripping is next, right after I fix the passenger door handle. My wife pushes the interior handle forward, but the door doesn’t “release” until she bumps the door with her shoulder and she’s really tired of doing that. The inside mechanisms look okay and seem to work properly when the door is open.
 

vette

Darth Vader
Country flag
Offline
Sometimes that occurs because the door or latch is dragging.
 

Patrick67BJ8

Obi Wan
Silver
Country flag
Offline
The passengers door latch is dragging/rubbing. Photos posted show the dragging marks on the tape. (Note: the round steel dowel was dragging on the door jamb a long time ago and I filed it down so that was fixed).

It appears that I will have to take a hammer and hit/tweak the dragging assembly on the door itself.

Thoughts anyone?
 

Attachments

  • A919D186-A74B-42B5-BA27-1CC77A228A03.jpeg
    A919D186-A74B-42B5-BA27-1CC77A228A03.jpeg
    854 KB · Views: 72
  • A25104F3-74D8-4BA5-B825-E4DE76AFC075.jpeg
    A25104F3-74D8-4BA5-B825-E4DE76AFC075.jpeg
    827.9 KB · Views: 72
  • 72B0351F-72DA-4503-86A6-7CB5BE56E461.jpeg
    72B0351F-72DA-4503-86A6-7CB5BE56E461.jpeg
    805.4 KB · Views: 68
  • B3416847-5B5C-4093-80F4-2B9D7C9D4AA7.jpeg
    B3416847-5B5C-4093-80F4-2B9D7C9D4AA7.jpeg
    680.3 KB · Views: 73

vette

Darth Vader
Country flag
Offline
I don’t believe I would hit the door latch with a hammer. The door has quite a bit of flex in it and is susceptible to bending. Instead of tape use chalk to mark and then highlight the areas of contact. When the chalk transfers to the other surface you can see exactly where contact is being made. Maybe too many or to little shims are present under the latch plate on the latch panel. Or same for the latch mechanism itself on the door. The door needs to close without any contact on the metal pieces until it actually engages the catch. The adjustment should be able to be effected by loosening the screws to move things around and/or adding or removing shims.
Not by hammering it. It’s precision adjustment not muscle. If you get to a state where it is so close but still a very slight drag and you just can’t get it any better then you can cheat a little by placing just a tecsh of lube/white grease on the spot where the chalk indicates erroneous contact.
 

AUSMHLY

Obi Wan
Country flag
Offline
Hello Patrick,
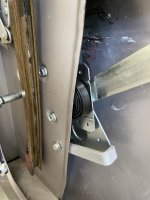
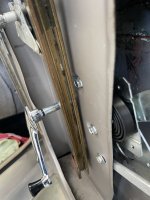
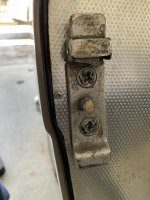
The Lock Assembly is held in place by 3 screws and not adjustable. Make sure it's screwed in tight. Hammering won't fix anything.
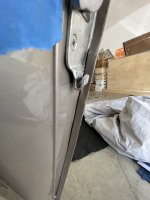
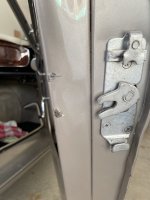
The Lock Plate is adjustable. Remove the lock plate and make sure there are no shims behind it. If so, remove, most likely problem solved. If no shims, look to see if any are under the 2 door hinges. Possibility the rear door is too close to the rear wing. If no shims and you can't move the door forward at all, then an extreme fix may be grinding the back of the lock plate to make it thinner.

As a side note, the steel dowel was once round. It can get flattened at the point of contact with the lock assembly latch. Remove the lock plate and you'll find on the back you can loosen the screw to the dowel, rotate the dowel so the round part is where it needs to be. Tighten the screw, good to go.

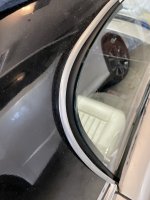
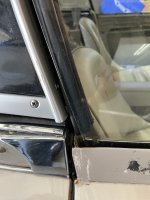
Once you figure out what the problem was, it's time to align the lock plate. It's adjustable, up/down right/left. To confirm it's in it's correct place, roll the window down so it doesn't come in contact with the rubber seal, hold the door handle button in so it doesn't latch and close the door. It should close easy with no resistance (except for the rubber seals around the side/bottom of the door. To confirm it's good, close the door. Did it close completely and the body line and door/wing line up? Good. Now gently push the handle button enough for the safety catch to stop the door from opening completely. Door should still be closed but not totally closed. Push the button more for it to completely open. Confirm the safety latch works. (The latch has 2 cut outs, safety and closed).

Let us know your findings.
Good luck.
 
Last edited:

Patrick67BJ8

Obi Wan
Silver
Country flag
Offline
I made a few minor adjustments and the door opens and closes good especially from inside the car where the problem was.

I had all the pieces CAD plated and that added additional thickness to the pieces and just enough to be a problem in addition to the door jamb striker. I removed the striker and tweaked the offending part of it and I also bent the top of the door mounted piece as well. The door mounted piece I did in carefully in place with a prybar and vice grips.

A few thousands here and there is all it needed.

Thanks guys for all your suggestions!
 

chicken

Jedi Trainee
Country flag
Offline
Quick question, do the windows have 2 or 3 nylon guides in them for each door ?
I'm sure the book mentions 6 in total but i only have 2 on each window, at the top in the window guide and at the bottom on the rear door guide.
I wondered if there should be one one on the front at the bottom ?
Rob
 

bob hughes

Luke Skywalker
Country flag
Offline
Rob, from memory there should be three, also there are cutouts for the nylon guides in that L shaped frame, as you surmise, 2 in the front and one together rear.

Bob
 

chicken

Jedi Trainee
Country flag
Offline
Rob, from memory there should be three, also there are cutouts for the nylon guides in that L shaped frame, as you surmise, 2 in the front and one together rear.

Bob
Hi Bob, though i cant see how i would fit a guide in the front bottom corner, it has the cutouts on either side but where the frame is riveted to the upright on the bend there is no hole through the back for the nylon guide, any ideas ?


IMG_4887.jpg
IMG_4890.jpg
 
Similar threads
Thread starter Title Forum Replies Date
B BJ7/8 side window glass Austin Healey 6
vette BJ7 Side Windows Austin Healey 21
B Advice on Wooden Header and Side Trim Rails for a BJ7 Convertible Top Austin Healey 9
T BJ7 Side Exhaust for increased clearance Austin Healey 19
R BJ7 listing to the port side Austin Healey 9
5 WTB: BJ7 Squab Austin Healey 13
5 BJ7 Boot Rust-Through Austin Healey 13
B For Sale Too many Healeys - BN2, BN4, BT6, BJ7 For Sale Austin Healey Classifieds 0
Walter74 BJ7 Throttle Linkage "Support Panel" Austin Healey 5
T BJ7 Trim Recession (Convertible Top) Austin Healey 2
ModifiedBJ7 BJ7 Windshield Surround Rubber Seal Austin Healey 2
R New Hood for BJ7 Austin Healey 3
chicken BJ7 Chrome Trim Austin Healey 15
JMACENGINESHOP BJ7 Engine Rebuilding Austin Healey 23
R BJ7 Rear Axle Maintenance Austin Healey 5
B Wanted Grill Top Cowl and Surround - BJ7 Austin Healey Classifieds 1
B BJ7/BJ8 Door Check Straps Austin Healey 10
R Changing BJ7 Differential Ratio Austin Healey 10
X Trouble shooting trafficator - 1963 BJ7 Jaguar 9
T BJ7 Hard to find First Gear when G/Box is hot Austin Healey 3
B BJ7 Rear View Mirror Mounting Hardware Austin Healey 7
chicken BJ7 Door Fit Austin Healey 27
T Wanted BJ7 parts needed Austin Healey Classifieds 0
T Weight of BJ7 Transmission/Overdrive Austin Healey 10
D BJ7 Clutch Austin Healey 6
R BJ7 Back Seat-Rest Austin Healey 1
HealeyRick BJ7/8 Convertible Top Issues Austin Healey 5
B BJ7 Interior Finishing Details Austin Healey 2
chicken Healey BJ7 door (i think) Austin Healey Classifieds 0
chicken BJ7 Rear Number Plate Mounting Austin Healey 3
chicken BJ7 Door Seal Austin Healey 5
chicken BJ7 Rear Quarter Panels Austin Healey 6
B BJ7 Boot Trim Austin Healey 7
T Early BJ7 Vent Window Seal Austin Healey 2
D BJ7 Underdash Trim Austin Healey 9
G Steering Arm Installation Recommendations - BJ7 Austin Healey 2
D BJ7 Rear rail trim Austin Healey 0
D BJ7 Hood frame mounting plate Austin Healey 7
D Wanted BJ7/8 front grill top cowl Austin Healey Classifieds 4
BLong63AH BJ7 Hard Fuel Lines Austin Healey 20
T Spin-On Oil Filter Removal [BJ7] Austin Healey 12
T Installing Garmin GPS in a BJ7 Austin Healey 19
pbraun How much does a BJ7 or 8 transmission weigh? Austin Healey 3
P BJ7 Upholstery Austin Healey 1
B BJ7 back end rebuild Austin Healey 1
Marvin Gruber BJ7 door panels Austin Healey 4
Marvin Gruber BJ7 Top Installation Austin Healey 1
B Rear shroud connection to the floor pan on a BJ7 Austin Healey 21
P BJ7 HS6 Carb Baseline Setting Austin Healey 10
Marvin Gruber BJ7 tach cable location. Austin Healey 3

Similar threads

Top