• Hi Guest!
    You can help ensure that British Car Forum (BCF) continues to provide a great place to engage in the British car hobby! If you find BCF a beneficial community, please consider supporting our efforts with a subscription.

    There are some perks with a member upgrade!
    **Upgrade Now**
    (PS: Subscribers don't see this gawd-aweful banner
Tips
Tips

Battery box time - pictures and tips for me?

tdskip

Yoda
Country flag
Offline
Hi guys - hope everyone is having a good weekend so far.

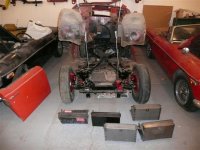
So flush with enthusiasm from the TR6 wiring progress (electrical had been a big stumbling point for me) I decided I really needed to learn how to use the MIG welder I bought. So a couple of hours of instruction later I'm ready for to get going on the TR4 battery box.

Dale - I know you wrote up your experiences about making a replacement shelf.

Anyone have experience fitting one of the replacement boxes
from the Big 3? Are TRF's actually better than those from Moss?

Is the 'uppers' are OK and it is just the floor that is gone would you use one of the Big 3 boxes still or just fabricate the bottom?

What do you think guys?
 
I didn't know that anyone offered a steel box/shelf for the TR4. Just the TR3.

The TRF boxes are thicker steel than they used to be, but that's p/n CAR1 for the 3. I also noticed that TRF has one p/n CAR2 for the T250/6.

Where did you find one? I need one for my 4A also. Probably CAR2 will work as well.
 
Hi Peter - good point. I got sloppy with thinking. My TR4 has been messed around with, but it looks like per your note that only the TR3 has a box.

So it looks like a patch panel is the ticket. Any tips on getting the ridges like original stamped or contoured?

$170 seems a bit steep for this metal (red part below);

TR6-250GBweb163.jpg
 
I had one of those plastic boxes in my TR6. It looked butt ugly, imho, but since I had an old battery it was necessary. Recently I replaced the old battery with an Optima 34 and now do not need the plastic tub. Much better!!

There is a point, fix the metal shelf and get an Optima. Your car will look better and you will have piece of mind. Or at least mine does and I do.
 
My 1958 TR3A still has the original 4 pieces of black rubber under the battery. These are the original ones that came with my car when I bought it brand new 50 years ago. There are two stacks of two each. Each stack of two is about 1/8" high total and they are spaced apart under the battery.

For the first 80,000 miles, my voltage regulator was set too high and the battery acid spit all over and corroded the battery box. I MIG welded in a new box in 1990 and set the voltage regulator correctly. After that, I had a bit of spitting but it has never needed that ugly black battery box because I eliminated the problem once and for all by re-setting the voltage regulator correctly. Since 1990, I have driven 99,000 miles.
 

Attachments

  • 12273.jpg
    12273.jpg
    76.9 KB · Views: 207
tdskip said:
Hi Peter - good point. I got sloppy with thinking. My TR4 has been messed around with, but it looks like per your note that only the TR3 has a box.

So it looks like a patch panel is the ticket. Any tips on getting the ridges like original stamped or contoured?

$170 seems a bit steep for this metal (red part below);

TR6-250GBweb163.jpg

$170 does seem like a lot, but by the time you have a body man fabricate it, or you buy the bead roller and dies, it will more the likely cost you more. By the way, that part is hand made in England, so there may be some fitting issues and I would call to see if it indeed looks like the original. Anyway, if originality or strength is your goal, buy the replacement panel and use only what you need of it or use the whole thing. Else, pick up a sheet of 19 or 18 gauge sheet metal cut it to size and have at it.

If it were me, I would buy the panel as I have a tendency to second guess my decisions to short cut or go cheap and every time I looked at the panel (albeit infrequent) I would ask "Why did I do that?"
 
When I visited the the Roadster Factory this past spring, I saw the battery boxes as they were being made and they are a very good quality and heavy gauge steel.

Roadster Factory Tour
 

Attachments

  • 12276.jpg
    12276.jpg
    46.5 KB · Views: 194
I got a HF bead roller as a Christmas present one year. I thinky my brother paid $89 on sale so not much invested in it. It came with several different size and shaped rollers, at least 4 sets (the rollers are paired shapes.)

I played around a little and found it really takes 2 people to work the thing: 1) to hold and move the piece as well as direct the cranking speed for 2) the person that turns the crank. I've done a couple of test pieces and they came out pretty nice for freehand but tracing a pattern (like the 3 recesses on the battery shelf) would take some practice. Still, I will give mine a shot before I spend $170.
 
I used one of those HF bead rollers that Tony at Ratco has to make a bottom repair piece for my TR3 driver's seat. And, yes it really does take two to operate, but it does work well.
 
Is the bead for orginality purposes, strength, or both?

Thanks for the TRF pic Paul. Those trays look flat on the bottom.
 
If you're a fan of doing things yourself... measure it up, and then make a pattern out of an old cereal box. (better than corrugated cardboard, folds like sheet metal.) A cheap HF box brake would be nice, but a vise and/or the edge of a workbench will do in a pinch.

As mentioned above, an inexpensive bead roller will put some stiffness back in the panel. If you're crafty, you can make a hammerform out of some MDF, that will do the same thing.

With the MIG... Practice your plug welds on the same gauge materials, until you've figured your settings out. Make sure you're getting enough penetration that the bottom panel is discoloured and that the weld cannot be pulled apart without destroying it. The most important (and hardest) part is making sure that the two surfaces are perfectly flush. Zinc-prime (weld-through primer) all hidden seams before final assembly.
 
Back
Top