 but were afraid to ask:
 I noticed something I had not been aware of in that there was some kind of bracket used to hold the top part of the back seat in place; the bracket looks simple like perhaps a J shaped hook to fastens to the seat and then to the tub and is covered up by the trim. Does anyone have a picture of an original?

-
 Hey Guest!
British Car Forum has been supporting enthusiasts for over 25 years by providing a great place to share our love for British cars. You can support our efforts by upgrading your membership for less than the dues of most car clubs. There are some perks with a member upgrade!**Upgrade Now**
(PS: Upgraded members don't see this banner, nor will you see the Google ads that appear on the site.)

Tips
- We have a special forum called "Member Articles" where you can submit actual articles for consideration for publication. Learn More
- Don't have an Avatar? If not, your avatar will default to the 1st character in your username. Go into "Account Details" to change your Avatar.
- Some basic forum navigation info: click
 Hey - did you know if you click on the title of a thread it will take you to the first unread post since you last visited that thread?
- Hey Guest - Is your British Car Club in our Clubs database? If not, send me a PM - Basil

- Looking for a local club? Click the "Clubs" tab above and browse hundreds of clubs world-wide.
- Add Android or iPhone APP: click
- Did you know - any picture or video you add in your posts in any marque-specific forum will also get added to the Media Gallery automatically.
- A few more tips about posting and replying: click
- Hey there Guest - be sure to keep your profile page up to date with interesting info about yourself: learn more
- More tips and tricks on Posting and Replying: click
 STOP!! Never post your email address in open forums. Bots can "harvest" your email! If you must share your email use a Private Message or use the
  smilie in place of the real @
- Want to mention another member in a post & get their attention? WATCH THIS

- So, you created a "Group" here at BCF and would like to invite other members to join? Watch this!
- Hey Guest - A post a day keeps Basil from visiting you in the small hours and putting a bat up your nightdress!
- Hey Guest - do you know of an upcoming British car event?
 Pretty Please - add it to our Events forum(s) and add to the calendar! >> Here's How <<
- Hey Guest - you be stylin' Change the look and feel of the forum to fit your taste. Check it out
- If you run across an inappropriate post, for example a post that breaks our rules or looks like it might be spam, you can report the post to the moderators: Learn More
- If you would like to try some different "looks" or styles for the site, scroll to the very bottom, on the left and click the Style Selector.
You are using an out of date browser. It may not display this or other websites correctly.
You should upgrade or use an alternative browser.
You should upgrade or use an alternative browser.
TR2/3/3A back seat bracket
- Thread starter sp53
- Start date
STeve 1958
Jedi Hopeful
Offline
I've had two TR3A's and neither had a bracket there. That's not to say that there wasn't one, but the seat back stays in place without it.
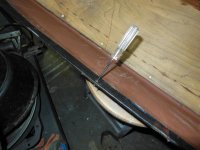
Yeh I have had a few tr3s myself and none of them had a bracket. I did have the seat keep sliding out of those slots one on and drilled a couple of holes on the very lip of the back side of the seat and pulled the seat in from the trunk and wired it to those C shaped brackets that the seat wedges into.
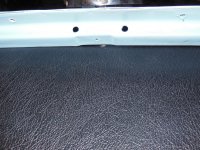
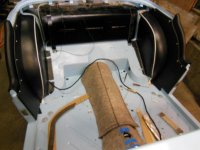
I have no life, so finding new things on a tr3 interest me; how exciting. Anyways, when I noticed how the tub had a recess where the back seat goes and there was a corresponding hole in the seat, I thought I had figured something new and astonishing out. Perhaps I could make them and become rich.
The way I see it there was some engineering for something there and maybe the early cars had something.
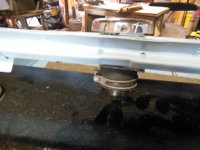
David posted a bracket for the steering column that I had never seen before-- plus I kinda thought before there should be something there to hold that side. Moreover, the radiator over flow tube bracket was unknown to me until a couple years ago, so there is hope for more unknown parts on a tr3 kind like "exhibition unknown" on TV.
I have no life, so finding new things on a tr3 interest me; how exciting. Anyways, when I noticed how the tub had a recess where the back seat goes and there was a corresponding hole in the seat, I thought I had figured something new and astonishing out. Perhaps I could make them and become rich.
The way I see it there was some engineering for something there and maybe the early cars had something.
David posted a bracket for the steering column that I had never seen before-- plus I kinda thought before there should be something there to hold that side. Moreover, the radiator over flow tube bracket was unknown to me until a couple years ago, so there is hope for more unknown parts on a tr3 kind like "exhibition unknown" on TV.
Attachments

TRopic6
Jedi Warrior
Offline
Steve.
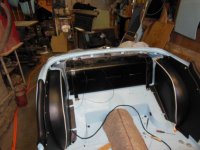
That's where the hardtop brackets go (aka "Bridge Piece"). Here is a page from the workshop manual showing how to fit the hardtop. Apparently after TS6824 the body was stamped for the brackets. I dug out my old rear panel - no holes that might match those on the rear deck; looks like yours is the same.


That's where the hardtop brackets go (aka "Bridge Piece"). Here is a page from the workshop manual showing how to fit the hardtop. Apparently after TS6824 the body was stamped for the brackets. I dug out my old rear panel - no holes that might match those on the rear deck; looks like yours is the same.
Attachments
I hear Tropic6 I have those holes also, and I have a hard top hooked up with all the fittings on another car. This indent is dead center and has a recess for something to slide back into right at area around the gas cap on the sheet metal of the tub. Is that a 3/16 hole I see in the center at the top back of your back seat panel or a speck of dirt?


My guess is a bracket that looks a lot like the other back seat brackets on the tub but was screwed onto the seat first then when the seat was slide back a screw was put into the tub to hold the seat from sliding forward. Or maybe kinda like the ones on the bottom of the seat; something simple. I have had the seat slid forward before and wired them back. Don E would have probably known.
STeve 1958
Jedi Hopeful
Offline
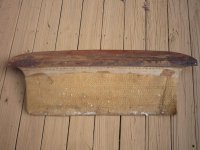
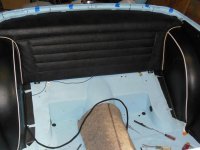
What did you end up using for the wheel arches. Foam rubber, cotton, nothing. They look better than mine with cotton backing.
I struggled with how to do it; I cut some foam but decided to glue right onto the medal. It is far from perfect and I pulled it up and glued it 3 times. After getting sooo much glue on the seam and moving to 3M 99 for better sticking, I was able to turn the hard nylon seam down--- then laying the glued up mess flat parts of the nylon seam down the edge of the arch.
It might have been better to take some very fine cotton batting and put some on either side of the seam, just a little; it was something like that originally . Moreover, this really nice retiring upholster named Char made me some softer white piping to go around the trim.
It might have been better to take some very fine cotton batting and put some on either side of the seam, just a little; it was something like that originally . Moreover, this really nice retiring upholster named Char made me some softer white piping to go around the trim.