• Hi Guest!
    You can help ensure that British Car Forum (BCF) continues to provide a great place to engage in the British car hobby! If you find BCF a beneficial community, please consider supporting our efforts with a subscription.

    There are some perks with a member upgrade!
    **Upgrade Now**
    (PS: Subscribers don't see this gawd-aweful banner
Tips
Tips

aluninun shut face pillar cover on BJ8

bluegrass john

Senior Member
Country flag
Offline
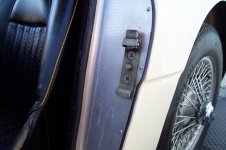
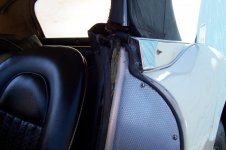
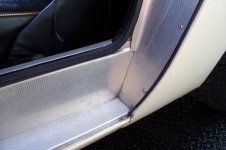
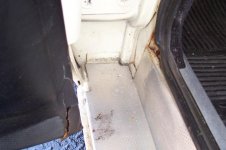
I could not find any history on this subject so I will ask if anyone has suggestions about installing the aluminum shut face trim on a Austin Healey BJ8: I was curious as to the best way to trim this dimpled material and form it to fit without damaging the dimpled surface. Is there a preferred supplier that offers a better fit and finish than the others or are they pretty much all the same? If this has been covered in another thread I am sorry for the repeat questions.

Any suggestions or ideas would be appreciated or a reference to another thread................. this something better left to the experienced professional?

Thanks,

John
 
John,
As far as I know the panels are supplied by AH Spares to the other vendors, well made but there are slight differences from an original. Do you have your originals? I use them as templates for a correct fit. There is a process of cutting, edge finishing, and trial fit, to get them looking correct. New sill replacement inner or outer can be a problem on shutface fitment if not done correctly. I can dig up some pics if you like.

Carroll Phillips
Top Down Restorations
 
John,

You are talking about fascia plates and fitment is focused toward the rear vertical jam with some area exposed toward the hinges side of the sill. Since every vertical jams and sills are hand installed with limited assembly accuracy during production, you can expect not to find any body part that will have exact dimensions with your car. Find a best location for your sill plate and adjust the rear edge to allow the vertical jam to fit behind. Since the sill and jam fascia plates are a way to cover most issues, the installation of interior colored vinyl beading has been fitted between the jam plate and fender to cover the gap.

Enjoy the task,
Ray (64BJ8P1)
 
Thanks for your replies............I do have my originals and will use those. It is my understanding that Kilmarten also makes a finisher set but you have to purchase the kit that supplies all the pieces required for both sides. I have been told Kilmartin finishers are of very high quality and fit very well; i am only needing the pieces to do the left side.

Any thoughts on how to trim the metal without causing damage to the dimpled metal Cut off wheel or small metal shears ??

Thank,

john
 
John,

Then finish pieces are too thick for shears to do a good job. I do not think you will have much to cut off and a good file or a cut-off wheel followed by a file would be sufficient.

Ray (64BJ8P1)
 
Thanks for your replies............I do have my originals and will use those. It is my understanding that Kilmarten also makes a finisher set but you have to purchase the kit that supplies all the pieces required for both sides. I have been told Kilmartin finishers are of very high quality and fit very well; i am only needing the pieces to do the left side.

Any thoughts on how to trim the metal without causing damage to the dimpled metal Cut off wheel or small metal shears ??

Thank,

john
I had to replace the sills/jambs on my Healey and the original aluminum finishing plates were in poor condition. I put masking tape on the backsides of the plates and held them in place against the jambs. Note the distance between the edge of the plates and the jambs where the door seals fit! If your originals worked good with the door seals and you did not replace the jambs you are ahead of the game. Place the plates in position and with a small point marker draw the outline of the plates from the backside using the fender as a guide. You might want to place some tape on the fender too.

I trimmed my plates using aviation snips and followed up with a file to finish the edges.
 
I was going to say, cut your margins with a good quality sharp pair of aviation snips__Weiss or Milwaukee quality, NOT Harbor Fright! Then do final finishing with a relatively fine file. You can remove the tool marks from the file, ideally with a 2" right-angle die-grinder, outfitted with Scotch-brite pads.

I Bought an aftermarket set, as all the odd originals I had (still have, sign me up to hoarder's anonymous too) each had some blems on them. It was frustrating at first, as none of the pieces seemed to be made for even a British car, let alone a single model of Healey, but once you start whittling them down, a little bit off each one__per side__it starts coming together. It was some consolation that the piece covering the windlace fit without requiring any rework.
 
attachment.php
attachment.php
attachment.php
attachment.php


Here is an original set for you to see how they go together, use a phillips #4 screw to set them up first ,then replace with the new pozi drive screws as they get damaged easily (heads) USE THE CORRECT screwdriver (POZI drive)
Piping is black
Carroll
 

Attachments

  • 100_3300.jpg
    100_3300.jpg
    55 KB · Views: 306
  • 100_3301.jpg
    100_3301.jpg
    45.1 KB · Views: 486
  • 100_3299.jpg
    100_3299.jpg
    52.7 KB · Views: 343
  • 100_3303.jpg
    100_3303.jpg
    45.5 KB · Views: 324
Back
Top