-
 Hi Guest!
If you appreciate British Car Forum and our 25 years of supporting British car enthusiasts with technical and anicdotal information, collected from our thousands of great members, please support us with a low-cost subscription. You can become a supporting member for less than the dues of most car clubs.
There are some perks with a member upgrade!**Upgrade Now**
(PS: Subscribers don't see this gawd-aweful banner

Tips
- We have a special forum called "Member Articles" where you can submit actual articles for consideration for publication. Learn More
- Don't have an Avatar? If not, your avatar will default to the 1st character in your username. Go into "Account Details" to change your Avatar.
- Some basic forum navigation info: click
 Hey - did you know if you click on the title of a thread it will take you to the first unread post since you last visited that thread?
- Hey Guest - Is your British Car Club in our Clubs database? If not, send me a PM - Basil

- Looking for a local club? Click the "Clubs" tab above and browse hundreds of clubs world-wide.
- Add Android or iPhone APP: click
- Did you know - any picture or video you add in your posts in any marque-specific forum will also get added to the Media Gallery automatically.
- A few more tips about posting and replying: click
- Hey there Guest - be sure to keep your profile page up to date with interesting info about yourself: learn more
- More tips and tricks on Posting and Replying: click
 but were afraid to ask:
  STOP!! Never post your email address in open forums. Bots can "harvest" your email! If you must share your email use a Private Message or use the
  smilie in place of the real @
- Want to mention another member in a post & get their attention? WATCH THIS

- So, you created a "Group" here at BCF and would like to invite other members to join? Watch this!
- Hey Guest - A post a day keeps Basil from visiting you in the small hours and putting a bat up your nightdress!
- Hey Guest - do you know of an upcoming British car event?
 Pretty Please - add it to our Events forum(s) and add to the calendar! >> Here's How <<
- Hey Guest - you be stylin' Change the look and feel of the forum to fit your taste. Check it out
- If you run across an inappropriate post, for example a post that breaks our rules or looks like it might be spam, you can report the post to the moderators: Learn More
- If you would like to try some different "looks" or styles for the site, scroll to the very bottom, on the left and click the Style Selector.
You are using an out of date browser. It may not display this or other websites correctly.
You should upgrade or use an alternative browser.
You should upgrade or use an alternative browser.
Alternator upgrade wiring?
- Thread starter kodanja
- Start date

martx-5
Yoda
Offline
Supposedly, this is a plug and play, but I guess different years had different wiring. I found this that might help.
Edit: After looking at the wiring diagrams, it appears that up to '72, the Lucas alternator had a sense terminal which was eleiminated later on. This would account for the extra wiring on your alternator. The Fiesta alternator apparently eliminates the sense terminal also.
Edit: After looking at the wiring diagrams, it appears that up to '72, the Lucas alternator had a sense terminal which was eleiminated later on. This would account for the extra wiring on your alternator. The Fiesta alternator apparently eliminates the sense terminal also.
martx-5
Yoda
Offline
If you look at this wiring diagram for your year ('69 right?), you will see the three Brown/Yellow wires at the alternator. Two go to one post, and one to another, but they are all hooked together. If you have an ohmeter, check to see if, in fact, they are all hooked together. That would tell me that anyone of them should work. But...maybe there is more to it then this, so maybe you could rig up some sort of jumper from one of the wires onto the new alternator before you permanently cut any wires.
TR3driver
Great Pumpkin - R.I.P
Offline
Yeah, not a plug-n-play with the early Lucas alternators. But Moss and various other vendors sell an adapter that works.
In theory, you could eliminate all but one of the brown/yellow wires, but connecting them all together will work.
BTW, all the Bosch units I've seen do have a 'sense' input, but I see you've already got it wired up with a small brown wire, so that part is good to go.
In theory, you could eliminate all but one of the brown/yellow wires, but connecting them all together will work.
BTW, all the Bosch units I've seen do have a 'sense' input, but I see you've already got it wired up with a small brown wire, so that part is good to go.
Brosky
Great Pumpkin
Offline
Oops....My Bad!!
I never knew there was a difference between the harnesses. I'll update my site to note that it's plug and play if you wiring looks like mine until I find the exact years that it will fit easily. I'm thinking 73-76, but there may be more.
EDIT: 07-22-08
I did update my site to reflect this latest information.
LastDeadLast
Jedi Knight
Offline
Be careful here. The OEM wiring was not made to handle the 55-60amps that the Bosch alternator puts out at full charge... so if you fire your car up with a low battery it could start melting things.
I've done the same upgrade and I ran an 8 guage wire from the alternator to the battery terminal on the starter. It just gives a little extra security.
I bought the alternator wiring adapter from Moss just like the others said. I think it' like $7.00. Other than that it's a plug and play.
I've done the same upgrade and I ran an 8 guage wire from the alternator to the battery terminal on the starter. It just gives a little extra security.
I bought the alternator wiring adapter from Moss just like the others said. I think it' like $7.00. Other than that it's a plug and play.
Brosky
Great Pumpkin
Offline
Shannon,
My wiring isn't even really warm with the headlamps and cooling fan on. I've talked to several guys who have done this and none reported any issues. I don't doubt you, but I didn't see any problem so far. My main wire at the rear of the alternator to the starter appears to be 8 gauge. It's the same as the main feed wiring in the Masters H/L kit and the Spal Fan kit.
My wiring isn't even really warm with the headlamps and cooling fan on. I've talked to several guys who have done this and none reported any issues. I don't doubt you, but I didn't see any problem so far. My main wire at the rear of the alternator to the starter appears to be 8 gauge. It's the same as the main feed wiring in the Masters H/L kit and the Spal Fan kit.
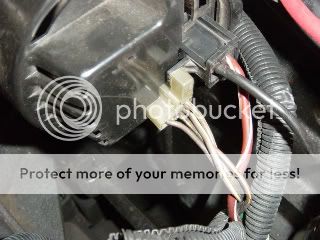
I spent a bit of time trying to get this right. I have a '70 and my wiring diagram was different from Dan Masters - the wire he refers to as Brown/Red was just Brown for me. I cut this off and taped it back.
The smaller Brown/Yellow wire I connected to the smaller spade terminal in the same block as the two large terminals. I believe this runs back to the idiot light on the dash (and is important, keep reading.)
The big Brown/Yellow wire I connected to the large spade terminal below the smaller Brown/Yellow wire.
Two points that I think you should consider: (i) on the cars w/ Ammeters, the big Brown/Yellow runs thru the Ammeter to the starter soleniod so all the current runs thru this wire. I've heard the original ammeter wasn't rated to carry 55amps. My short-term workaround was to connect both wires to the ammeter to the same side so no current was running thru it. Long term solution is to order a volt meter from gauge guys (smiths repro looks similar to original (tho the ammeter is Lucas) - will let you know if it fits and how it looks.) Gauge guys has a 60 amp ammeter, but they recommended using the voltmeter.
(ii) Now that you've connected the smaller Brown/Yellow wire that runs the idiot light, don't be an idiot and assume the bulb works. I spent more time than I'd like going back to the auto parts store to get them to tell me my new Bosch alternator works fine. . . if the light is blown, it won't draw enough current to get the alternator to start charging. The good news is I now have a bright red light on my dash that glows when I first start up and haven't gone above idle - peace of mind when I hit the throttle and it goes out.
-Lee
OP
kodanja
Obi Wan
Offline
so whats the verdict? 
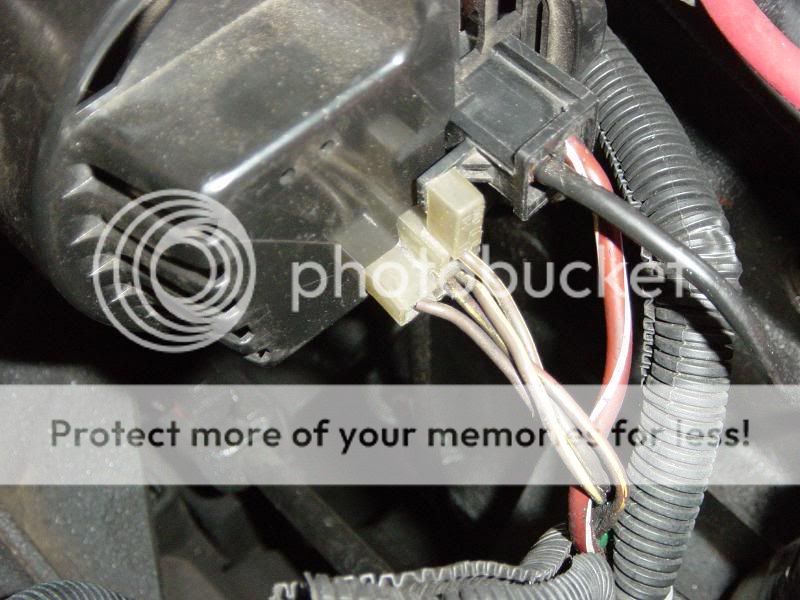
large brown wire to the large spade, 3 brown/yellow wires to the small spade in the same box as the 2 large spades,
what about the small brown wire?
does that go to the small spade above marked B+?
and should I still connect the black ground wire?
large brown wire to the large spade, 3 brown/yellow wires to the small spade in the same box as the 2 large spades,
what about the small brown wire?
does that go to the small spade above marked B+?
and should I still connect the black ground wire?
TR3driver
Great Pumpkin - R.I.P
Offline
Yup, good so far.<div class="ubbcode-block"><div class="ubbcode-header">Quote:]what about the small brown wire?kodanja said:large brown wire to the large spade, 3 brown/yellow wires to the small spade in the same box as the 2 large spades,
does that go to the small spade above marked B+?[/QUOTE]Also good.<div class="ubbcode-block"><div class="ubbcode-header">Quote:]and should I still connect the black ground wire?[/QUOTE]Not absolutely essential (the Bosch will ground through it's mount), but a good idea IMO.
Also IMO, the factory wiring won't have any trouble with full output, as long as the connections are clean and tight. The wire might possibly get warm to the touch after an extended period of operation, but not enough to hurt anything. I've had a 60 amp alternator in my TR3A feeding into the original brown wires for almost 20 years, and the wires are still fine.
LastDeadLast
Jedi Knight
Offline
Brosky said:Shannon,
My wiring isn't even really warm with the headlamps and cooling fan on. I've talked to several guys who have done this and none reported any issues. I don't doubt you, but I didn't see any problem so far. My main wire at the rear of the alternator to the starter appears to be 8 gauge. It's the same as the main feed wiring in the Masters H/L kit and the Spal Fan kit.
I'm sure the oem wiring will be fine under normal conditions... Here's my worry: Let's say you leave the lights on in a parking lot and you need a jump. The first thing your alternator will start doing once the car is started is to recharge the battery... as fast as it can. So your wiring.. made for 28-30 amps, is now getting double or more depending on the type of alternator you have. Again, not a very likely scenario, but one that would probably happen during ownership of any car. It's just easy insurance.. because the alternative is a melted wiring harness and possibly a fire.
-s
LastDeadLast
Jedi Knight
Offline
You don't have to upgrade the gauge.. just add an additional 8 gauge wire to share the load if your alternator decides to charge full boar.
TR3driver
Great Pumpkin - R.I.P
Offline
What I did on the '3 was to add some smaller wire directly across the ammeter. Played with length & number of strands until the reading was about 1/2 the actual current. (Used the headlights as a dummy load while adjusting the shunt.)
There may be a some variation between ammeters, but a friend measured his TR6 ammeter for me some years ago, and came up with 2.7 milliohms. That means an 8" length of 16 AWG wire would make a suitable shunt, to make the ammeter read 1/2 the actual current.
However, I think we're jumping the gun here as far as 'upgrading' the ammeter. Even with just the stock ammeter, you should see the current start to fall off after just a few minutes of operation (depending on how badly discharged your battery was), and eventually go to zero with sustained driving. If it's constantly showing charge, you may have something else wrong, like a shorted cell or a bad voltage regulator (inside the alternator) or a wrong connection. The consequences can be severe, so I would want to first check out the charging, and worry about the ammeter later. Check the voltage across the battery terminals with an accurate meter. If it's over 14.5, there is something wrong with the alternator. Or if it stays down around 12.5 for very long with the ammeter showing heavy charge, likely the battery has a shorted cell.
Another test is to trickle charge the battery overnight (or otherwise have it charged), then install it and start the engine. In that case, you should see the ammeter current fall to nearly zero within seconds, and fully zero within a few minutes (of constant fast idle or above).