• Hi Guest!
    If you appreciate British Car Forum and our 25 years of supporting British car enthusiasts with technical and anicdotal information, collected from our thousands of great members, please support us with a low-cost subscription. You can become a supporting member for less than the dues of most car clubs.

    There are some perks with a member upgrade!
    **Upgrade Now**
    (PS: Subscribers don't see this gawd-aweful banner
Tips
Tips

Almost legal

David_Doan

Jedi Warrior
Country flag
Offline
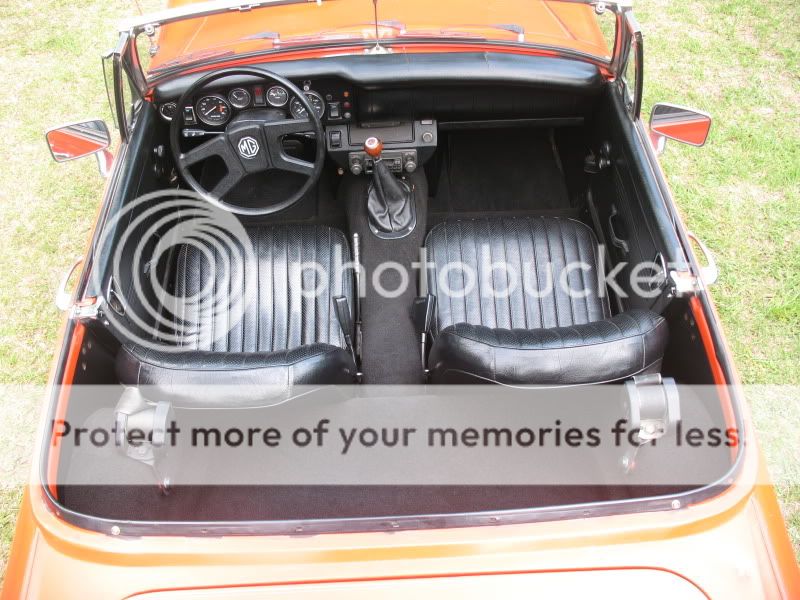
My 15 yo son and I inherited a 61 Bugeye earlier this summer. It is almost 100% original with about 75K on the odometer. The only thing that has been obviously changed is the carbs, I think they were upgraded from the stock 1 1/8 to 1 1/4. It had been garaged for about 10 years with no activity at all. The prior 10 years it was at most driven a couple times a month.

I'm completely new to old British cars, this is my 1st. We've made a lot of progress this summer. I've learned a lot from these forums. I've not posted a lost of questions, but there's a lot of information burried here if you just look. In summary we have:

- Learned that it is actually a 1959 model (thanks to BMIHT)
- Completely rebuilt the brakes and hydraulic system
- Learned about priming the oil pump (just before disaster)
- Completely rebuilt the ignition system
- Cleaned and balanced the SU carbs
- Frabricated a new handbrake button
- Changed all the fluids, thermostat, etc.
- Re-did the interior including insulating the floor, new door seals. new DIY carpet and panels, polished the aluminum cockpit surround
- Repaired horn button and light wiring, ALL the lights work now
- Installed seat belts

All the details are in my blog if anyone is interested. As of tomorrow, it will be completely legal to drive. I've had the opportunity to work on this car for a long time, but I was never interested in a small 4-banger. My mother-in-law finally decided she wanted to sell it, to get it out of the garage. I offered to get it running to increase the value. After the 1st drive (with only the handbrake functional), I decided to keep it. It is a great, fun car and I am facinated by the small size and simpicity. I also enjoy the comradery of the LBC community.

Thanks,

David
 
Very, very nice story. And it's great that this car stayed in the family.

I just looked at the blog......you did a great job on it!

I've been a Spridget owner for at least 40 years and I never get tired of these darn cars.

G'luck with your's! :thumbsup:
 
Be careful having people, even if they are small people, sitting on the back deck - it isn't designed for it and isn't strong enough to take the weight!

It must be VERY late 1959! Mine was #25xxx and was build 10/11 Nov 1959.

The cockpit trim was anodised so if you just polished it, it will quickly lose its shine as it oxidises.

Despite only having 4 cyls, 948ccs and 42 bhp they are tremendously good fun - you could have bought a Cobra, but then you daren't use all the power and handling (if you want to keep your licence :smile: ) but you can drive a Frog close to the limit and still be (just about!) legal.
 
great story and a very nice car!

I'm in the process of restoring my grandfather's bugeye and hopefully it will continue to stay in my family after i'm gone... :smile: Mine is not nearly as nice as yours, but like yours is still original(link to pics in my signature).

I like what you've done with the cockpit surround...i too am going to remove the vinyl from the front piece and polish. I think it looks much better!
 
That's great. My only concern is a 15 boy will drive it unsupervised like a 15 year old boy would. I'd hate to see a nice low mile heirloom car get beat to death. They are a bit fragile and it's hard to resist jumping railroad tracks as an adult, much less a 15 y.o kid. I say this only as I'd like to see him still have it @ 30. You may want to consider buying him a Corrolla till he learns how to drive and take care of a classic. I'd sure hate to still have my first car after I got through with it! I know sure made a lot of mistakes along the way.

BTW, you'll need to keep it loosened up till he's ready. Guess who's job that is? :wink:
 
I've got "<span style="font-style: italic">a 15 boy will drive it unsupervised </span>" covered. I have clasic car insurance, he can only drive it if I am with him.
 
David_Doan said:
I've got "<span style="font-style: italic">a 15 boy will drive it unsupervised </span>" covered. I have clasic car insurance, he can only drive it if I am with him.

....legally. :smirk:

Might wanna hide the keys. :wink:

I can remember some parents that didn't. :devilgrin: :driving:
(~now~ you can call me sneaky Jack. :thumbsup:smile:

And for the love of God, don't EVER let him see "Ferris Bueller's day off." :laugh:

That's one luck kid ya got there! He on the forum yet?
 
Great Story David. I did notice one thing in your blog that you may have found out by now.. You said that there was a small section of rubber hose on the oil pressure gauge tubing. There is actually supposed to be a section of rubber flex hose there (Original Part #ACA5420), but it should be heavy duty high pressure hose. Vac line can't take the pressure and will fail again at the most inopportune time.

Again, welcome. Lovely little car!!
 
It's a great blog. It looks like you and yours have had great fun so far!

My daughter (turned 12) is starting to look for her first car/project. I think she's finally growing out of the "it's got to be pink!" phase.

I wouldn't worry too much about your boy and driving the car. My first car was a similar situation. After having done all that work the last thing I would have ever dared do is damage it.

cheers!
Jody
 
scoutll said:
Great Story David. I did notice one thing in your blog that you may have found out by now.. You said that there was a small section of rubber hose on the oil pressure gauge tubing. There is actually supposed to be a section of rubber flex hose there (Original Part #ACA5420), but it should be heavy duty high pressure hose. Vac line can't take the pressure and will fail again at the most inopportune time.

Again, welcome. Lovely little car!!

Bryan, you're right, that vacuum hose already died. I posted my current fix HERE. I'm still looking for a proper hose to use (other than the $16 one offered ny Moss).
 
seano said:
great story and a very nice car!

I'm in the process of restoring my grandfather's bugeye and hopefully it will continue to stay in my family after i'm gone... :smile: Mine is not nearly as nice as yours, but like yours is still original(link to pics in my signature).

I like what you've done with the cockpit surround...i too am going to remove the vinyl from the front piece and polish. I think it looks much better!

Polishing the cockpit surround is a lot of work, but I liked the results. I started with 60 grit sandpaper to knock off the anodizing then worked up to 600 grit and finally 0000 steel wool. I finished up with Mother's aluminum polish. Some people will say to go to 2000 grit sandpaper, it just depends how much gloss, and how much maintenance you want. You can find 60 and 150 grit flap sanders that will save some elbow grease in getting the anodization off.

I did not clear coat or anodize mine. If you want to keep it nice, one of those needs to be done. I'm going to try clear coat on mine when I have time.
 
I love the honest comment about the carpet. Mine took me seven times longer than I thought. I spent seven 13 hour days to do mine.
 
My word Kellysguy, I may have spent two hours.
 
Yeah, but did you cut each piece out of a bulk roll? Gotta remember, I'm a perfectionist when it comes to stuff like that.
 
Nah, someone else did all the cutting and binding.
 
It's a real pain. David did a great job on his. I custon cut each piece five or six times to fit perfectly and appear seemless. Like David said, it takes a LOT of time. I figured I'd be done in a day...WRONG!

The cool thing about doing it yourself like this is you can change one piece at a time as it wears. I still have enough to do the car 1 1/2 times more. Good job David!


IMG_1955.jpg
 
I don't know how long the carpet took, I would guess 15 hours. I cut and glued each piece with contact cement and I did one at a time (There were 21 pieces I think, not including the covered panels). The piece that covers the front half of the transmission hump took 3 tries to get right. The right and left sides of the hump are not symmetrical. It is held down with Velcro so I can remove it to service the transmission.

I covered a lot areas with carpet that are normally vinyl. All of the panels were cut from new Masonite and "painted" with contact cement to attempt to make them water-proof.

I know the carpeted panels are not "original" but I like the look of continuous carpet and the added sound deadening.

The biggest lesson I learned is to use a soldering iron to make holes, I also used the soldering iron to cut out the slots where the mounts for the top poke through the rear panels to eliminate fraying.

DSC_5980.JPG
 
Some job David. The factory could not afford to do it that good.
 
Back
Top