• Hi Guest!
    You can help ensure that British Car Forum (BCF) continues to provide a great place to engage in the British car hobby! If you find BCF a beneficial community, please consider supporting our efforts with a subscription.

    There are some perks with a member upgrade!
    **Upgrade Now**
    (PS: Subscribers don't see this gawd-aweful banner
Tips
Tips

Air Intake Deflector - Radiator

RestoreThemAll

Jedi Warrior
Country flag
Offline
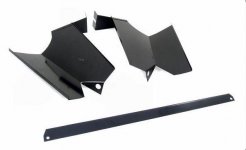
I'm installing the new radiator in my BJ7. I have the old air intake deflectors that go one on each side of the radiator. I must be missing a mounting part or parts. I can't tell how these things bold on. Does anyone have a pic or three to share?

Dale
 

Attachments

  • Air intake Deflectors 2.jpg
    Air intake Deflectors 2.jpg
    14.7 KB · Views: 127
I'm installing the new radiator in my BJ7. I have the old air intake deflectors that go one on each side of the radiator. I must be missing a mounting part or parts. I can't tell how these things bold on. Does anyone have a pic or three to share?

Dale
you have all the pieces except for the attaching hardware which is screws and bolts. Maybe someone will post photos which are worth a thousand words?
 
Patrick,
The pic is from the AH Spare web site. I do have the sheet metal pieces but I'll need to dig for or reproduce the bar. Yes, good pics are needed!
Dale
 
I don't recal if you can replace these with the radiator in place. I recall taking the rad out to get to them. Before removing the radiator, and certainly before replacing it, cover both front and back finned surfaces with cardboard. It's a tight squeeze in there and sooner or later you'll stick something into the core while you struggle with the replacement. Here's a not so great picture that will at least give you an idea of the orientation:


The straight bar (aluminum in my case) ties the two side pieces together at the bottom. IIRC, the two slotted ends mount somewhere on the studs holding the grille surround in. Once you have everything in place, reinstall the radiator. There is a slight lip on the edge of the deflectors which sits in a slight channel on the front edge of each side of the radiator. It should be pretty obvious once you get the pieces oriented correctly where everything fits. Wear mechanics gloves when doing the installation, the edges of the deflectors are sharp and you'll be banging your hands into stuff while you're cursing. Don't forget to remove the cardboard before driving.
 
In your pic, the big hole attaches to the shroud; the slot attaches to lower outboard grille mount. The left deflector in the pic is for the left side.
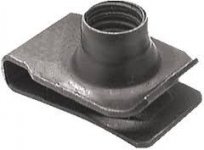
I used 1/4-20 u-nuts snapped into the big holes - makes installation easier.

You can insert the deflectors from the bottom without removing either the radiator or the grille.

Once they're attached to the car at the top and bottom, you can take a piece of 1/2" lightweight angle and make the crossbar to fit - per Rick's picture above.

U-nut: u_nut.jpg
 
In your pic, the big hole attaches to the shroud; the slot attaches to lower outboard grille mount. The left deflector in the pic is for the left side.
I used 1/4-20 u-nuts snapped into the big holes - makes installation easier.

You can insert the deflectors from the bottom without removing either the radiator or the grille.

Once they're attached to the car at the top and bottom, you can take a piece of 1/2" lightweight angle and make the crossbar to fit - per Rick's picture above.

U-nut: View attachment 45339

Steve's description of where the slotted pieces go is correct, mine is not.
 
After reviewing the input on this thread and the other thread that Steve gave, I went back to the shop. I found my missing brace for the bottom of the deflectors and put all three pieces together. It all makes sense now. Thanks for the U-nut idea. Just bought some at the hardware store. Another mystery solved! Thanks guys!
Dale
 
Back
Top