-
 Hi Guest!
You can help ensure that British Car Forum (BCF) continues to provide a great place to engage in the British car hobby! If you find BCF a beneficial community, please consider supporting our efforts with a subscription.
There are some perks with a member upgrade!**Upgrade Now**
(PS: Subscribers don't see this gawd-aweful banner

Tips
- We have a special forum called "Member Articles" where you can submit actual articles for consideration for publication. Learn More
- Don't have an Avatar? If not, your avatar will default to the 1st character in your username. Go into "Account Details" to change your Avatar.
- Some basic forum navigation info: click
 Hey - did you know if you click on the title of a thread it will take you to the first unread post since you last visited that thread?
- Hey Guest - Is your British Car Club in our Clubs database? If not, send me a PM - Basil

- Looking for a local club? Click the "Clubs" tab above and browse hundreds of clubs world-wide.
- Add Android or iPhone APP: click
- Did you know - any picture or video you add in your posts in any marque-specific forum will also get added to the Media Gallery automatically.
- A few more tips about posting and replying: click
- Hey there Guest - be sure to keep your profile page up to date with interesting info about yourself: learn more
- More tips and tricks on Posting and Replying: click
 but were afraid to ask:
  STOP!! Never post your email address in open forums. Bots can "harvest" your email! If you must share your email use a Private Message or use the
  smilie in place of the real @
- Want to mention another member in a post & get their attention? WATCH THIS

- So, you created a "Group" here at BCF and would like to invite other members to join? Watch this!
- Hey Guest - A post a day keeps Basil from visiting you in the small hours and putting a bat up your nightdress!
- Hey Guest - do you know of an upcoming British car event?
 Pretty Please - add it to our Events forum(s) and add to the calendar! >> Here's How <<
- Hey Guest - you be stylin' Change the look and feel of the forum to fit your taste. Check it out
- If you run across an inappropriate post, for example a post that breaks our rules or looks like it might be spam, you can report the post to the moderators: Learn More
- If you would like to try some different "looks" or styles for the site, scroll to the very bottom, on the left and click the Style Selector.
You are using an out of date browser. It may not display this or other websites correctly.
You should upgrade or use an alternative browser.
You should upgrade or use an alternative browser.
TR2/3/3A Air Deflector Installation Help Needed
- Thread starter Tinkerman
- Start date
luke44
Jedi Warrior
Offline
Do you mean the cowl vent door spring? Try these:
Good schematic in post #4
https://www.britishcarforum.com/bcf/showthread.php?67924
https://www.britishcarforum.com/bcf...TR3-cowl-vent-door-spring&p=850248#post850248
https://www.britishcarforum.com/bcf/showthread.php?71503-TR3-Scuttle-Vent-Assembly
Good schematic in post #4
https://www.britishcarforum.com/bcf/showthread.php?67924
https://www.britishcarforum.com/bcf...TR3-cowl-vent-door-spring&p=850248#post850248
https://www.britishcarforum.com/bcf/showthread.php?71503-TR3-Scuttle-Vent-Assembly
luke44
Jedi Warrior
Offline
Yes Geo, I meant the fiber board shroud in the nose/apron...
Funny, I also am struggling with that right now. So now I am trying to justify in my mind just leaving it off, being as I think it came later and would not be right for a 31xxx car.
Does anyone know when this was introduced?
Dick - do you have the nose on the car? Mine's on the bench (total access) and I still can't figure it out.
martx-5
Yoda
Offline
Put it in or the car will be prone to overheating. When it was introduced because of overheating problems, it was also meant to be retrofitted by the dealers to anyone who complained. It is therefore appropriate for any wide mouth TR3.
As far as fitting it goes, you have to fold the sides in a bit to stuff it into the grille opening. There should be tabs with holes (4, maybe 6?) in the apron for attaching the deflector when in place.
As far as fitting it goes, you have to fold the sides in a bit to stuff it into the grille opening. There should be tabs with holes (4, maybe 6?) in the apron for attaching the deflector when in place.
Geo Hahn
Yoda
Offline
...As far as fitting it goes, you have to fold the sides in a bit to stuff it into the grille opening. There should be tabs with holes (4, maybe 6?) in the apron for attaching the deflector when in place.
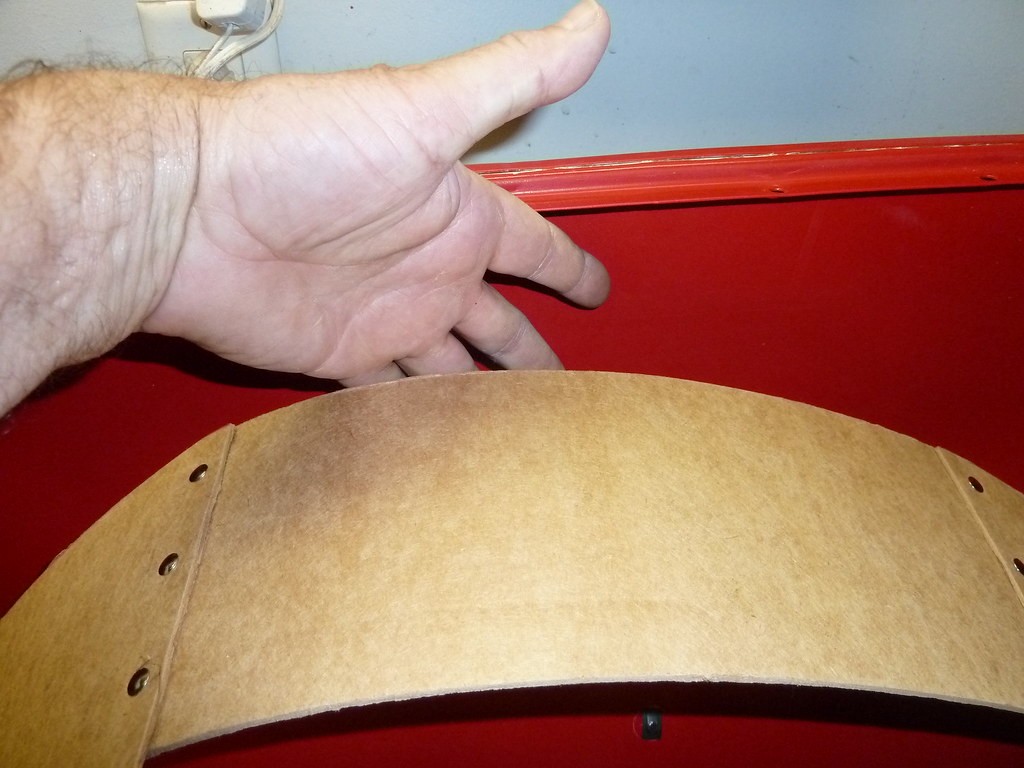
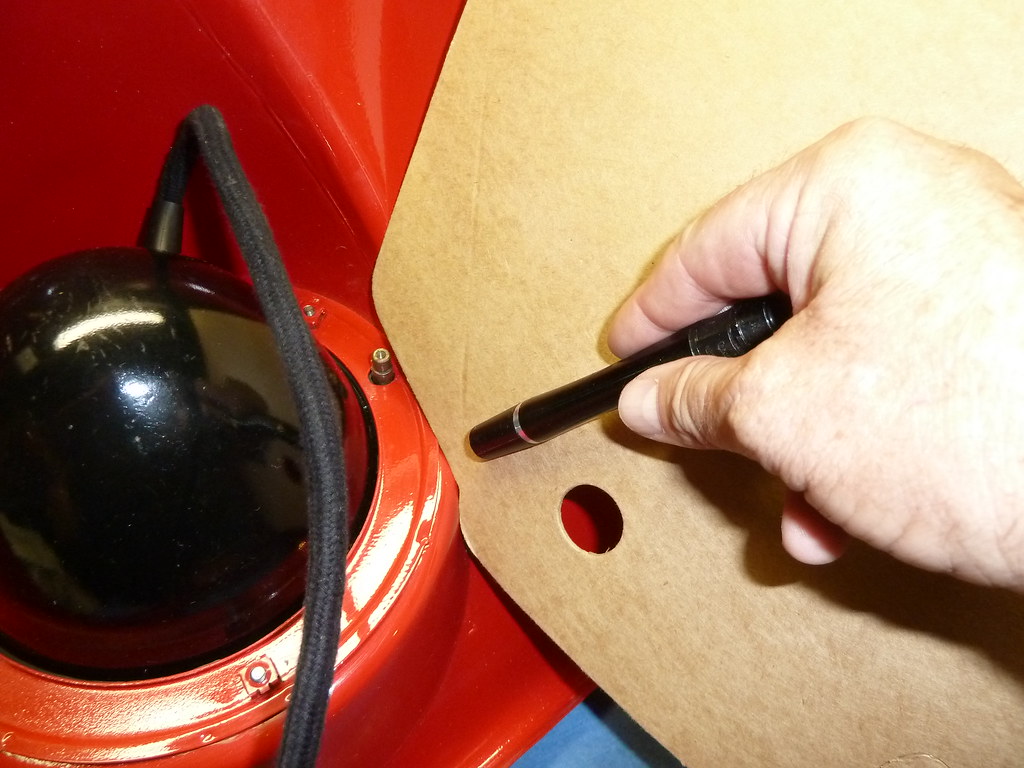
6 holes on mine. I marked them here once you figure out it is the apron upside down & backwards:
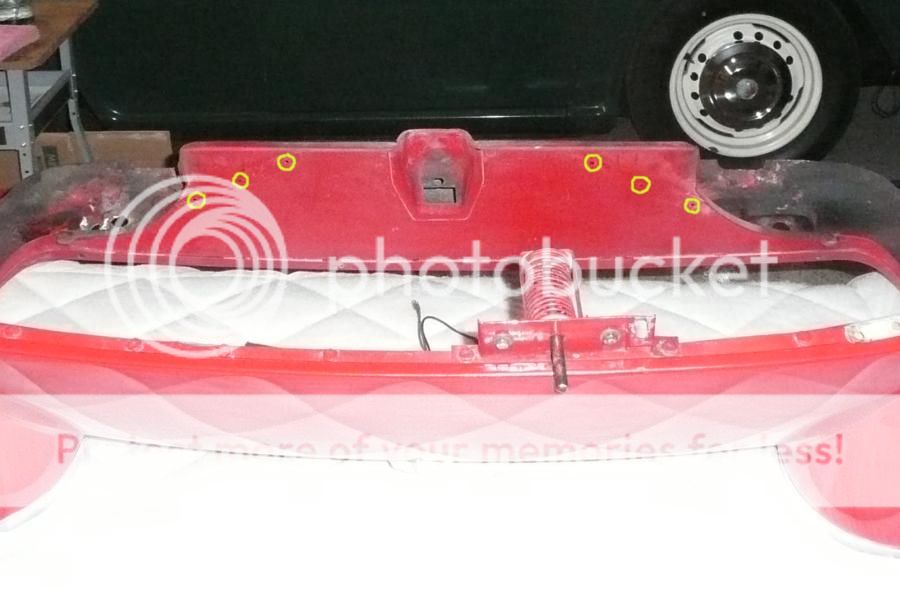
You can just see the outline left by the bottom edge of the fibreboard. The bottom lip of the cardboard come forward to get to those holes. The replacements I have used (they seem to last about 25 years) had the hole location marked with a dimple.
If your apron did not have one originally you'll have to do some figuring, otherwise the holes should be there.
Either way -- a bit of TR Origami!
luke44
Jedi Warrior
Offline
6 holes on mine. I marked them here once you figure out it is the apron upside down & backwards:.... The replacements I have used ... had the hole location marked with a dimple...If your apron did not have one originally you'll have to do some figuring, otherwise the holes should be there...
No holes on a 31xxx car. This photo helps. Is the bottom lip turned inward into the tunnel created by the cardboard, or outward away from it? I assume inward....
I will check the cardboard (TRF supplied) for the dimples and try to post some pix this weekend.
luke44
Jedi Warrior
Offline
OK, let me show you where I'm at. I have the luxury of doing this off the car (based on my trial and error I'd sure not want to do this on the car!)...I think the pix tell the story...it just doesn't fit as it is. The bottom edge sits flat, but hangs out. There is a large gap at the top....
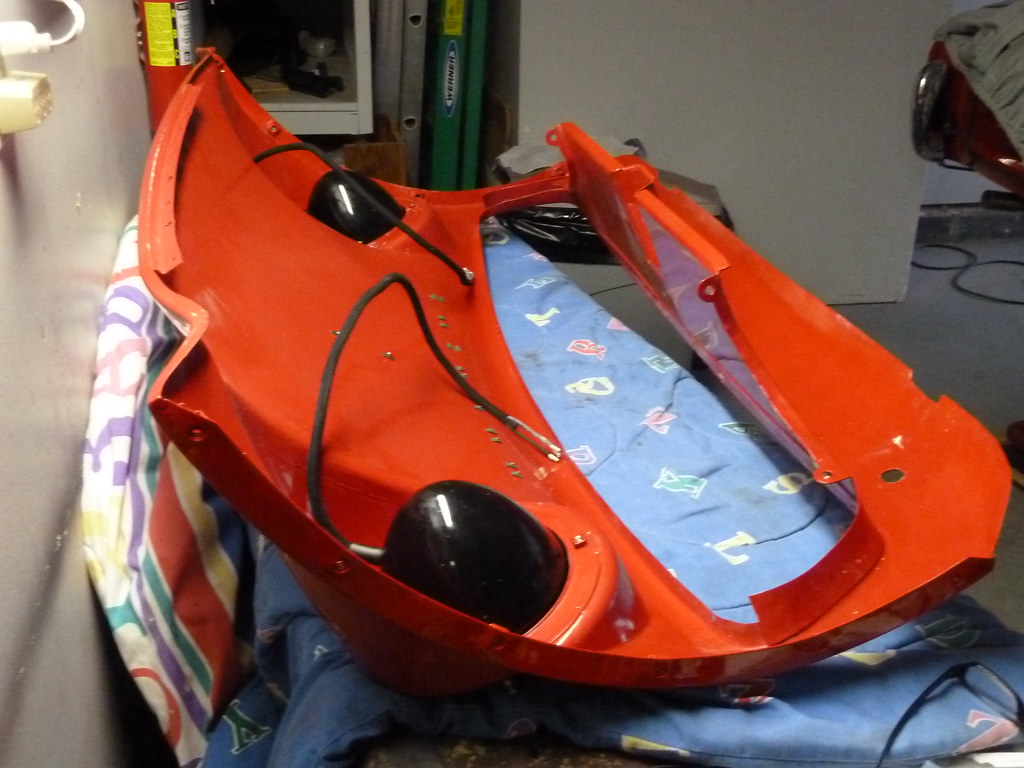
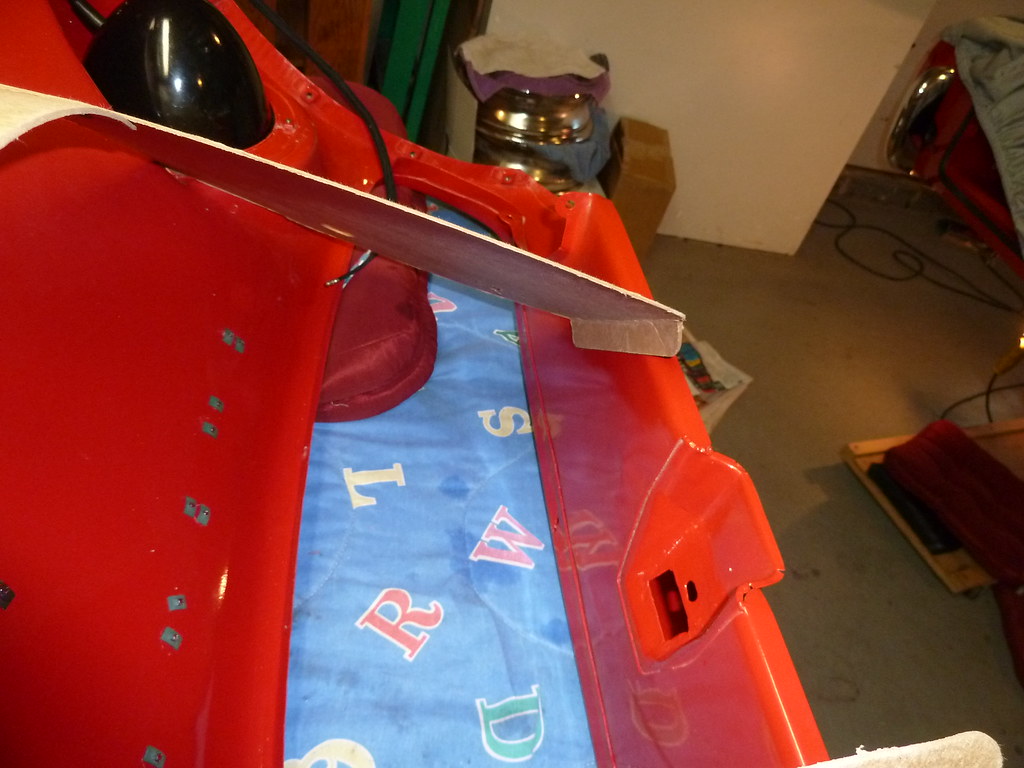
The only answer I can see is to trim the deflector around the headlight pod so it sits closer to the nose. Thoughts? comments?
The only answer I can see is to trim the deflector around the headlight pod so it sits closer to the nose. Thoughts? comments?
Geo Hahn
Yoda
Offline
Yes it folds there -- but more importantly it also folds at the two seams.
IOW -- it does not bow, but rather it is in 3 flat sections.
I think you may have to install this after the apron is in place -- that is how I have always done it and I really think you need the radiator in place with the apron to make it all fit up.
IOW -- it does not bow, but rather it is in 3 flat sections.
I think you may have to install this after the apron is in place -- that is how I have always done it and I really think you need the radiator in place with the apron to make it all fit up.
Gordon_Dedrick
Jedi Trainee
Offline
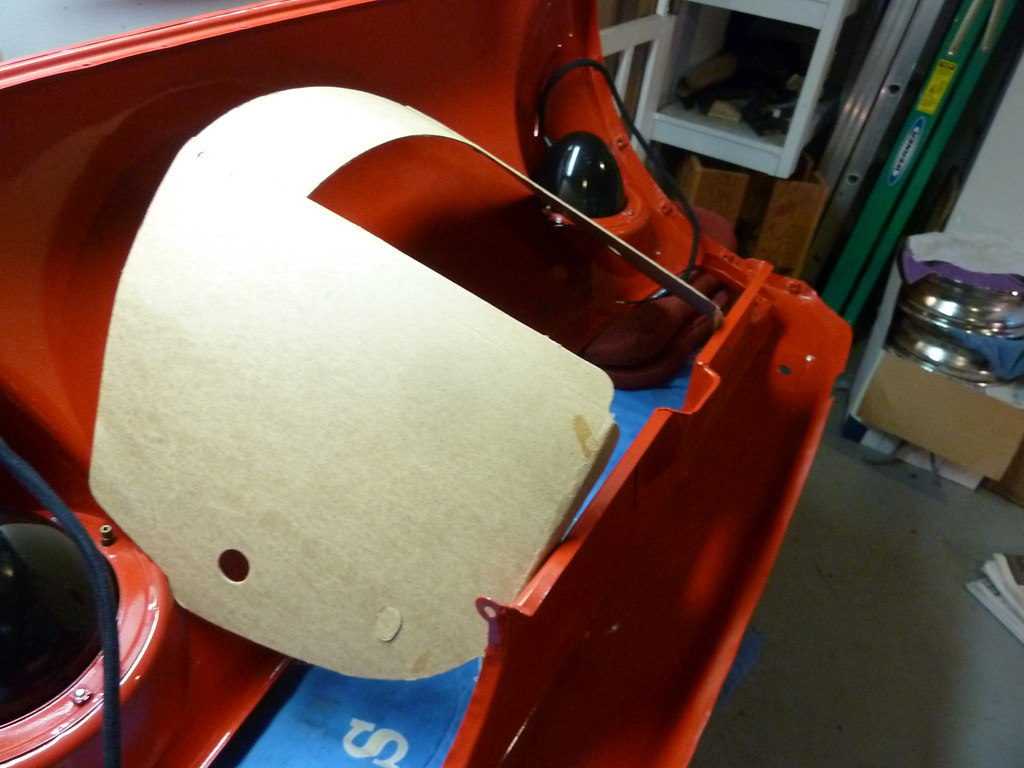
Believe you will have better luck if you wait untill the apron is installed. The cardboard has to fit tight against the radiator and just needs a couple od screws to secure it to the apron lower panel. It wedges in pretty tight and you need to fiddle with the top to make sure you don't cover some of the cooling fins.
Gordon
Gordon
Geo Hahn
Yoda
Offline
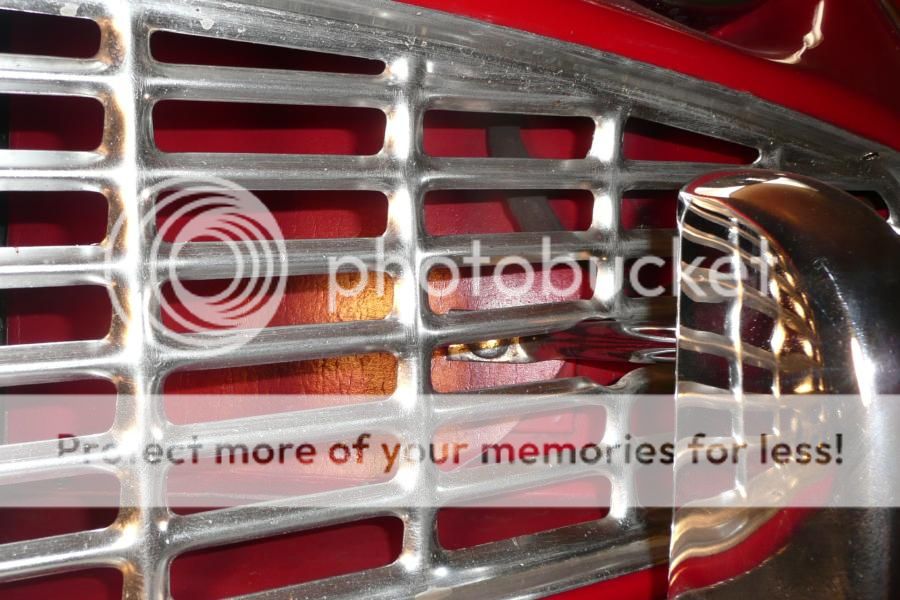
Somehow my 1000s of TR3 pics do not include any of this part installed. Here are some shots I just took thru the grille in case they give you some idea.
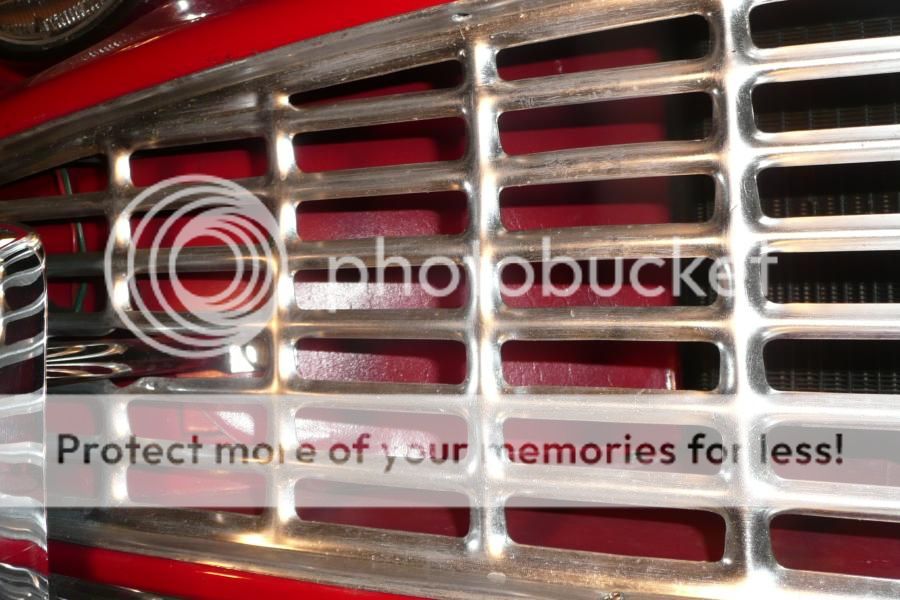


Perhaps you can also see how you want to fold a lip along 3 sides of the radiator.
Wires for the sidelamps/turn signals go thru those holes in the shroud.
Once you have the apron on but before the grille and overider supports are in place -- it will be obvious... but as noted it must be tucked around the radiator so now is not the time to do this.
BTW -- I believe the fibreboard is generally painted body color. The paint may also help it last longer/be waterproof.
TR3driver
Great Pumpkin - R.I.P
Offline
According to Bill Piggott, it was at TS40104.Does anyone know when this was introduced?
TS39781LO didn't have the holes when it came to me either, but I believe it had a replacement apron (so maybe they weren't drilled either). It also didn't have any signs of the holes for the letters. (I've been told that replacement aprons didn't come with the letter holes, because they were different for different letter sets.)
Don Elliott
Obi Wan
Offline
When I bought my TR3A brand new in 1958, there were no holes for the deflector. In fact, it came before deflectors were devised. I put one on during my restoration from 1987 to 1990. It came in 3 pieces and I secured the top center piece to the two side pieces with brass long stem rivets. Though it was black, I sprayed mine a couple of coats of aerosol black on both sides before final installation. Dick - if you car is red, spray the deflector pieces red. They should be body colour. By now I'd guess that there are another 5 coats of black paint on my deflector. This is for water protection so it doesn't rot or decay. I hold it into place with the two chromed top supports for the bumperettes. I drilled no extra holes. There was a crease in my side pieces that told me to fold the bottom flange forward and the upright flanges backwards to fit up the two sides of the radiatior. Don't drill any holes in the bottom deck behind the grille! Dick - I'll e-mail you some photos. Cheers Don - e-mail me at 58tr3a at videotron dot ca with your address.
I am also trying to install one of these this holiday weekend. I have a new one from Moss that "almost fits". Does anyone have a picture of one installed. Does the lip around the radiator bend toward the front or toward the back? Is it attached to the radiator in any way? Should it be painted black or the car the same color as the car? Thanks, in advance.
Geo Hahn
Yoda
Offline
Yeah, can take a couple of seconds for the photos to load. Hopefully those answered your questions but in case...
On mine: Lip around radiator bends back. Not attached to the radiator at all. Body color is the paint used.
It's hard to see in the photo but on mine the lip across the top edge of the radiator is folded all the way back, i.e. flat against itself, not at a right angle like the sides. That is what I did to get it to fit well, possibly not correct.