Hey Guest!

 Hey - did you know if you click on the title of a thread it will take you to the first unread post since you last visited that thread?
 but were afraid to ask:
  STOP!! Never post your email address in open forums. Bots can "harvest" your email! If you must share your email use a Private Message or use the
  smilie in place of the real @
 Pretty Please - add it to our Events forum(s) and add to the calendar! >>
Jim_Gruber
Yoda
Offline
Looking for some collective wisdom from this list.
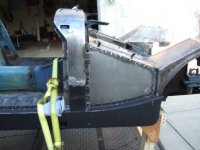
I pulled of the lower portion DS A-Post skin and it is totally ugly underneath. Will need to replace the entire A post and do some work even on the backing skin. Have not got to PS yet but I know skin on that side needs to be replaced. Not sure about A-Post but may get lucky there.
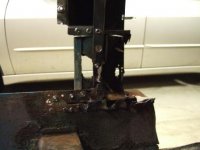
Question is this, I read through my Practical Classics Reto Guide and looked at all the pics thoroughly. Can't seem to tell which side the A posts were spotwelded to the backing skin. Did they weld from inside the footwell meaning the A Post went on first or do I need to look closer at the A post to spot the welds. Trying to figure out which side to work from in cutting spot welds.
This one is quickly becoming ugly but when I can stick a screwdriver all the way through under the lower hinge it's time for that one to come out.
Upper joint on A-Pillar skin is soldered I believe. Do you take a torch to it to melt the solder. That's got to be messy.
Debating wheter I can partially replace the A-Post or need to do it as a complete assembly.
The idea of a complete assembly to keep hinges seems easier. Which is the easiest way to repair the A-Post , complete or partial replacement. So far I've only cut the A-Pillar skin up 6" from bottom. I do know that area where door stop check strap goes across is bent all to heck and is cracked so I need to go at least above that if I do a partial replacement.
Thoughts and opinions?
I pulled of the lower portion DS A-Post skin and it is totally ugly underneath. Will need to replace the entire A post and do some work even on the backing skin. Have not got to PS yet but I know skin on that side needs to be replaced. Not sure about A-Post but may get lucky there.
Question is this, I read through my Practical Classics Reto Guide and looked at all the pics thoroughly. Can't seem to tell which side the A posts were spotwelded to the backing skin. Did they weld from inside the footwell meaning the A Post went on first or do I need to look closer at the A post to spot the welds. Trying to figure out which side to work from in cutting spot welds.
This one is quickly becoming ugly but when I can stick a screwdriver all the way through under the lower hinge it's time for that one to come out.
Upper joint on A-Pillar skin is soldered I believe. Do you take a torch to it to melt the solder. That's got to be messy.
Debating wheter I can partially replace the A-Post or need to do it as a complete assembly.
The idea of a complete assembly to keep hinges seems easier. Which is the easiest way to repair the A-Post , complete or partial replacement. So far I've only cut the A-Pillar skin up 6" from bottom. I do know that area where door stop check strap goes across is bent all to heck and is cracked so I need to go at least above that if I do a partial replacement.
Thoughts and opinions?