Hi Guest!

 Hey - did you know if you click on the title of a thread it will take you to the first unread post since you last visited that thread?
 but were afraid to ask:
  STOP!! Never post your email address in open forums. Bots can "harvest" your email! If you must share your email use a Private Message or use the
  smilie in place of the real @
 Pretty Please - add it to our Events forum(s) and add to the calendar! >>
GTP1960
Jedi Knight
Offline
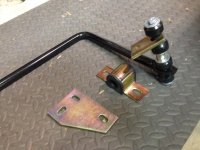
I had ordered this ADCO anti sway bar from TRF several months ago. But the instructions were dismal
and next to useless, the kit also was missing parts. So I needed something like this tropical storm, spawned from hurricane Joquin to get me started. ( forecasting as much as 12" of rain tonight: having her up on jack stands might be A really good thing)
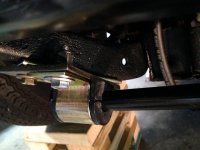
First thing I did was get some pics of a sway bar installed & in place, from Tush a few weeks ago.
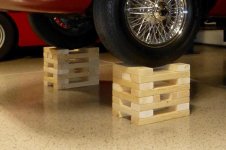
then I built cribs based on Geo's design.
Using 2x4x8's. : cutting 14" & 10" blocks leaves no wasted board ft.
 Use 2 boards per crib to make them 8 tiers & approx. 11" tall.
(easy to make, but I'm not a quick carpenter )
(Reason for cribs: it is important to have your wheels under load, for proper bar location, so the cribs answered and gave me plenty of headroom too. Of course ramps would work also;
you also need the rear tires level with the front)
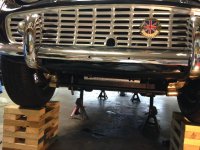
Built one more 20" x 10" four level crib, to elevate my jack safely.

The bar seems stout enough, but the 5/16" bolts that is attached to the lower A arm leaves a lot to be desired. They hold the bushings and bring the end of the bar down to the right height.
(**** kit was missing cup washers, used to support the bushes, I could not find cups, so I used #8, 5/16" washers:
also missing were the two 3/8 " extended bolts & castle nuts to secure the small plate to the "A arm", the originals are to short. I replaced the castle nuts with nylocks)

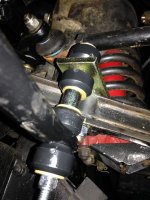
the instructions allow for drilling 2ea. 3/8" holes through the bumper connector arms, but that was almost border-to-border on the strut, so I dropped back to 5/16" (BTW: using anti-seize as drill bit lube worked much better than 30w oil & made the drilling much easier) and used #8 bolts for added strength.
the attachment plates are not a perfect fit, but the heavy duty hardware allows me to draw the struts down and make a strong union. The kit included backing plates, but they were to wide to fit in the channel of the strut, so I used them as shims instead. I will go back in and weld the two plates together, for added strength. I will see about fashioning a correct backing plate.

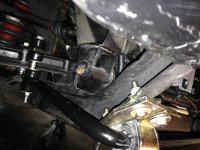
it feels secure, doesn't appear to be binding anywhere. But it will be a few days before I can make a test drive.
( to let the weather clear.)


and next to useless, the kit also was missing parts. So I needed something like this tropical storm, spawned from hurricane Joquin to get me started. ( forecasting as much as 12" of rain tonight: having her up on jack stands might be A really good thing)
First thing I did was get some pics of a sway bar installed & in place, from Tush a few weeks ago.
then I built cribs based on Geo's design.
Using 2x4x8's. : cutting 14" & 10" blocks leaves no wasted board ft.
(easy to make, but I'm not a quick carpenter )
(Reason for cribs: it is important to have your wheels under load, for proper bar location, so the cribs answered and gave me plenty of headroom too. Of course ramps would work also;
you also need the rear tires level with the front)
Built one more 20" x 10" four level crib, to elevate my jack safely.
The bar seems stout enough, but the 5/16" bolts that is attached to the lower A arm leaves a lot to be desired. They hold the bushings and bring the end of the bar down to the right height.
(**** kit was missing cup washers, used to support the bushes, I could not find cups, so I used #8, 5/16" washers:
also missing were the two 3/8 " extended bolts & castle nuts to secure the small plate to the "A arm", the originals are to short. I replaced the castle nuts with nylocks)
the instructions allow for drilling 2ea. 3/8" holes through the bumper connector arms, but that was almost border-to-border on the strut, so I dropped back to 5/16" (BTW: using anti-seize as drill bit lube worked much better than 30w oil & made the drilling much easier) and used #8 bolts for added strength.
the attachment plates are not a perfect fit, but the heavy duty hardware allows me to draw the struts down and make a strong union. The kit included backing plates, but they were to wide to fit in the channel of the strut, so I used them as shims instead. I will go back in and weld the two plates together, for added strength. I will see about fashioning a correct backing plate.
it feels secure, doesn't appear to be binding anywhere. But it will be a few days before I can make a test drive.
( to let the weather clear.)