Hey Guest!

 Hey - did you know if you click on the title of a thread it will take you to the first unread post since you last visited that thread?
 but were afraid to ask:
  STOP!! Never post your email address in open forums. Bots can "harvest" your email! If you must share your email use a Private Message or use the
  smilie in place of the real @
 Pretty Please - add it to our Events forum(s) and add to the calendar! >>
GTP1960
Jedi Knight
Offline
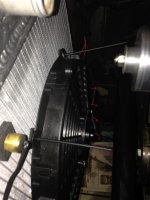
Finally got everything on my engine compartment list done. Even spent about 3 hours fitting the radiator air director duct around the pusher fan.
must have tested & tweaked the fan, adjusted the fan thermo sensor & snugged up the wiring about 20 times.
only to find that the apron would not fit with fan in place as a pusher. The center shelf on the inside of the apron ( where the hand crank housing resides) reaches to far inwards for the 12" fan.
The depth of the fan is only 1-3/4", so if you are thinking about a pusher, look into 10" fans, or double check your available space before you get underway.
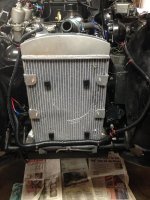
i reversed the fan blade, switched the wiring, and mounted it as a puller.(after removing the rad strutt, horn & upper rad. hose. No big deal.
i will have to come up with a durable solution for the duct before I try the apron again.
(the four bolts on front of the rad., designed to mount the pusher, made a good zip tie base for the duct.
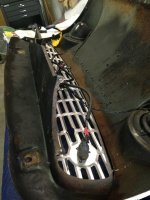
Test fitted the apron, checked the wiring connections, and ordered new trim beading connectors from TRF.
While I am getting impatient, to get her on the road, I've decided to fix the beading, fully inspect the old wiring under the apron & remove the surface rust & repaint the underside of the apron, before I re mount it, so another week or so)
must have tested & tweaked the fan, adjusted the fan thermo sensor & snugged up the wiring about 20 times.
only to find that the apron would not fit with fan in place as a pusher. The center shelf on the inside of the apron ( where the hand crank housing resides) reaches to far inwards for the 12" fan.
The depth of the fan is only 1-3/4", so if you are thinking about a pusher, look into 10" fans, or double check your available space before you get underway.
i reversed the fan blade, switched the wiring, and mounted it as a puller.(after removing the rad strutt, horn & upper rad. hose. No big deal.
i will have to come up with a durable solution for the duct before I try the apron again.
(the four bolts on front of the rad., designed to mount the pusher, made a good zip tie base for the duct.
Test fitted the apron, checked the wiring connections, and ordered new trim beading connectors from TRF.
While I am getting impatient, to get her on the road, I've decided to fix the beading, fully inspect the old wiring under the apron & remove the surface rust & repaint the underside of the apron, before I re mount it, so another week or so)