• Hi Guest!
    You can help ensure that British Car Forum (BCF) continues to provide a great place to engage in the British car hobby! If you find BCF a beneficial community, please consider supporting our efforts with a subscription.

    There are some perks with a member upgrade!
    **Upgrade Now**
    (PS: Subscribers don't see this gawd-aweful banner
Tips
Tips

1968 Sprite MKIV Lights/Electrical

NullReturned

Freshman Member
Offline
Hi Everyone! I'm new to the forum, and I've just purchased my first Classic. It's a 1968 Sprite MKIV (HAN9) and I'm trying to sure up some things before really considering it ready to drive around. One of my major concerns is the lighting. Here is the situation:


  • When I flip the light switch to the middle (for parking lights) nothing comes on.
  • When I flip the light switch to the bottom (for headlights) the right headlight turns on bright and the left head light is dim.
  • When I flip on the high beams, the left highlight is bright, but the right headlight is dim.
  • When I flip on the emergency flashers, everything works as expected.
  • When I flip the dashboard light switch, nothing happens. (note: It did work before I replaced the battery and had to jump start it.)
  • Brake lights work as expected.


Does anyone have a good place to start? Is this a grounding issue? Or rusted connectors? Maybe the switches? I want to sort out the lights, specifically the headlights, before I take it out as I don't want to be caught out at night without proper headlights.

Thanks in advance to anyone who might have info!
 
Hello and welcome aboard! You've definitely found the right place. I purchased a '69 Sprite Mark IV in August 2013, so I'm not that far ahead of you. This group is extremely knowledgeable and very helpful.

With the parking lights have you tried jiggling the switch in the middle position? Sometimes, my parking lights won't come on until I jiggle it. With the headlights, it sounds like the leads for the high beam on the right side headlight have been reversed.

Do you have no dashboard lights at all, or does the switch to dim the dashboard lights not work?

The electrical systems on these cars can be quite confounding. When you have "Prince of Darkness" Lucas wiring combined with almost 47 years of age, the results can sometimes be quite interesting, as you have found out. In my case, I've had to reach up under the dash every now and again when my tach stops working. One jiggle - tach works again. I spent over a week last winter chasing down an electrical gremlin which caused my rear running lights and tag light to stop working, but the brake and turn signals worked normally. It turned out one of the in-line fuses under the dash had blown.

If you don't have them already, one of the pencil type voltage testers and a multi-meter ought to be part of your tool kit.
 
As SaxMan has said above, it can be a matter of step-by-step labor to locate these problems.

It's unlikely that it's just one or two areas......probably lots of little areas of poor contact. As he says, you are dealing with a 47 year old convertible. A combination of age and weather exposure will create these problems in any car.

Basically, the solution is pretty labor intensive.

My "secret" is to get some electrical contact cleaner (like ~This Stuff~) and do your best to spray it inside the switches as you flick them on and off.
Also, disconnect all male/female plug-in connectors and spray them with this cleaner. Slide plugs together a few times (while spraying them).

Remove every light bulb and connector and spray liberally while reconnecting.

There are only four fuses. Clean them with spray and be sure none are "blown". Spray the fuse box connection tabs too.

This may catch many of your problems.

G'luck and welcome!
 
A very small wire brush in a Dremel tool, some have suggested a rifle bore cleaning kit in the past and fine Emery Paper to clean contcts and get them shiny is all that is needed. The Emergency Flasher switch has turn signals and flasher circuit runing through it. Many of your issues will be solved if you pull this switch and clean the contacts where wires attach. In addition I took this switch apart. On my '68 there was a dumbell shaped contact that rolls back and forth. I was able to open up the switch, clean this contact up and it solved a myriad of problems. I think there are still pics of this switch as I took apart on Gerards Garage Web site. Propero Garage publishes wiring diagrams for our cars on laminated card stock. In addition there are wiring diagrams I think on the technical pages here. It may look daunting at first but if you relate the color coded wiring at each switch or device and test with a 12V probe. Do I have current here Y/N, clean the connectors and plug it back togehter. Do I now have current here Y/N. If no trace that Blue/White Headlamp Wire back upstream in the wiring bundle to the next set of bullet connectors and clean hte next set.

When I brought Bugsy my '68 Sprite home I was faced with the same situation, no instruments, lamps, lights, nothing worked. I systematically worked with a wiring diagram, identifying wires by color code in front of me that I could physically see and touch to the printed piece of paper. It took being able to touch that Blue/White wire and look at the diagram to understand this isn't hard to understand. Ground issues are also a problem. You need a cheap volt meter to validate that a Ground wire has zero resistance between where you are testing to the negative terminal of the battery. There is a master ground lug on the right side fenderwell where all of the grounds from the lights up front run to. Make sure that ground lug is clean and shiny. There is also a big bunch of bullet connectors on right side down low, follow the main harness down the right side and you will see where there are 6-8 Bullet connectors. A frequesnt point of problems down there.


It will take time but I was able to get every circuit, bulb, and lamp and instrument working just be cleaning up contact points on the wiring harness. Gook luck and keep asking questions. we've been where you are at.
 
Welcome! and welcome to the wonderful world of Lucas! Notwithstanding the very good advice above, you do in fact have a starting point.

Before you do anything else,

1. Find the fuse box and one at a time remove and clean the contacts and replace - pay particular attention to green wires,

2. Go through the engine bay, starting around the headlights and working your way back - including the trunk. Check and clean every black wire (ground) contact - especially any that attach to the body.

Once you have this, then you have a baseline to start with the rest, and, you will have a better shot at fixing the gremlins once and for all.

welcome and, hang around, there is a lot of wisdom here!
 
Just to add to the good advice given, use a chemical cleaner first...much easier on the component. For brushes I prefer .22 cal nylon and brass/copper bore brushes on a very slow drill, you only want to remove the corrosion. Follow this with dielectric grease to prevent future oxidation/corrosion.
Rut
 
I'll just add another "Welcome to the realm of the Prince of Darkness." Other than that, I can't really add to the advice you received already. Those guys know of what they speak.
 
Damian originally posted his electrical question in the Austin-Healey forum. I chased him over to the Spridgets forum. He was certainly welcome in the AH forum, but I let him know that the people with the knowledge are over here. Man, that turned out to be true! You guys have been there, done that!
 
HOLY WOW! I didn't log in for 18 hours, and you guys rock! I'm going to review all of the replies, but I had to say "Thank you!" to everyone in advance for their replies!
 
Welcome!
If you have not invested in a manual for your car yet, this is a good time to do so. Armed with the wiring diagram and the tools mentioned above you will be able to sort this out.

Regarding the headlights, most Lucas wiring schemes have a left and right headlight harness that joins somewhere at the front of the car behind the grille. From there, wires go back to the switch. Since you are reporting one headlight brighter than the other, start your checks at the front with the plugs on the headlamps, then follow the headlight harnesses where they join. Clean the connections (power and ground) from the lamps back to the switch as necessary until you get both lamps working.

After I clean contacts I coat them with dielectric grease as Rut suggested.
 
Adding to Doug's excellent post, while you are peering into the wheel wells looking at the wiring (best to remove the tires for room) look for the ground wires that are held to the body by headlight housing screws. Loosen, clean and abrade the lugs and mating metal areas and hardware, cover with some dielectric grease and reassemble.

Lucas Prince of Darkness hahaha whatever. Lucas electrical systems are quite conventional and ordinary. The greatest weak point however is their use of bullet lugs and spring metal sleeves as junction points. The metal alloy sleeves fatigue and crack rendering them in-op. You will find some of these in the headlight harness behind the grill. Do go to the trouble of checking them, but you might as well order some to have them on hand because just the act of removing a bullet lug can break the contact sleeve. Once you know the front wiring is good and there is still a problem I would head to the dash area BUT do inspect the harness all over for signs of some previous owner modifying the harness. People do silly things with wiring.

these suck.jpg
 
I have a bugeye, but I think the wiring is similar. They use a lot of those 4 terminal bullet terminals to bring grounds together for the headlights, blinkers, etc. This makes it tricky to diagnose issues because if 2 lights are supposed to be on at the same time, and one of them has a bad ground it can ground through another bulb making things look OK, but dim.

The easiest way to start trouble shooting is to REMOVE ALL THE BULBS and verify that each socket has a good ground. If you don't remove all the bulbs, you will still get continuity for any that are wired in parallel.

Adding to Doug's excellent post, while you are peering into the wheel wells looking at the wiring (best to remove the tires for room) look for the ground wires that are held to the body by headlight housing screws. Loosen, clean and abrade the lugs and mating metal areas and hardware, cover with some dielectric grease and reassemble.

Lucas Prince of Darkness hahaha whatever. Lucas electrical systems are quite conventional and ordinary. The greatest weak point however is their use of bullet lugs and spring metal sleeves as junction points. The metal alloy sleeves fatigue and crack rendering them in-op. You will find some of these in the headlight harness behind the grill. Do go to the trouble of checking them, but you might as well order some to have them on hand because just the act of removing a bullet lug can break the contact sleeve. Once you know the front wiring is good and there is still a problem I would head to the dash area BUT do inspect the harness all over for signs of some previous owner modifying the harness. People do silly things with wiring.

View attachment 35535
 
The female sockets for the male bullet connector are indeed problematic and as Tom said, you will want to buy some bullets and sockets to keep for replacements and spares. Though you will be able to buy these from most of the usual, car specific parts suppliers, it is a good idea to visit the britishwiring.com web site. The folks at britishwiring.com will have most if not all the basic electrical parts you need including the correct color coded wire for repairs. Their prices are typically better also.
 
Heh, complaints. The first step on a new old car is to clean every single connection and ground in the syste, not too many really.

That said, and I have restored three of them, I have never had a light problem after the cleaning and one I had for 20 years.

Miss Agatha had all new wiring and she never had an electrical problem from day one everything worked as it should.
 
At the risk of repeating what's already been said- CHECK THE GROUNDS!

My Sprite was doing some crazy stuff, similar to what you've described. I had one bad dimmer switch and three bad grounds.

As 58Custom said, the grounds to the headlight screws are particularly problematic.
 
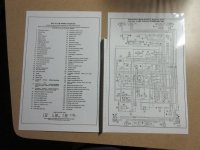
Thank you everyone for the feedback, once again. This is amazing. So I'm prepped and ready to start working through the electrical once I come back from being out of town for the holidays. I have a couple shop manuals at this point, as well as a step by step battle plan for going through the electrical. Luckily I'll have a buddy there as well to keep me honest. Also, after I received my Bentley Workshop Manual, I made laminated blowups of the wiring diagram, nice and big on Tabloid paper. It's double sided, with the key on one side and the diagram on the other. Two copies only $11 from Fedex, what a deal.

Ruler included in the picture to show the scale.
Sprite MKIV Wiring Diagram.jpg
 
Those little ice pick continuity testers that all parts stores carry come in mighty handy for checking where you have power or not also. The laminated wiring diagram is a nice thing to have in the boot when traveling. I once got several hundred miles from home before dark only to find I had no headlights when night fell. Flash light and wiring diagram saved the day.

Kurt.
 
Damian,

I have the same diagram from my old '68 and when blown up and laminated it will be used all too often but once you get it all working and cleaned up you will be good for at least 8-10 years based on my experience.Happy to help you work through adding relay for headlights. Really made a tremendous difference in being able to drive at night. And there is a really easy out of the way spot to place them. A couple of relays, 2 sockets, 2 fuse holders, 2 20 Amp fuses,soldering iron, solder, shrink wrap, and tie wraps and you can do for < $25. When I had the pleasure of having an oncoming car flash their high beams to tell me to dim my lights it made my day. Let there be light.
 
Jim et all,

So you would highly recommend adding in a relay? How difficult is it to do so? I'm not afraid of wiring, as I went to school for Electrical Engineering. I'm just a bit out of practice, but I want to make the car more bulletproof.

Also, any thoughts on the LED conversion kits that are out there for the car lighting? (Headlights, backup, brake, etc) Would the LED lights be overall brighter and easier on the battery?
 
Back
Top