• Hi Guest!
    You can help ensure that British Car Forum (BCF) continues to provide a great place to engage in the British car hobby! If you find BCF a beneficial community, please consider supporting our efforts with a subscription.

    There are some perks with a member upgrade!
    **Upgrade Now**
    (PS: Subscribers don't see this gawd-aweful banner
Tips
Tips

1962 center shift gearbox cover

  • Thread starter Deleted member 21878
  • Start date
D

Deleted member 21878

Guest
Guest
Offline
i would like to recover the vinyl on the tunnel at the gear shift. this is a center shift gearbox.

at first glance it looks easy to do... but then it looks like it could be easy to wrinkle. i wondered if there is a video or pictures or some instructions on the best way to do this.


Thanks
TL
 
Fairly easy to do as 90% of the vinyl isnt even seen once the tunnel is in place with shift grommet and console in place .
Cut a small hole maybe two inch dimeter in a piece of vinyl then lots of slits around its circumference once its glued in place to wrap inside the cover .
 
thanks. my old one is made a little different. not sure i can get a proper pattern from it.
 
so do you wrap the sides and leave a seam in the front? then push it over at the top and cut out for the hole?
 
so do you wrap the sides and leave a seam in the front? then push it over at the top and cut out for the hole?
Cut an oversized piece of fabric .
Cut a 2” hole in it (centred ) and glue it to the flat top portion . Now cut slits in it 3/4” apart around the circumference and fold/wrap them into the hole to glue them down .
LET IT DRY !!!!
Now apply more spray on contact glue and use the oversize amount to pull /stretch (carefully) down the sides .
LET IT DRY !!!!!
cut off the excess .
Done .
 
made an attempt today to cover this piece. did not go as easily as i hoped. guess i don't have the talent or something.

tried cutting the hole and the slits, then gluing the top. let it sit and then clamped it. but i could not get the sides down without wrinkles. tried everything i could think of.

so i ended up cutting a slit at the front. worked the back on and then around to the front. as i did, i just tried to work it over the top and keep the wrinkles under the boot. of course it leaves a seam in the front but you can not really see it once in... unless you really look.

i expect i will replace this piece again when i actually do the interior... maybe next year... to get the color right. Mine is painted to the color it is now. by then hopefully i can figure out how to do it better.

couple of pics:
first off the attempt at doing the top first.


539C23E5-85E1-4214-B72E-2659995A1670.jpg
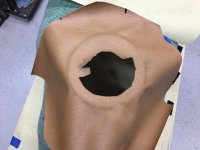
cutting the slits.
7C22501E-C3F5-47B8-9103-F75D1619FD12.jpg
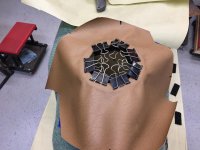
clamped
6F2EC759-7D4C-4B2B-902F-0C40A640D054.jpg
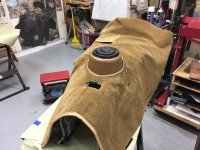
wrapped. still had a few wrinkles to work out. have left clamps on them tonight.
A18D7D4D-8583-4383-9A47-8C810464E172.jpg
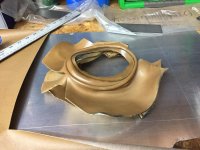
this is what i pulled off which is why i did not have a pattern. think mine looked better than this one anyway. it had open seams all over. guess the guy had no more of a clue than i did.
 
Back
Top