
• Hey Guest!
    British Car Forum has been supporting enthusiasts for over 25 years by providing a great place to share our love for British cars. You can support our efforts by upgrading your membership for less than the dues of most car clubs. There are some perks with a member upgrade!

    **Upgrade Now**
    (PS: Upgraded members don't see this banner, nor will you see the Google ads that appear on the site.)

TR2/3/3A battery box fitting and fastening

sp53

Yoda
Offline
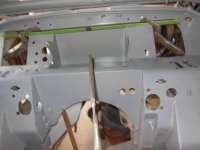
I have been sanding so much my body feels its age. Anyways I put off installing the battery box for better access plus I was not sure how I was going to attach the box to the tub anyway. I wanted to paint underneath the flanges of the sheet metal because I was being a perfectionist at the moment. Now I need to attach the box to the tub with both sides of the sheet metal primmered with sealer.

Sure I could fasten it all kinds of ways, but I still want to weld it for the original look.

My thoughts are I could drill a 3/16 hole then put something behind the weld like copper so it will not stick and fill the hole like I am plug welding. Let the weld burn the primmer and hope it welds to the 2 small clean surfaces from drill the hole on each piece of sheet metal.

The box is a very tight fit and probably not going to move much, but it is the cheaper box and does not fit well and needs to have the flanges bent down some and fastened. What do you guys think of welding and burning the paint in hopes the weld stays together?
 

Attachments

  • DSCN0085.JPG
    DSCN0085.JPG
    1.4 MB · Views: 20
I have been sanding so much my body feels its age. Anyways I put off installing the battery box for better access plus I was not sure how I was going to attach the box to the tub anyway. I wanted to paint underneath the flanges of the sheet metal because I was being a perfectionist at the moment. Now I need to attach the box to the tub with both sides of the sheet metal primmered with sealer.

Sure I could fasten it all kinds of ways, but I still want to weld it for the original look.

My thoughts are I could drill a 3/16 hole then put something behind the weld like copper so it will not stick and fill the hole like I am plug welding. Let the weld burn the primmer and hope it welds to the 2 small clean surfaces from drill the hole on each piece of sheet metal.

The box is a very tight fit and probably not going to move much, but it is the cheaper box and does not fit well and needs to have the flanges bent down some and fastened. What do you guys think of welding and burning the paint in hopes the weld stays together?


If you use a plastic battery box liner it is going to cover up most of your hard earned plug welds. So the only person to know that you worked so hard to make it look original is YOU. And in that vain I simply tack welded the outer edge of the box to the tub and then ground down the welds to make them flush with the top of the battery box . I also added sealer around the battery box edges. Which further covered up the welds.or at least made them blend in with the battery box lip I just went out to see what it looked like and it took me a bit of looking to finally see a couple of welds at the front corners.
If you are going to go with the plug welds you better have a helper to hold your copper spoon from the underside. Because you are not going to be able to reach around to both top and bottom at the same time. It is very tight under there.
I am not a great welder so I do not try to burn through primer to get the weld that I really am after. For me clean metal is a priority.
Charley
 
Back
Top