• Hi Guest!
    You can help ensure that British Car Forum (BCF) continues to provide a great place to engage in the British car hobby! If you find BCF a beneficial community, please consider supporting our efforts with a subscription.

    There are some perks with a member upgrade!
    **Upgrade Now**
    (PS: Subscribers don't see this gawd-aweful banner
Tips
Tips

TR2/3/3A old 4 bolt axle differential.

sp53

Yoda
Country flag
Offline
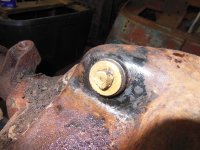
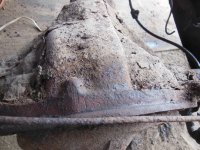
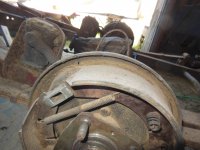
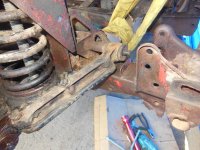
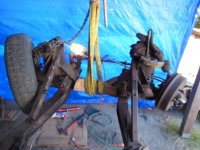
My new TR2 project has the old 4 bolt axle differential. The TS number on the differential is TS 741… something, so it could even be original. I want to use the early Lockheed brakes and it looks to me in order to do that I need to use this differential with the 4 bolt axel because the brake backing plates have 4 holes, and the updated newer differential changed to 6 bolts and is physically larger.

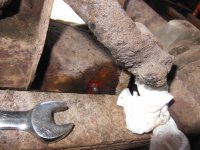
Having never rebuilt a differential, I was wondering are these units hard to rebuild? It spins fine. The tires go around and around with no crunching noise. The only leak I see is at the front seal. I am not sure how the rear seals work or go into the case.

I Could pull off the cover and eyeball gears to look for chips in the teeth and put a new seal in and call it hope. maybe a new bearing on the pinion gear becuase i have done that, but the inner bearings and stuff i do not know

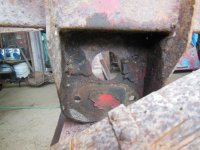
I remember John had some challenges with a couple of parts; some kind of split ring for something on the early Diff.

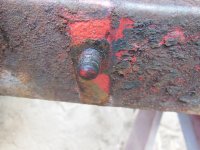
I also remember Randall saying something about axle bearings being almost impossible to get off without breaking something, I think the axle. I notice the early axle housing is about ¼ inch smaller in outside diameter.

Anyways looking for some ideas because I want to put the differential back on the frame once I get that painted.

Steve
 

Attachments

  • DSCN1343.JPG
    DSCN1343.JPG
    3.3 MB · Views: 86
  • DSCN1286.JPG
    DSCN1286.JPG
    3.3 MB · Views: 81
  • DSCN1269.JPG
    DSCN1269.JPG
    3.4 MB · Views: 80
  • DSCN1270.JPG
    DSCN1270.JPG
    3.4 MB · Views: 79
The old axle is MUCH easier to work on. The newer axle is the one with the pressed on hubs that must be removed to replace the bearings. The old axle uses splined hubs that slide right off once you remove the hub bolt. The wheel bearings are ball bearings and are held in by the brake back plate.

The old axles are known to be weak and break. I would pull them and look at the end of the splines on each end very closely, if not have them magnafluxed. The splines are also known to leak at the wheel hubs. Guber them well with sealant when you install the hubs...with the splined tapered split washers. That will seal them for a year, but then they will start to leak again. They leak into the brake shoes...kind of a bummer. I finally learned to not over-fill the diff with oil, and that helps better than any sealant.

At least replace the seals. These would be the pinion front seal and the 2 axle seals. There is no inner grease seal as on the later Girling axles. The brakes are also very different up to the flex line to the body...but that is covered in the manual fairly well.

You should have fun working on this axle!
 
Thanks John I am glad to hear the older axel was built a little simpler. Does yours have that brass fill plug or is that something the PO put in. After taking this car apart, I have been analyzing the cars running history. Somebody put new brake shoes all the way around and a new clutch. The drums where half buried in mud which hardened to the drums. I took one of the drums and put that into one of my rust dissolving tubs for 4 days and all the mud and rust fell off. The drums look good, but I will need to have them measured. I want to get the rear axle and suspension back on the frame first, so I can move stuff.

The car had a red frame, so I will paint the frame red.

Steve
 

Attachments

  • DSCN1230.JPG
    DSCN1230.JPG
    3.3 MB · Views: 75
  • DSCN1245.JPG
    DSCN1245.JPG
    3.2 MB · Views: 82
  • DSCN1252.JPG
    DSCN1252.JPG
    3.4 MB · Views: 81
  • DSCN1279.JPG
    DSCN1279.JPG
    3.3 MB · Views: 68
  • DSCN1312.JPG
    DSCN1312.JPG
    3.5 MB · Views: 75
  • DSCN1310.JPG
    DSCN1310.JPG
    3.4 MB · Views: 72
A red frame is pretty cool! And, it's definitely red in areas that were likely not repainted. Your frame looks to be dirty, but no bad rust through at all...also cool!

Yes, the TR2 used brass plugs for the diff cover and engine oil drain too. I see you have the original 4 wheel drum brakes. I have all drums on mine, and they work great (when dry). I was worried because I remember all the drum cars darting a bit in the 1960's when you first applied the brakes. But the TR2 brakes work great and no darting at all on application.
 
Yes the frame is in great shape in some spots and rusty in others. There are a couple of spots on the frame horns that need attention. When you rebuilt your front suspension, did you use the nylon bushing on the lower arms or go with the rubber bushing. I am leaning toward the rubber because that was stock for 1955, but I can see the nylon would be better. Hopefully, I can get the front brakes finished with shoes and rebuilt or new brake wheel cylinders. The wheel cylinders in it might clean up and it looks like new is available.

Steve
 
I went with the newer, nylon, that comes in the suspension kits these days. I see no problem with the original rubber bushings, if you can find them. Mine were still in place when I rebuilt mine.
 
I should be out sand blasting the frame more, but I need a break from that. Anyways how do I get the axles out? Take out the 4 bolts and the axle will slide out? Do I need to loosen the single big bolt on the axle end now?

I have never taken a differential assembly completely apart. What I am doing now is cosmetically cleaning the outside of differential so not to have crud everywhere. I took the cover plate off the back, and looked inside and turned the ring and pinion--- plus turned I think they are called spider gears, those 4 small ones. Everything looks nice. I could not see any chips on any of the teeth. I do think I feel a growling noise at the end of one of the axles where I think the bearing is.

Thanks Steve
 
Yes, once the 4 bolts are out the whole axle/hub/brake assembly will slide out. It may take some tapping, as the bearing is a ball bearing rather than the later taper bearing. The race has to be tapped out. You don't even have to open the pumpkin cover. You may want to loosen the hub nuts first, though, as they are tight and it will be harder to hold the axle to unscrew them when they're out. You will need to remove the hubs to replace the seals and bearings.

A constant growl would be a bearing.
 
Disregard the hub nut comment above. You can always put the hub into an old wheel to hold it and loosen the large hub nuts.
 
I will probably need to check the outer wheel bearing behind the single large axel bolt. I see what you mean about holding the axle onto the 4 bolts of a wheel. Should I use a breaker bar or is an impact gun ok. I do not want to snap anything. I assume removing the axle from the main gear cluster would help the splines by not having the splines of the axle into the gear cluster or does it matter.

Thanks Steve
 
An impact wrench should remove the big nut easily. Randall used to worry about using impact wrenches on parts supported by roller bearings, but you will likely replace the wheel bearings anyway.
 
I am probably overthinking the whole axle system. Heck using an impact gun has to be less that popping the clutch. Now, I am thinking use the impact gun while the axels are in the case. My fear was the snap of the gun on the old splines could cause some kind of whatever.

Steve
 
Back
Top