-
 Hi Guest!
You can help ensure that British Car Forum (BCF) continues to provide a great place to engage in the British car hobby! If you find BCF a beneficial community, please consider supporting our efforts with a subscription.
There are some perks with a member upgrade!**Upgrade Now**
(PS: Subscribers don't see this gawd-aweful banner

Tips
- We have a special forum called "Member Articles" where you can submit actual articles for consideration for publication. Learn More
- Don't have an Avatar? If not, your avatar will default to the 1st character in your username. Go into "Account Details" to change your Avatar.
- Some basic forum navigation info: click
 Hey - did you know if you click on the title of a thread it will take you to the first unread post since you last visited that thread?
- Hey Guest - Is your British Car Club in our Clubs database? If not, send me a PM - Basil

- Looking for a local club? Click the "Clubs" tab above and browse hundreds of clubs world-wide.
- Add Android or iPhone APP: click
- Did you know - any picture or video you add in your posts in any marque-specific forum will also get added to the Media Gallery automatically.
- A few more tips about posting and replying: click
- Hey there Guest - be sure to keep your profile page up to date with interesting info about yourself: learn more
- More tips and tricks on Posting and Replying: click
 but were afraid to ask:
  STOP!! Never post your email address in open forums. Bots can "harvest" your email! If you must share your email use a Private Message or use the
  smilie in place of the real @
- Want to mention another member in a post & get their attention? WATCH THIS

- So, you created a "Group" here at BCF and would like to invite other members to join? Watch this!
- Hey Guest - A post a day keeps Basil from visiting you in the small hours and putting a bat up your nightdress!
- Hey Guest - do you know of an upcoming British car event?
 Pretty Please - add it to our Events forum(s) and add to the calendar! >> Here's How <<
- Hey Guest - you be stylin' Change the look and feel of the forum to fit your taste. Check it out
- If you run across an inappropriate post, for example a post that breaks our rules or looks like it might be spam, you can report the post to the moderators: Learn More
- If you would like to try some different "looks" or styles for the site, scroll to the very bottom, on the left and click the Style Selector.
You are using an out of date browser. It may not display this or other websites correctly.
You should upgrade or use an alternative browser.
You should upgrade or use an alternative browser.
TR2/3/3A steel bushings for the lower Arms
- Thread starter sp53
- Start date


Offline
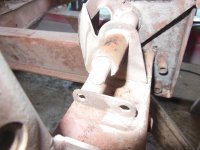
You do not appear to have anything further to remove. The shoulder of the surface that bears the bushing is a good bit bigger than the threaded end. See if your new bushes go on what you have.
Bob
Bob
Could be, I will check with a new bushing to see if it fits onto the shaft---- the way the shaft is after I get some coffee. I just assumed the original is still on there. Here is another pic from a different angle, and i will wipe the sand away to see clearer.
steve
steve
Attachments
charleyf
Luke Skywalker
Offline
The old bushing is still on there. It gets rusted in place. My efforts included trying heat. Use a propane torch to heat it and then use a pipe wrench. The last resort for me was to cut through the bushing with a dremel or some such tool and then use a pipe wrench and or chisel to get it to move. I was especially nervous about damaging the spindle it is mounted on when working on it. But then realized that any accidental nick or cut is covered by the new bushing. If you have removed and replaced this bushing before then it may not be necessary to replace it again. Especially if it does not show any wear. I figured that replacement every 30 to 40 years is a good thing.
Charley
Charley
You are reading my mind Charley. I tried the heat and if you look close those are vise grip marks, a pipe wrench would probably work better. Yeh I need to get some new nylon bushing and see how they fit. Heck the new ones might be inferior. Plus I could break something because these are not coming off without a fight, decisions……
steve
steve
Offline
Charley probably has a better memory than I and something is remaining of the old bushing. I vote for a cutoff wheel on a Dremel.
Bob
Bob
Tybalt
Jedi Warrior
Offline
Once you get the old bushing sleeve off, hit that shoulder with a ScotchBrite pad to clean it up. I don't assemble anything like that anymore without using an anti-seize lubricant. For this application something like the Loctite LB 8009 or the zinc containing LB 8044 would be appropriate since it is steel on steel. The zinc adds an additional level of corrosion protection for steel assemblies. The nickle containing LB 771 and the copper containing LB 8008 are used for high temperature applications and selection is driven by similar/dissimilar metals considerations.
 www.henkel-adhesives.com
Products
www.henkel-adhesives.com
Offline
I assume your replacement bushes will contain steel and plastic components. Be careful where you apply anti-seize. Metal dust in anti-seize compounds will unduly wear the plastic components of the new bushings.
Bob
Bob
LionelJrudd
Jedi Trainee
Offline
In those situations I use an angle grinder on the flat rather than a cutting disc. By grinding away the metal slowly, as you get through the outer layer it normally goes blue as the remaining metal gets thinner. When that happens, you can use a cold chisel to strike away from the thin area and the outer layer will split and rotate off the inner. In this way you haven't risked nicking the inner piece.