 Hi Guest!

 Hey - did you know if you click on the title of a thread it will take you to the first unread post since you last visited that thread?
 but were afraid to ask:
  STOP!! Never post your email address in open forums. Bots can "harvest" your email! If you must share your email use a Private Message or use the
  smilie in place of the real @
 Pretty Please - add it to our Events forum(s) and add to the calendar! >>
WHT
Jedi Hopeful
Offline
Hello,
Can I raise the back of a 1967 BJ8 engine (with the transmission removed) several inches without damaging the motor mounts or other assemblies? If so, what preparation is required (for example, removing the radiator, unclipping the carburetor linkage and perhaps loosening the motor mounts?).
I have an article describing a Tremec T-5 transmission installation into a BJ8 that recommends this procedure. Unfortunately, I don't know the source of the article to contact them directly. I was given the article by Driven Man, and they do not know the source.
I was hoping Forum members who are experienced with installing a transmission in a BJ8 can help with this question. The Tremec T-5 transmission kit uses the stock BJ8 clutch housing (bellhousing) with an adapter plate. That means, you could install the bellhousing and adapter plate to the engine first, and then bolt the T-5 transmission to the bellhousing from within the car. We are only replacing the transmission.
This makes it easier to install the transmission because you are not trying to (i) rotate the transmission to get clearance for the bellhousing/starter mount while (ii) inserting the transmission tailshaft into the propeller-shaft tunnel.
And (iii), the two transmission mating surfaces are in easy reach inside of the cabin area, and (iv) it is easy to set up and observe the release bearing/airgap (you can install the slave cylinder and cycle the clutch while watching the inside of the bellhousing).
However, to accomplish this, you have to raise the rear of the motor so the tailshaft of the transmission will be above the propeller-shaft tunnel. Otherwise, there is not enough room to install the transmission shaft into the bellhousing/clutch cover/clutch plate/pilot bearing. It also requires removing the radiator; which is fine by me because I will also be installing a new DW red cooling fan and the lower radiator hose.
Please see the included images from the article. And, maybe, someone might know the source of the article?
Thank you for any help.
Regards, Bill
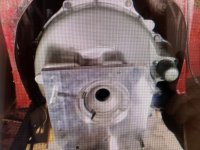
These are the instructions from the article:
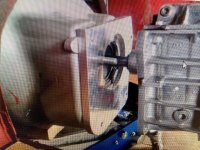
Place a floor jack under the bell housing where the bell meets the engine using a bock of wood to prevent damage to the surfaces. Jack the engine up as far as possible, while keeping an eye on the hoses and wires making sure nothing gets pulled loose, it may be necessary to drain the coolant system and unhook the upper heater hose in order to raise the engine high enough. Install the conversion cross-member using the factory hardware. Install the conversion mount to the transmission with the provided hardware. With the engine jacked up you can install the transmission to the bell by standing over the tunnel and sliding the transmission into the bell clutch and pilot bushing
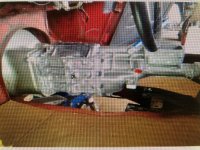
If you have trouble getting the input shaft to fully engage the pilot bushing it means the clutch disk is not lined up fully with the pilot, you can have an assistant press the clutch pedal this will release the clutch disk and allow you to center it by moving the transmission (Only do this if the input shaft is locked on the splines of the clutch disk if it is not the disk will fall.). DO NOT FORCE THE TRANSMISSION IN PLACE OR USE THE BOLTS TO PULL IT IN OR DAMAGE WILL RESULT. Bolt the transmission to the adapter plate tighten to 35 ft lbs. Lower the jack down until the transmission mount is roughly a quarter inch from the cross-member this will allow you some wiggle room when installing the mount bolts once the bolts are started lower the trans the rest of the way, tighten the bolts to 25 ft lbs. From beneath the car insert the conversion driveshaft into the the tunnel between the differential and tunnel push it in until it is close to the transmission. From above the car install the slip yoke into the transmission as far as it will go. Get under the car and bolt the driveshaft flange to the differential flange. Install the conversion speedometer cable to the transmission, leave the speedometer end unhooked until the tunnel is installed .Using an appropriate sealer on the transmission where the shifter bolts down, then bolt the shifter to the transmission tighten till snug then 1/4 turn. Remove the fill plug and fill with Dextron 3 until it is level with the fill hole. Install the tunnel. With the provide hardware install the shift lever. Now install the interior of the car. Note the position of the shifter in the console and clock the shift leaver as necessary.
Can I raise the back of a 1967 BJ8 engine (with the transmission removed) several inches without damaging the motor mounts or other assemblies? If so, what preparation is required (for example, removing the radiator, unclipping the carburetor linkage and perhaps loosening the motor mounts?).
I have an article describing a Tremec T-5 transmission installation into a BJ8 that recommends this procedure. Unfortunately, I don't know the source of the article to contact them directly. I was given the article by Driven Man, and they do not know the source.
I was hoping Forum members who are experienced with installing a transmission in a BJ8 can help with this question. The Tremec T-5 transmission kit uses the stock BJ8 clutch housing (bellhousing) with an adapter plate. That means, you could install the bellhousing and adapter plate to the engine first, and then bolt the T-5 transmission to the bellhousing from within the car. We are only replacing the transmission.
This makes it easier to install the transmission because you are not trying to (i) rotate the transmission to get clearance for the bellhousing/starter mount while (ii) inserting the transmission tailshaft into the propeller-shaft tunnel.
And (iii), the two transmission mating surfaces are in easy reach inside of the cabin area, and (iv) it is easy to set up and observe the release bearing/airgap (you can install the slave cylinder and cycle the clutch while watching the inside of the bellhousing).
However, to accomplish this, you have to raise the rear of the motor so the tailshaft of the transmission will be above the propeller-shaft tunnel. Otherwise, there is not enough room to install the transmission shaft into the bellhousing/clutch cover/clutch plate/pilot bearing. It also requires removing the radiator; which is fine by me because I will also be installing a new DW red cooling fan and the lower radiator hose.
Please see the included images from the article. And, maybe, someone might know the source of the article?
Thank you for any help.
Regards, Bill
These are the instructions from the article:
Place a floor jack under the bell housing where the bell meets the engine using a bock of wood to prevent damage to the surfaces. Jack the engine up as far as possible, while keeping an eye on the hoses and wires making sure nothing gets pulled loose, it may be necessary to drain the coolant system and unhook the upper heater hose in order to raise the engine high enough. Install the conversion cross-member using the factory hardware. Install the conversion mount to the transmission with the provided hardware. With the engine jacked up you can install the transmission to the bell by standing over the tunnel and sliding the transmission into the bell clutch and pilot bushing
If you have trouble getting the input shaft to fully engage the pilot bushing it means the clutch disk is not lined up fully with the pilot, you can have an assistant press the clutch pedal this will release the clutch disk and allow you to center it by moving the transmission (Only do this if the input shaft is locked on the splines of the clutch disk if it is not the disk will fall.). DO NOT FORCE THE TRANSMISSION IN PLACE OR USE THE BOLTS TO PULL IT IN OR DAMAGE WILL RESULT. Bolt the transmission to the adapter plate tighten to 35 ft lbs. Lower the jack down until the transmission mount is roughly a quarter inch from the cross-member this will allow you some wiggle room when installing the mount bolts once the bolts are started lower the trans the rest of the way, tighten the bolts to 25 ft lbs. From beneath the car insert the conversion driveshaft into the the tunnel between the differential and tunnel push it in until it is close to the transmission. From above the car install the slip yoke into the transmission as far as it will go. Get under the car and bolt the driveshaft flange to the differential flange. Install the conversion speedometer cable to the transmission, leave the speedometer end unhooked until the tunnel is installed .Using an appropriate sealer on the transmission where the shifter bolts down, then bolt the shifter to the transmission tighten till snug then 1/4 turn. Remove the fill plug and fill with Dextron 3 until it is level with the fill hole. Install the tunnel. With the provide hardware install the shift lever. Now install the interior of the car. Note the position of the shifter in the console and clock the shift leaver as necessary.
Attachments
Last edited: