• The Roadster Factory Recovery Fund - Friends, as you may have heard, The Roadster Factory, a respected British Car Parts business in PA, suffered a total loss in a fire on Christmas Day. Read about it, discuss or ask questions >> HERE. The Triumph Register of America is sponsoring a fund raiser to help TRF get back on their feet. If you can help, vist >> their GoFundMe page.
  • Hey there Guest!
    If you enjoy BCF and find our forum a useful resource, if you appreciate not having ads pop up all over the place and you want to ensure we can stay online - Please consider supporting with an "optional" low-cost annual subscription.
    **Upgrade Now**
    (PS: Subscribers don't see this UGLY banner)
Tips
Tips

BJ7 Boot Trim

bob hughes

Luke Skywalker
Country flag
Offline
Hi Guys

Can anyone help out here please.

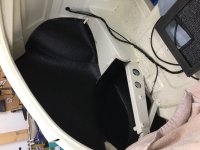
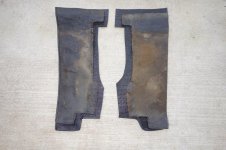
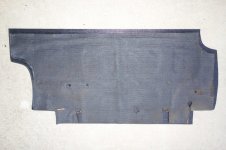
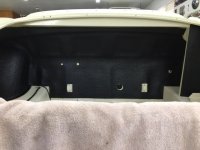
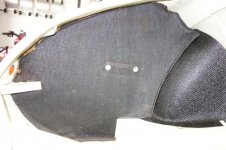
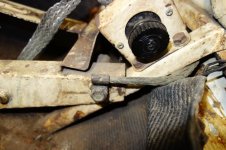
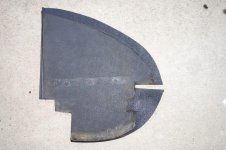
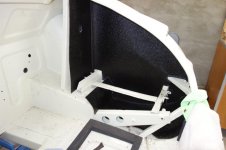
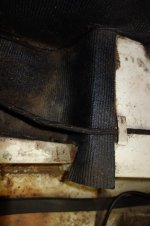
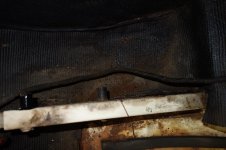
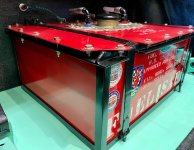
I just took possession of the latest jigsaw puzzle from AH Spares that is the boot trim set for my BJ7, It is a bit premature as I am not quite ready yet but I could not resist a peak. There are some sections that are easily recognizable and others I can not make out. I must say that I have never owned a Healey that had much in the way of the correct trims and carpeting so I am pretty green regarding what goes where. I can see that the middle piece fits to the face of the bulkhead at the back of the boot, the piece to the left may or may not fit around the top rail above the middle piece and I do not have a clue where the other two pieces on the right fit. Further more it appears to me to be beneficial to fit most of the side trims with the shroud off as there is more than a bit of a cutting to do to get the individual pieces to fit. On that note, would you provide cutouts in the trim for access to the bolts holding the wings (fenders ) on? I have a pot of contact adhesive that the Jaguars use for their trims, apparently, it does not age harden ( I will soon find out if that is true because I bought it some years ago and it has not yet been opened :LOL:)

Cheers

Bob

Boot carpet 1.jpgBoot carpet 2.jpgBoot carpets 3.jpg
 
Country flag
Offline
... On that note, would you provide cutouts in the trim for access to the bolts holding the wings (fenders ) on? I have a pot of contact adhesive that the Jaguars use for their trims, apparently, it does not age harden ...

View attachment 68900View attachment 68904View attachment 68905

I made cutouts when I installed a Moss kit in my BN2 and, TBH, I kind of regret it. I doubt they bothered to do this at the factory, and you probably could cut holes later if you absolutely had to (you could maybe not put glue where bolt heads are). As for the adhesive, I've always assumed 'non-hardening' meant 'after application.' The upholstery glues I've used go bad in the can eventually; at least, they separate but might be salvageable with a good shaking/stirring.

Edit: The Moss kit came with some fairly decent installation instructions; I looked on their site and couldn't find any, at least for BJ7s, but you might give them a call.
 
Last edited:

JoeCA

Member
Country flag
Offline
The two pieces on the right fit in the "wells" on the right (under the battery) and left side of the boot. The finished edge goes up against the piece that glues to the side. I trimmed both of these pieces and re-sewed the edging to fit closer to the originals. Photos: Armacord - Left Fender, Wheel arch, fenderwell fitting, Armacord - L & R fenderwell comparisons.

The piece on the left fits on the inside of the curved section of the rear shroud. The unfinished edge is at the bottom. Photo: Armacord - Center section. This isn't a great photo...but you will get the idea. It is looking down on top of the center brace of the boot (you can see the boot latch and the two wiring harness tabs. Something I found interesting was that these two wiring harness tabs in my car were painted black to go along with the black armacord. The same was true for the round mounts where the bumpers attach). In the photo the armacord is pulled loose from the shroud and folded over. You can see the finished edge is on top.

The center piece is for the face of the bulkhead at the back of the boot as you indicate. I also trimmed this piece to achieve a proper fit. You can get an idea of how much to trim by placing it and then bending it around the angles at the top. If this piece is too high, you will see the unfinished edge of the Armacord at the top of the boot (we had a thread about this the other day). Photo: Armacord bulkhead panel comparison. My BT7 had 6 rivets in this panel. The concours guidelines indicate the BJ cars did not have these rivets.

Holes for the fender bolts were not cut out on my car. Like you, I debated doing this so I could go ahead and glue in all the panels. However, I decided just to glue in the front three (wheel arch, bulkhead panel and the vertical panel in front of the battery) so that I could run my wiring harness. and battery cable. I will glue the remaining panels in after the fenders are on. Photos: Original Armacord Left, Front 3 panels glued in place.

Glue: I used Weldwood Contact Adhesive - Landau Top and Trim 1145 HHR High Solids Contact Adhesive Spray grade. This is a low VOC version that is available in California. I brushed it on.

Watch where the finished edges go, as they determine the order of the panels being glued in place. Have fun! I have more photos if you need them.

joe
 

Attachments

  • Armacord - Left Fender, wheel arch, fenderwell fitting.JPG
    Armacord - Left Fender, wheel arch, fenderwell fitting.JPG
    1,014.9 KB · Views: 137
  • Armacord - L & R Fender Well Comparison.jpg
    Armacord - L & R Fender Well Comparison.jpg
    213.1 KB · Views: 134
  • Armacord - center section.jpg
    Armacord - center section.jpg
    144.5 KB · Views: 120
  • Armacord - Bulkhead Panel Comparison.jpg
    Armacord - Bulkhead Panel Comparison.jpg
    223 KB · Views: 121
  • Front 3 panels glued in place.JPG
    Front 3 panels glued in place.JPG
    105.9 KB · Views: 121
  • Original Armacord - Left.jpg
    Original Armacord - Left.jpg
    241.8 KB · Views: 123
OP
B

bob hughes

Luke Skywalker
Country flag
Offline
Thanks Joe,
I did talk to AH Spares over the phone and they took me through it but photos are much better, I had the bulkhead piece and that was all. I will be doing what you have done with regard to bolt holes and brackets etc, my old piece had slots cut in it to fit around fuel pipe and the tank straps it really looked terrible.

Cheers

Bob
 

JoeCA

Member
Country flag
Offline
Bob, since you don't have many pieces to help guide you, I am attaching a few more photos. My set did not come from AHSpares, so I don't know how much the comparison photos will help you with regards to trimming...but you can put them in place and figure it out.

The way I fitted the bulkhead panel and the vertical panel that the battery cable routes through is definately not as original. My panels were like yours...they had large sloppy holes, notches and slits cut in them to accomodate the wiring harness, battery cable, tank strap mount etc. I have a lot more time on my hands than the original installers so I tried to make a little cleaner fit. It's cleaner, but not perfect.

Photo: Armacord center shroud. This photo shows the new and old piece comparison. For my boot set, this was the piece that most closely matched the original. You can see the slits cut in the unfinished edge to go around the center support and the holes for the spare tire strap staple.

Photo: Armacord center by battery switch. This shows the center section from the side by the battery switch. You can see how it fits down by the floor.

Photo: Armacord - Right side comparison. Shows the original and the new right side panel. Note the missing piece of the original. I measured the cutout for the battery support and located it on the new panel and then cut a single slit in the panel underneath the support cutout so that the piece can be glued in place. You can see this better in the next photo. I haven't installed this panel, so if you want a picture of just the panel, let me know.

Photo: Armacord right new fitted. Vertical, side and well pieces for the right side loosely fitted.

Photo: Armacord Left well, Left well center. Top views of the left well showing how the armacord bends and glues down in front of the wiring harness tab. The Left well center photo shows the bumper bracket mounts painted black.

joe
 

Attachments

  • Armacord center Shroud.jpg
    Armacord center Shroud.jpg
    197.5 KB · Views: 119
  • Armacord center by battery switch.jpg
    Armacord center by battery switch.jpg
    149.4 KB · Views: 119
  • Armacord - Right Side Comparison.jpg
    Armacord - Right Side Comparison.jpg
    229.5 KB · Views: 119
  • Armacord - right new fitted.jpg
    Armacord - right new fitted.jpg
    117.9 KB · Views: 112
  • Armacord - left well.jpg
    Armacord - left well.jpg
    95.3 KB · Views: 116
  • Armacord - Left well center.jpg
    Armacord - Left well center.jpg
    145.6 KB · Views: 127

dougie

Luke Skywalker
Country flag
Online
This is boot trim for the vintage racer.....
 

Attachments

  • Fuel Cell 1.jpg
    Fuel Cell 1.jpg
    998.9 KB · Views: 126
  • Fuel Cell 2.jpg
    Fuel Cell 2.jpg
    915 KB · Views: 114
  • Fuel Cell 3.jpg
    Fuel Cell 3.jpg
    678.5 KB · Views: 110
  • Rear Boot 3.jpg
    Rear Boot 3.jpg
    284.6 KB · Views: 107
Similar threads
Thread starter Title Forum Replies Date
5 BJ7 Boot Rust-Through Austin Healey 13
B Soft Top Boot Cover - BJ7 Austin Healey 5
60TR3A BJ7/BJ8 Boot Cover Question Austin Healey 15
M BJ7 BOOT LID Austin Healey 6
R BJ7 convertible top boot cover- snap orientation. Austin Healey 8
5 WTB: BJ7 Squab Austin Healey 13
B For Sale Too many Healeys - BN2, BN4, BT6, BJ7 For Sale Austin Healey Classifieds 0
Walter74 BJ7 Throttle Linkage "Support Panel" Austin Healey 5
T BJ7 Trim Recession (Convertible Top) Austin Healey 2
ModifiedBJ7 BJ7 Windshield Surround Rubber Seal Austin Healey 2
R New Hood for BJ7 Austin Healey 3
chicken BJ7 Chrome Trim Austin Healey 15
JMACENGINESHOP BJ7 Engine Rebuilding Austin Healey 23
R BJ7 Rear Axle Maintenance Austin Healey 5
B Wanted Grill Top Cowl and Surround - BJ7 Austin Healey Classifieds 1
B BJ7/BJ8 Door Check Straps Austin Healey 10
R Changing BJ7 Differential Ratio Austin Healey 10
X Trouble shooting trafficator - 1963 BJ7 Jaguar 9
T BJ7 Hard to find First Gear when G/Box is hot Austin Healey 3
B BJ7 Rear View Mirror Mounting Hardware Austin Healey 7
chicken BJ7 Door Fit Austin Healey 27
T Wanted BJ7 parts needed Austin Healey Classifieds 0
T Weight of BJ7 Transmission/Overdrive Austin Healey 10
D BJ7 Clutch Austin Healey 6
R BJ7 Back Seat-Rest Austin Healey 1
HealeyRick BJ7/8 Convertible Top Issues Austin Healey 5
HealeyRick BJ7 Side Window Alignment Austin Healey 31
B BJ7 Interior Finishing Details Austin Healey 2
chicken Healey BJ7 door (i think) Austin Healey Classifieds 0
chicken BJ7 Rear Number Plate Mounting Austin Healey 3
chicken BJ7 Door Seal Austin Healey 5
chicken BJ7 Rear Quarter Panels Austin Healey 6
T Early BJ7 Vent Window Seal Austin Healey 2
D BJ7 Underdash Trim Austin Healey 9
G Steering Arm Installation Recommendations - BJ7 Austin Healey 2
D BJ7 Rear rail trim Austin Healey 0
D BJ7 Hood frame mounting plate Austin Healey 7
D Wanted BJ7/8 front grill top cowl Austin Healey Classifieds 4
BLong63AH BJ7 Hard Fuel Lines Austin Healey 20
T Spin-On Oil Filter Removal [BJ7] Austin Healey 12
T Installing Garmin GPS in a BJ7 Austin Healey 19
pbraun How much does a BJ7 or 8 transmission weigh? Austin Healey 3
P BJ7 Upholstery Austin Healey 1
B BJ7 back end rebuild Austin Healey 1
Marvin Gruber BJ7 door panels Austin Healey 4
Marvin Gruber BJ7 Top Installation Austin Healey 1
B Rear shroud connection to the floor pan on a BJ7 Austin Healey 21
P BJ7 HS6 Carb Baseline Setting Austin Healey 10
Marvin Gruber BJ7 tach cable location. Austin Healey 3
T Toyota 6 cylinder eng & trans in a BJ7 Austin Healey 0

Similar threads

Top