Hey - did you know if you click on the title of a thread it will take you to the first unread post since you last visited that thread?
 but were afraid to ask:
  STOP!! Never post your email address in open forums. Bots can "harvest" your email! If you must share your email use a Private Message or use the
  smilie in place of the real @
 Pretty Please - add it to our Events forum(s) and add to the calendar! >>
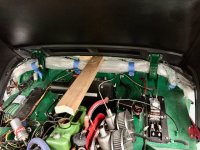
Replacing front shroud. Do I remove the hinge, bolt it to the shroud (4 bolts), then slide it back into the hinge enclosure and bolt it there (1 bolt), or do I leave the hinge attached in the enclosure (1 bolt) and try to bolt it to the shroud from inside the engine compartment? (4 bolts)
-
 Hi Guest!
If you appreciate British Car Forum and our 25 years of supporting British car enthusiasts with technical and anicdotal information, collected from our thousands of great members, please support us with a low-cost subscription. You can become a supporting member for less than the dues of most car clubs.
There are some perks with a member upgrade!**Upgrade Now**
(PS: Subscribers don't see this gawd-aweful banner

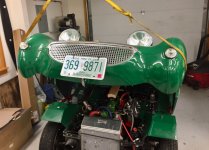
Bugeye nose
- Thread starter rossco
- Start date