• Hi Guest!
    You can help ensure that British Car Forum (BCF) continues to provide a great place to engage in the British car hobby! If you find BCF a beneficial community, please consider supporting our efforts with a subscription.

    There are some perks with a member upgrade!
    **Upgrade Now**
    (PS: Subscribers don't see this gawd-aweful banner
Tips
Tips

Painting the Car - Corner Bead Advice

BG 62AH

Senior Member
Country flag
Offline
Guys,

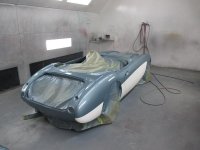
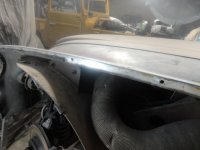
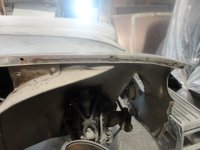
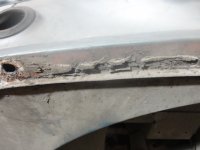
I am getting ready to have my car painted. I have all of the fenders mounted back on the car, with the screws that hold them onto the car hand tight.

I was planning on painting the car with the corner bead off of the car, and the fenders left loose. I would install the corner bead and "final" tighten the fender screws after the car was painted.

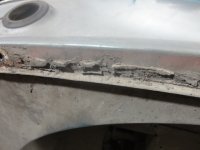
The plan sounded good, but the painter pointed out that any residual paint or clear coat that dripped down in between the fender and shroud would make the 2 stick together after the clear hardens.... making it very difficult to separate the fender/ shroud to insert the tabs that hold the corner bead in place.

Should I put some type of shims in between the 2 pcs to separate them? I was concerned that the shims might get stuck.

Has anyone had experience with this? Any suggestions are really appreciated.

Thank you
 
I was planning on painting the car with the corner bead -"OFF"- the car, and the fenders left------ LOOSE.
Then install the corner bead with tape over the locking tabs so you do not nick up your new paint job when dry.
Now "final" tighten the fender screws after the car is painted.
There is probably more help on the way-:highly_amused:
 
Hey Bill,
I painted my Healey last year and used base coat/clear coat and with the fenders mounted did not have the problem your painter mentioned. Unless your painter is using an unusual amount of paint would not think it will cause the two pieces to stick together as he suggested. Keoke is right, just don't have the fender bolts tightened up. Also tape up those tab ends as he suggested and if you can, have someone help you put the stainless steel beading back on the car. That beading has a life of its own and a lot easier with two people handling each piece. Good luck and just take your time !
Regards
Mike
 
I believe there is supposed to be an insulating strip on the fender/shroud flanges (between the steel and aluminum surfaces) to resist corrosion that occurs between dissimilar metals. This would be located where the possible drips would be, are you using this?
 
I believe there is supposed to be an insulating strip on the fender/shroud flanges (between the steel and aluminum surfaces) to resist corrosion that occurs between dissimilar metals. This would be located where the possible drips would be, are you using this?

AFAIK, there was no such insulating strip installed originally. Our cars were expected to be driven for a few years--as were most cars of the era--then (most likely) scrapped. The only original insulation was paint, which works pretty well except in the most extreme conditions (even some modern cars rust where salt is used on the roads). Our BN2/100M was mostly original when we bought it--though it had been resprayed at least once--and both the aluminium and steel flanges were in good shape (but it was a CA car).

I doubt BMC would have spent even one pence per car just to make them last longer. You would also have needed the insulation in other areas, like where the rear shroud was riveted to the brace that goes under the rear lip of the boot and where the rear shroud was riveted to the boot pan. When we restored the car, I put electrical tape on the boot pan where it joins the shroud, just because water can get in the boot and puddle here, and it was easy to do. I also used seam sealer on all seams.
 
I plan to use this stuff.
https://www.ahspares.co.uk/austin-healey/big-healey/Wing-fittings/ANTI-CORROSION-JOINT-STRIP.aspx

My fenders and shrouds were in tough shape. They are new now and I want to keep them that way.

BTW: I do not disagree with Bob. :welcoming:

Just a thought:

Because corrosion between dissimilar metals is area related what are you going to do about those steel fasteners that hold the parts together. ??
For a given amount of corrosion produced it will be higher there expressed as a percentage.
 
Just a thought:

Because corrosion between dissimilar metals is area related what are you going to do about those steel fasteners that hold the parts together. ??
For a given amount of corrosion produced it will be higher there expressed as a percentage.

SS bolts?
I'm also thinking that the sealer strip fills a bit of the hole that the bolt passes through, protecting the aluminum from the steel bolt.
No approach is going to be perfect. Bob mentioned extreme conditions, and others have made similar comments; we don't drive these cars in the salt slush of the north anymore. They'll be fine.
 
I believe there is supposed to be an insulating strip on the fender/shroud flanges (between the steel and aluminum surfaces) to resist corrosion that occurs between dissimilar metals. This would be located where the possible drips would be, are you using this?

The factory method of pre-painting all the parts inside and out, then assembling them on the car
used the painted interfaces for corrosion isolation.
This is still an alternate method used during restoration.
 

Yep, that's the same stuff I used. although I think I sourced it from the U.S. (don't remember where)

The factory method of pre-painting all the parts inside and out, then assembling them on the car
used the painted interfaces for corrosion isolation.
This is still an alternate method used during restoration.

I'd use the panel off method of painting if it was a solid color, but with a metallic you want the panels on to avoid differences in coloration.
 
Guys, thank you all for your advice. I am going to mention to my painter that this should not be much of a problem as long as we leave them pretty loose. I had thought it if was a little stuck, I would use a razor and delicately separate them.

I am not going to use any insulation between the fender and shroud, but I did use 2 coats of epoxy primer on all the mated surfaces.

Thanks again for your help.
 
SS bolts?
I'm also thinking that the sealer strip fills a bit of the hole that the bolt passes through, protecting the aluminum from the steel bolt.

SS or steel bolts it is the fact that the bolts are conductive and allow the differential current produced by the different metals joined to flow.
 
Fenders/doors painted off car lined up as if on car, at same time body done, use 3M dumdum (black strip caulk) applied to body, then applied the stainless strip (left up off the body 3/8 in or so) , stuck to strip caulk, (only if your fenders fit perfect and no bending/manipulating into place) then offer fender to body, just mind the rear of fender as you need to get it over first. Beading was left up a little then as fender tightened pushed into place. and no worry about the tabs scratching paint.
 
Painted mine last winter with the bead off but the panels mounted. The painter didn't have any problem putting the bead back in and locking up the panels when it dried.
attachment.php
 

Attachments

  • 140908 60 Austin Healey (5).jpg
    140908 60 Austin Healey (5).jpg
    42.7 KB · Views: 205
Painted mine last winter with the bead off but the panels mounted. The painter didn't have any problem putting the bead back in and locking up the panels when it dried.
attachment.php

Boy, that's pretty. :encouragement:

Edit - Did he paint with the boot and bonnet lids off? If so, why? I'd think if you wanted to get the best match with the surrounding shrouds you'd paint with them on after jamming the openings.
 
If your painter is experienced he doesn't need to paint them in place. Our car was painted in multiple pieces and even on separate days.
 

Attachments

  • 2013-02-06 007.jpg
    2013-02-06 007.jpg
    90.7 KB · Views: 113
J - That's photo is inspirational. I hope to get my car in that state within the next two months. What was the color and paint code for the white you used. It's looks a little whiter than the normal OEW. I like it.
I'm heading right out to the garage to pick up the body prep again.....
 
I was able to photograph a early 3000 that had never been apart and I took pics of the sealing material between the front fenders and the shroud and also the rear fenders and the shroud. That bright glare on the front fender is the shiny aluminum on the shroud. The sealing material on the shroud only ran down the fender/shroud so far and then stopped. I couldn't believe how shiny the aluminum was!
 

Attachments

  • DSC01216.JPG
    DSC01216.JPG
    123.5 KB · Views: 128
  • DSC01217.JPG
    DSC01217.JPG
    127.7 KB · Views: 123
  • DSC01220.JPG
    DSC01220.JPG
    131.4 KB · Views: 129
  • DSC01223.JPG
    DSC01223.JPG
    139.5 KB · Views: 123
  • DSC01225.JPG
    DSC01225.JPG
    135.9 KB · Views: 128
  • DSC01226.JPG
    DSC01226.JPG
    132 KB · Views: 123
With today's coatings, epoxy-chromate primers & catalyzed urethane enamels, I honestly didn't give electrolysis a second thought...

Well, I DID use stainless steel hardware mounting the fenders to the shrouds!
 
Back
Top