-
 Hey Guest!
British Car Forum has been supporting enthusiasts for over 25 years by providing a great place to share our love for British cars. You can support our efforts by upgrading your membership for less than the dues of most car clubs. There are some perks with a member upgrade!**Upgrade Now**
(PS: Upgraded members don't see this banner, nor will you see the Google ads that appear on the site.)
You are using an out of date browser. It may not display this or other websites correctly.
You should upgrade or use an alternative browser.
You should upgrade or use an alternative browser.
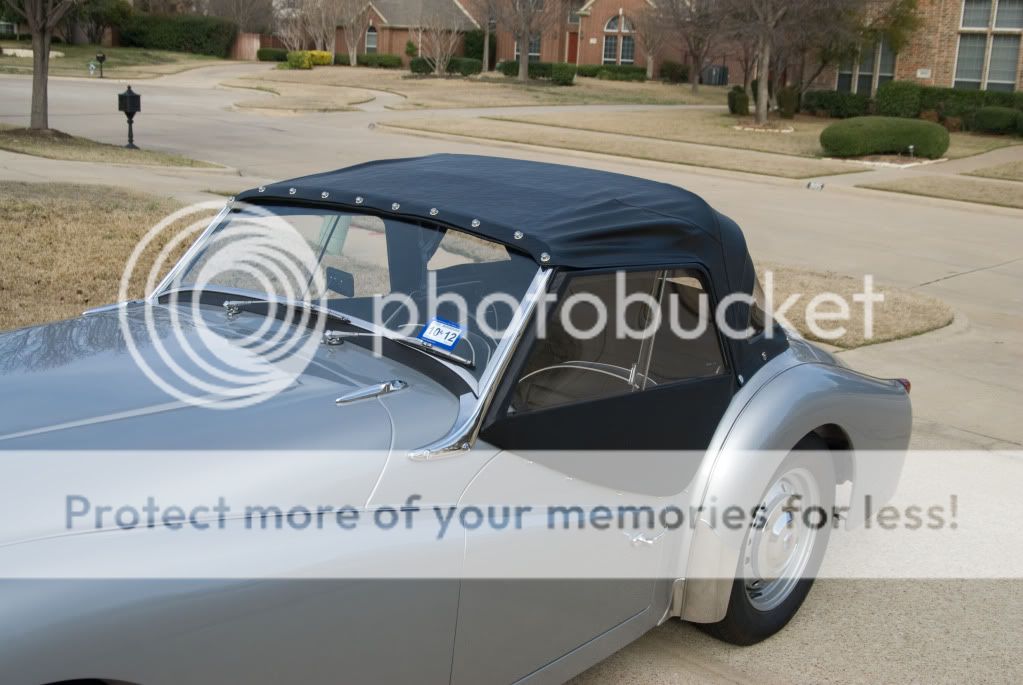
TR2/3/3A Back to TR3 Sidescreens
- Thread starter CJD
- Start date

Good job, John! And even better for us: a fantastic description of small details and important hints on how to do the job.
In the meantime, I have got hold of the instruction sheet on how to fit the pre-sewn covers, the channels and windows to the frame. I can send them to you by email, if you give me your address by PM.
Jesús
In the meantime, I have got hold of the instruction sheet on how to fit the pre-sewn covers, the channels and windows to the frame. I can send them to you by email, if you give me your address by PM.
Jesús
OP
CJD
Yoda
Offline
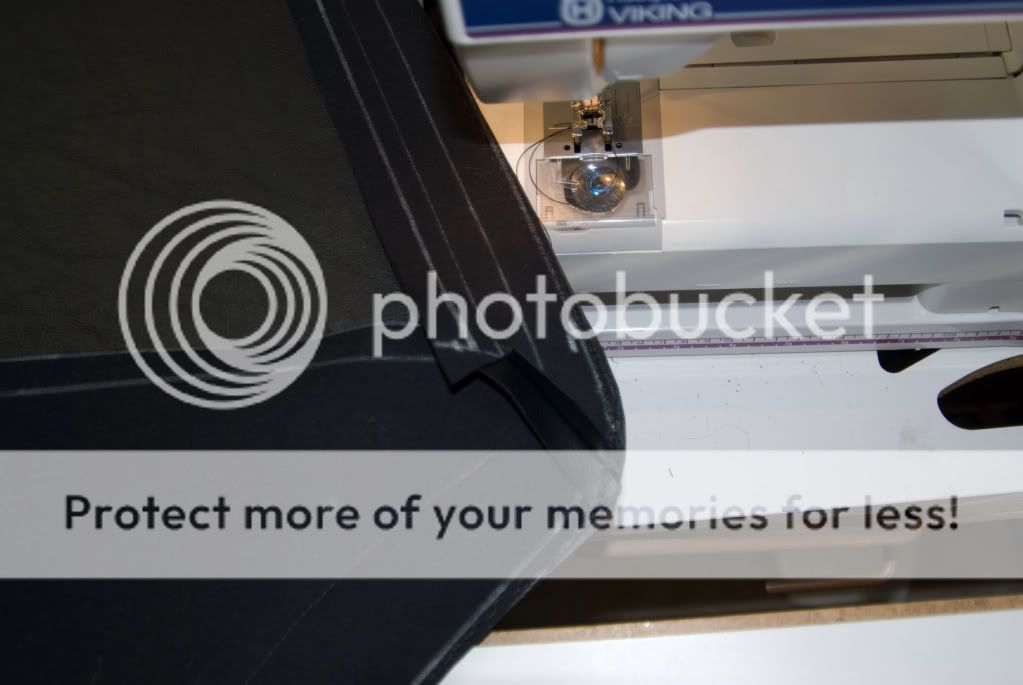
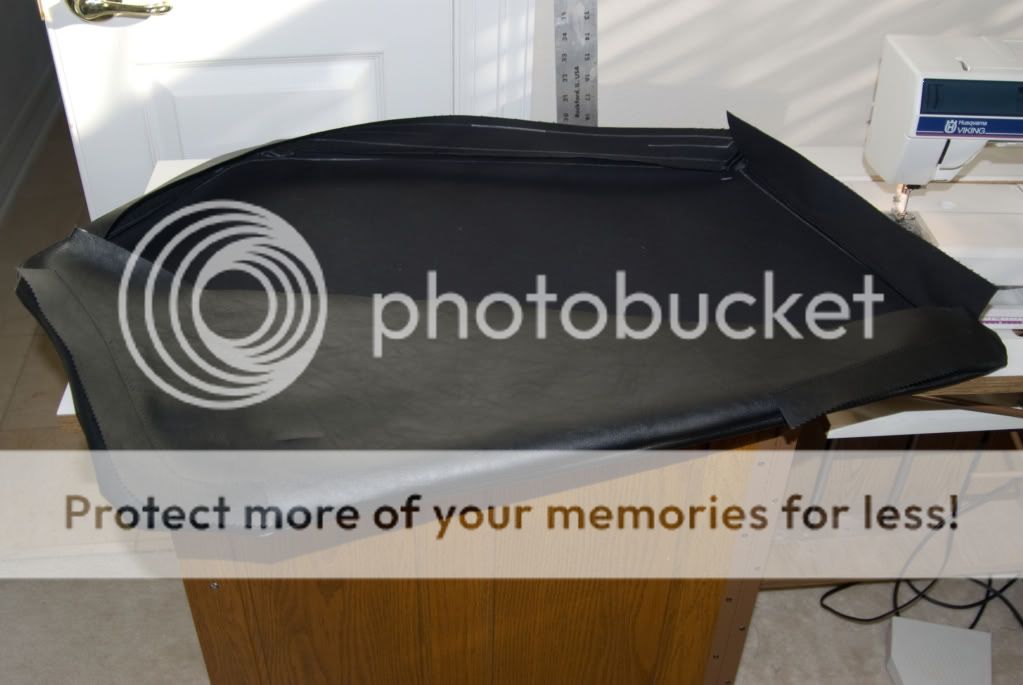
Latest update...still waiting for the channel samples to arrive. I'm stalled until they do. Hear are some pics from the second screen. Much easier this time. The entire screen is sewn flat, no fancy twisting like on the first.
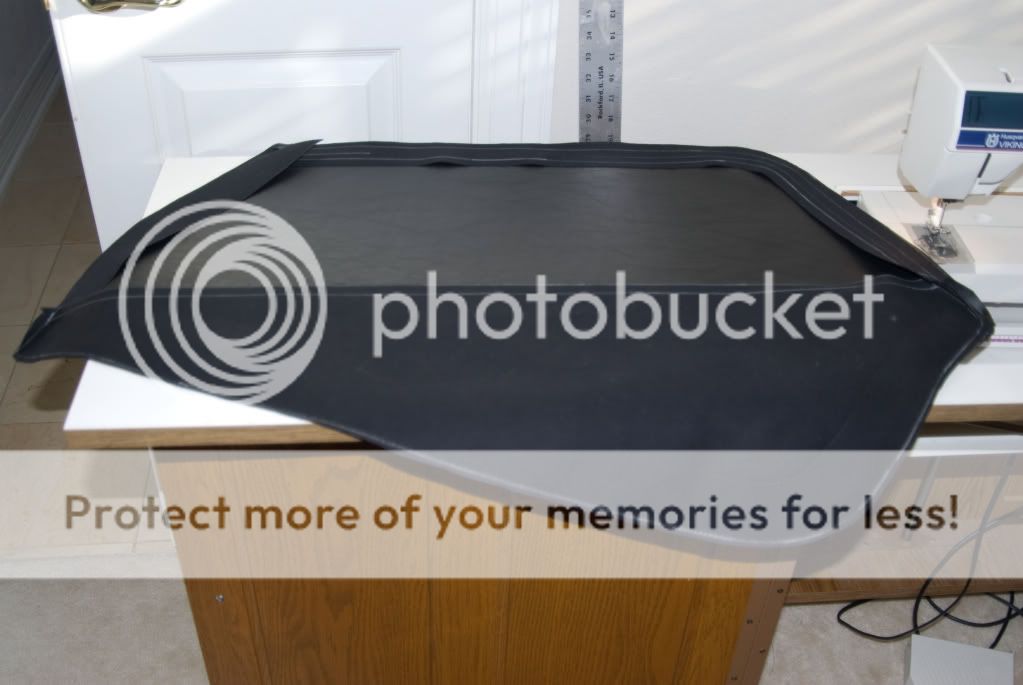
This is the entire cover fresh off the machine.
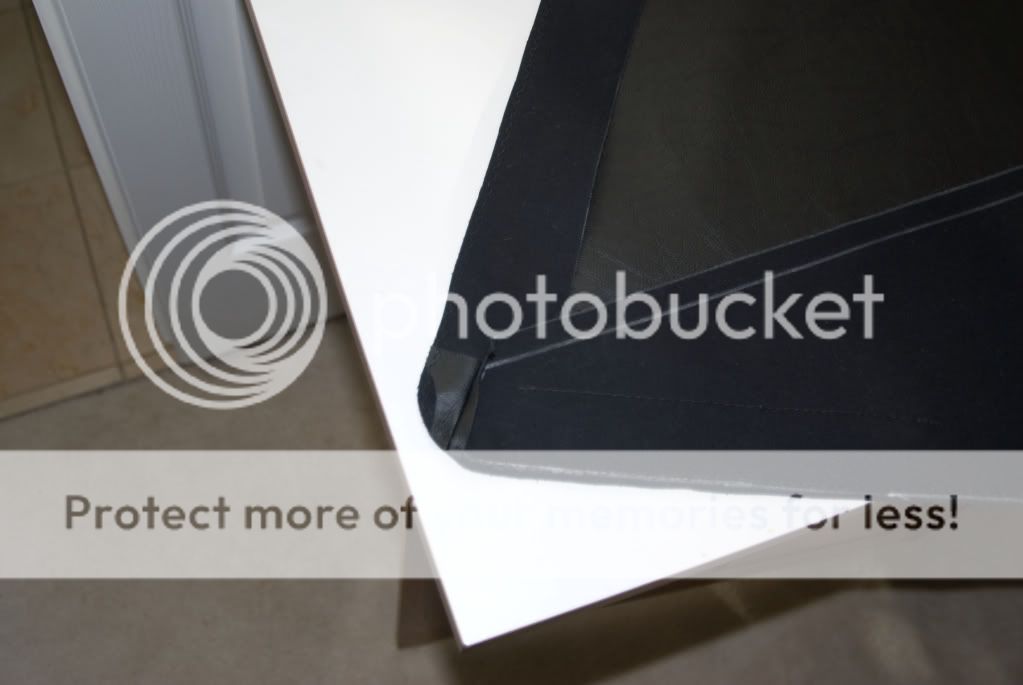
These are close ups of the corners.
And turned right side out...at this point the double stitch is run along the window channel portion of the cover. That was...first stitch line 1/8" from the edge, and the second about 1/4" from the edge.
This is the entire cover fresh off the machine.
These are close ups of the corners.
And turned right side out...at this point the double stitch is run along the window channel portion of the cover. That was...first stitch line 1/8" from the edge, and the second about 1/4" from the edge.
OP
CJD
Yoda
Offline
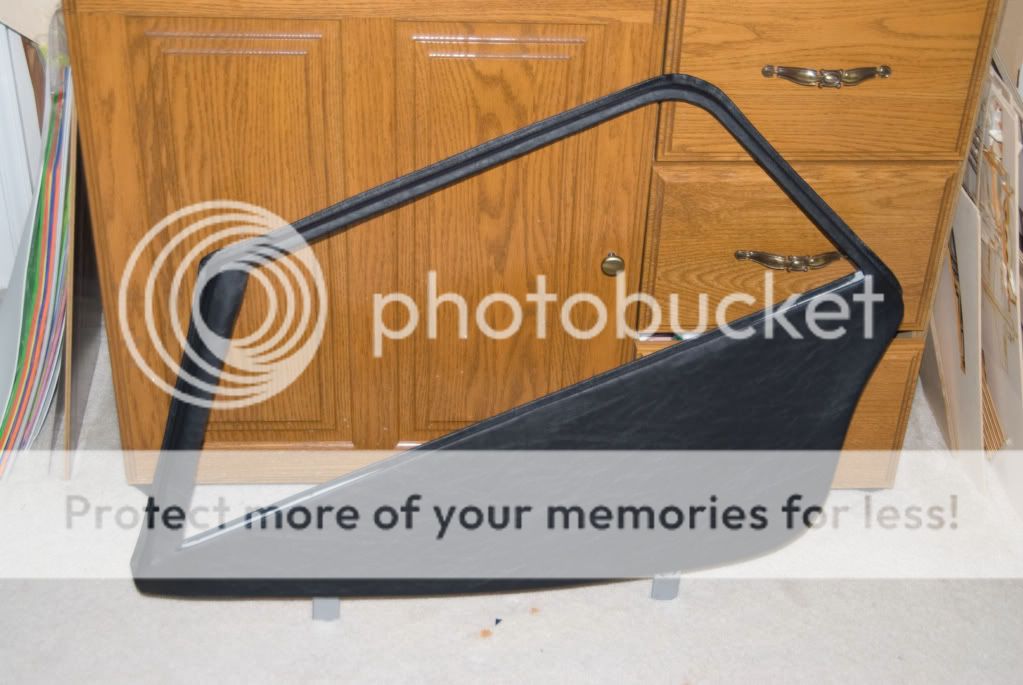
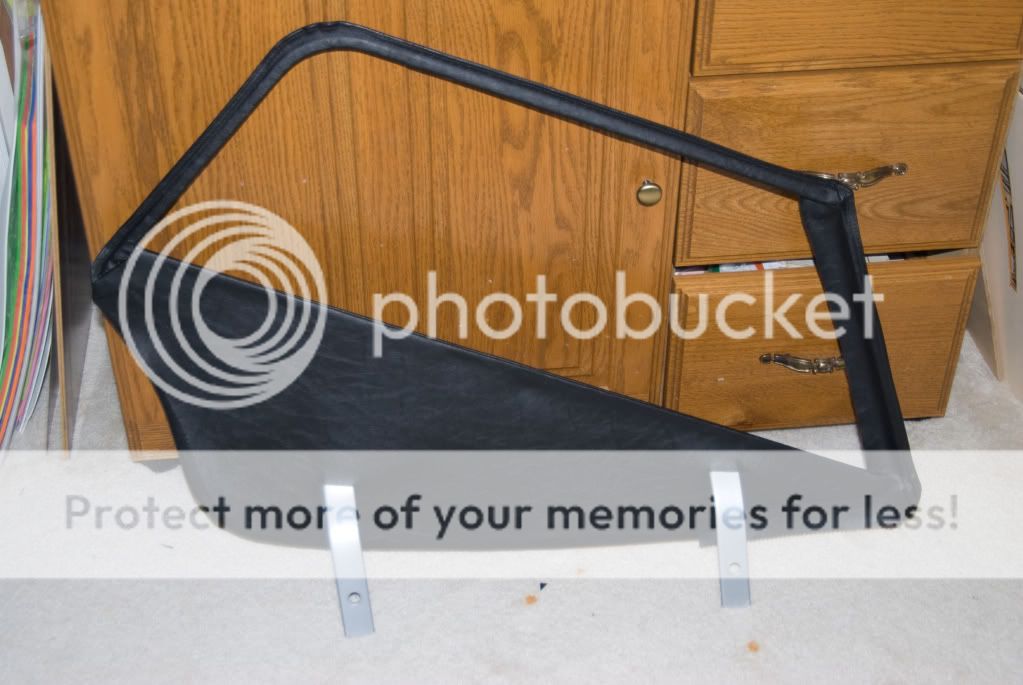
The gluing came next. I used c-clamps and paint mixing sticks to clamp the outer edges into place. I used Weldwood contact cement. This step is important, so the weather flap stretches to it's proper location on the inside edge of the frame. I still used the heat gun on the outside cover corners to make it easier to stretch the outer material into position.
The gluing was pretty easy. Trainig the dog to guard it while it dried took a bit longer.

Once the outer glue is dry...couple hours later, the clamps came off and I trimmed the edges of the material to about 3/8". This gets curled around the metal channel holder and glued inside. Here is the result.
The gluing was pretty easy. Trainig the dog to guard it while it dried took a bit longer.
Once the outer glue is dry...couple hours later, the clamps came off and I trimmed the edges of the material to about 3/8". This gets curled around the metal channel holder and glued inside. Here is the result.
OP
CJD
Yoda
Offline
Thanks Bill...the dog helped a lot...!?!
The forward edge of the window takes a little special attention. The stationary window gets sewn into this forward flap. To allow for this stitch, I measured back 1-1/2" from the frame and trimmed the material parallel to the frame. This leaves enough material to turn the edge under (both inside and outside cover) and then run a stitch through the window and both sides of the cover...7/8" back from the forward frame.
I will not attempt sewing the window stitch with the wife's machine. I like the car, but do not want to end up sleeping in it if I break her sewing machine. So, I'll get it ready to run the stitch and then take it to an upholstery shop to run the actual stitches. It's a 5 minute job with an industrial machine...so I don't expect they will charge more than a few dollars.

Here is a shot of the forward edge of the window. Of note is that the material is not touched for the first 1" back from the frame. It was then trimmed at a 45 degree angle up and away from the frame.

And here is the rear window corner for comparison. This corner is trimmed right to the frame corner, also at a 45 degree angle. It is then folded around the channel rail and glued to the inside. You can see how the material was stretched with the heat gun to get the weather flap in position at the inside edge of the frame.
The forward edge of the window takes a little special attention. The stationary window gets sewn into this forward flap. To allow for this stitch, I measured back 1-1/2" from the frame and trimmed the material parallel to the frame. This leaves enough material to turn the edge under (both inside and outside cover) and then run a stitch through the window and both sides of the cover...7/8" back from the forward frame.
I will not attempt sewing the window stitch with the wife's machine. I like the car, but do not want to end up sleeping in it if I break her sewing machine. So, I'll get it ready to run the stitch and then take it to an upholstery shop to run the actual stitches. It's a 5 minute job with an industrial machine...so I don't expect they will charge more than a few dollars.
Here is a shot of the forward edge of the window. Of note is that the material is not touched for the first 1" back from the frame. It was then trimmed at a 45 degree angle up and away from the frame.
And here is the rear window corner for comparison. This corner is trimmed right to the frame corner, also at a 45 degree angle. It is then folded around the channel rail and glued to the inside. You can see how the material was stretched with the heat gun to get the weather flap in position at the inside edge of the frame.
OP
CJD
Yoda
Offline
So, while I wait for my channel...I'll summarize how to cover one of these side screens.
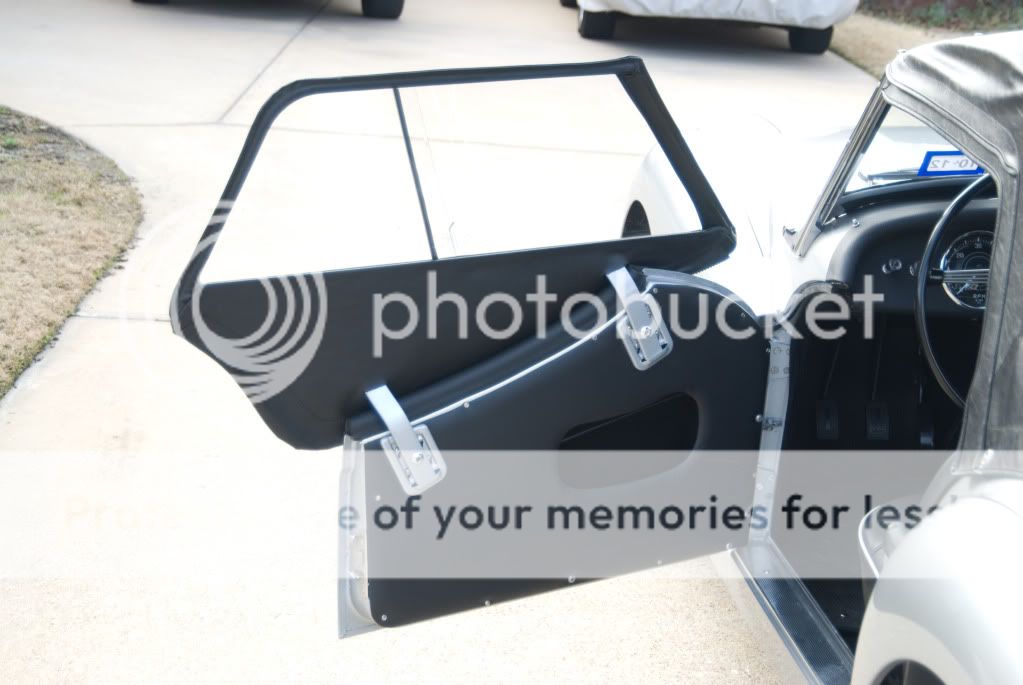
1). Remove the old cover and massage the bare frame to fit the door/windscreen/hood. It should touch the door and quarter panel the whole way around. Now is the time to locate and screw in the mounting plates to the door in the proper locations.
2). Strip, prime and paint the frame.
3). Trace the outer cover using the frame as a template. Trace the outside edge of the entire frame, and also trace the inside edge of the window opening. Trace a line 1/2" larger than the frame around the window. Trace another line 1/4" larger than the frame around the lower part of the frame. At the front and rear, taper these outer lines together. Cut out to the outermost line you drew.
4). Trace and cut the inner cover to match the exact size and shape of the outer cover. This CAN be done as a single piece. The factory used three separate pieces, apparently to make more efficient use of the material. If you use 3 pieces, allow enough edge to sew them together.
5). Cut the splash flaps and snap straps.
6) sew the splash flaps to the inner cover. Sew the 3 pieces of the inner cover together, using the outer cover as a template. Mark and cut slits for the screen mounting arms.
7). With both covers vinyl to vinyl, run a stitch around the outermost line you drew to sew them together. Use max tension on a 4.5 mm straight stitch.
8). Turn the "bag" you just made right side out. Run a seam around the window opening 1/8" from the outer edge. Run a second stitch 1/4" from the edge...taper this stitch into the 1/8" stitch at the front and rear of the window opening.
9) Install the bag on the frame. Trim, stretch, and glue into place...not necessarily in that order.
That gets us up to the window installation...stay tuned....
John
startech47
Jedi Knight
Offline
It's not sewing, it's upholstering.
DNK
Great Pumpkin
Offline
So?startech47 said:It's not sewing, it's upholstering.
HerronScott
Darth Vader
Offline
That is beautiful. Very nice work.
Scott
Scott
Fantastic work, John, and thank you very much for sharing your experience with the detailed guide.
I am now in the steps prior to sewing the two sides of the cover together, and what puzzles me is how to best produce the edge (rim or water excluder upstand) along the window. This is why I have studied your instructions and have some questions, to see if I understood correctly:
In step 3), you mention:
Now in step 7):
And in point 8):
As I mentioned in a previous post, can send to you an instruction sheet for assembling the windows together, with some useful hints.
Jesus
I am now in the steps prior to sewing the two sides of the cover together, and what puzzles me is how to best produce the edge (rim or water excluder upstand) along the window. This is why I have studied your instructions and have some questions, to see if I understood correctly:
In step 3), you mention:
---Let´s call this line A.CJD said:3). Trace the outer cover using the frame as a template. Trace the outside edge of the entire frame, and also trace the inside edge of the window opening.
---Let’s call this second line, B.CJD said:Trace a line 1/2" larger than the frame around the window. Trace another line 1/4" larger than the frame around the lower part of the frame. At the front and rear, taper these outer lines together.
---That is along line B, I presume.CJD said:Cut out to the outermost line you drew.
Now in step 7):
<span style="font-weight: bold">Should this stitch be run along line A or B?</span>CJD said:7). With both covers vinyl to vinyl, run a stitch around the outermost line you drew to sew them together. Use max tension on a 4.5 mm straight stitch.
And in point 8):
I assume that these two stitches on the right side are for creating the water excluder rim along the window.CJD said:8). Turn the "bag" you just made right side out. Run a seam around the window opening 1/8" from the outer edge. Run a second stitch 1/4" from the edge...taper this stitch into the 1/8" stitch at the front and rear of the window opening.
As I mentioned in a previous post, can send to you an instruction sheet for assembling the windows together, with some useful hints.
Jesus
OP
CJD
Yoda
Offline
Eureka...found the proper channel! But back to that in a second.
Hey Jesus,
I see why I confused you. I was a bit off. You are correct in cutting completely around your line "B". That is where my instruction went off...
The first stitch is 1/8" inside the cut (line "B") for the portion around the window, but, along the lower frame the stitch should be exactly along the line "A". The point where your transition this stitch from "A" to "B" is at the front and rear most corners of the frame. Just make a smooth curve as you stitch around those two corners.
Finally, you are correct in your interpretation of step 8).
Thanks for offering the instructions, but I managed to complete the screens this morning. Maybe if someone else knows how to include .pdf's, we can post it for anyone else that tackles this job.
So, back to the channel. I recieved the samples from Restoration Specialties (814-467-9242), but none of them matched. I decided to take the front window to a trim shop to have it sewn...they did it while I waited for $20. It only took about 5 minutes, boy I wish I had an industrial machine like he has! Anyway, I asked him about the channel, and he directed me to the same upholstery supply that I used to order the material from Robbins. They had it in stock!
It turns out the channel we need is listed as "5P" on page 9 of the Restoration specialties Catalogue. The catalogue is available as a pdf online. You need two sticks of at least 72".
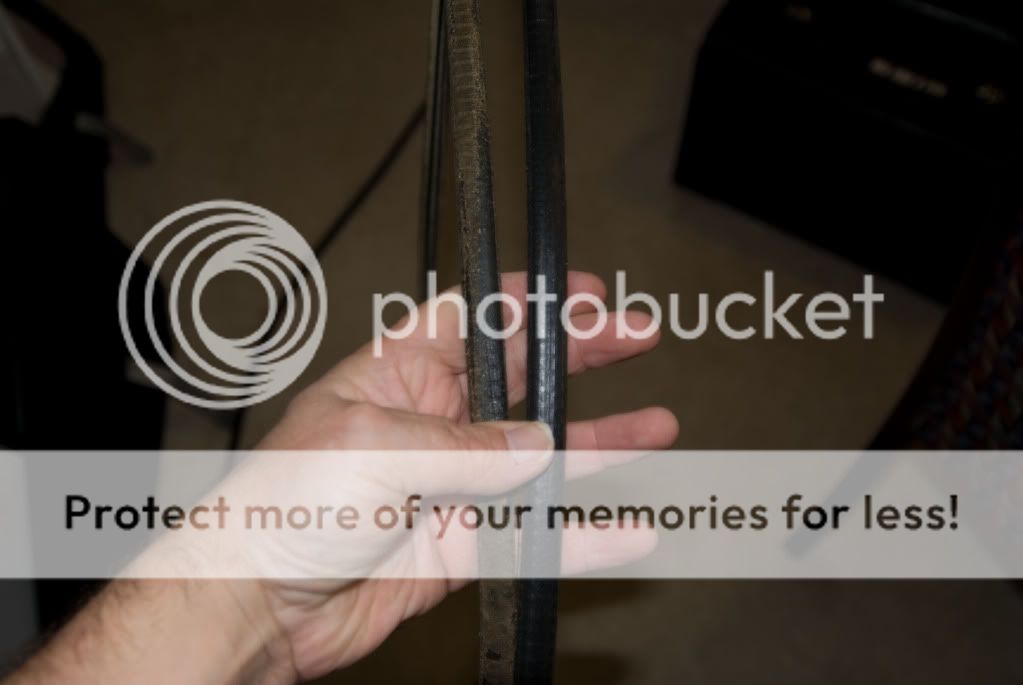
Here is a comparison of the old and new channels. The "5P" is an identical match.
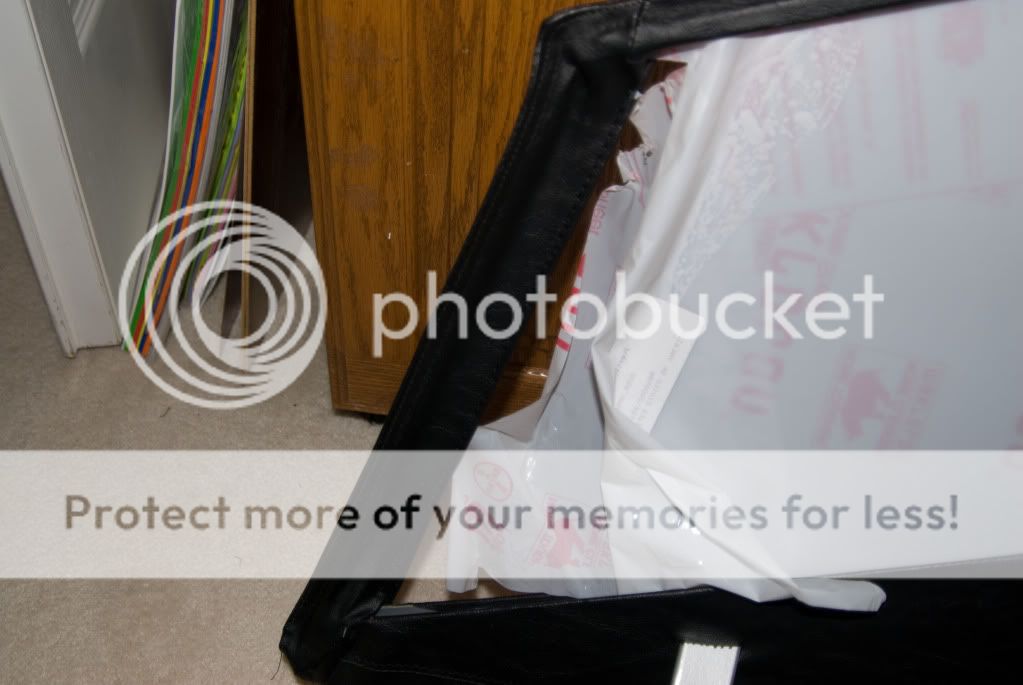
This is the front window after being stitched by the local trim shop. I left the protective paper on, but pealed it back to expose the front edge that gets sewn. The shop had to use some contact cement to keep the edge of the vinyl folded properly as he stitched. IMPORTANT! make sure the rubber seal on this front window is to the inside. I had it backwards, but caught my mistake right before he started the stitching. It is easy to get turned around working on these!

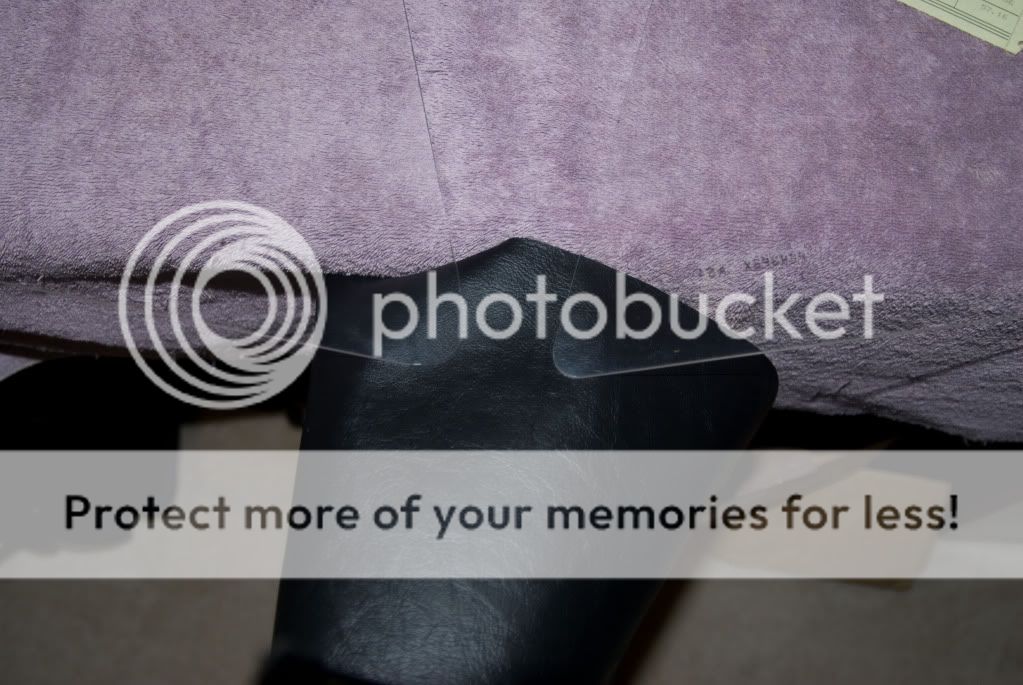
The channel tucks into the frame pretty tightly. I used a small putty knife to coax it into position. I found it easiest to start at the bottom front, and work my way around the frame to the top front. I trimmed the excess at that point using tin snips.
Here is the only difficulty I had in installing the rear window. When in place, the window angle at the rear was off just a few degrees, so it did not close all the way at the top. Also, the sharp angle at the lower rear corner was too sharp. I had to trim the angle on a mitre saw, and sanded the radius a little larger. When finished it slides easily and closes completely.
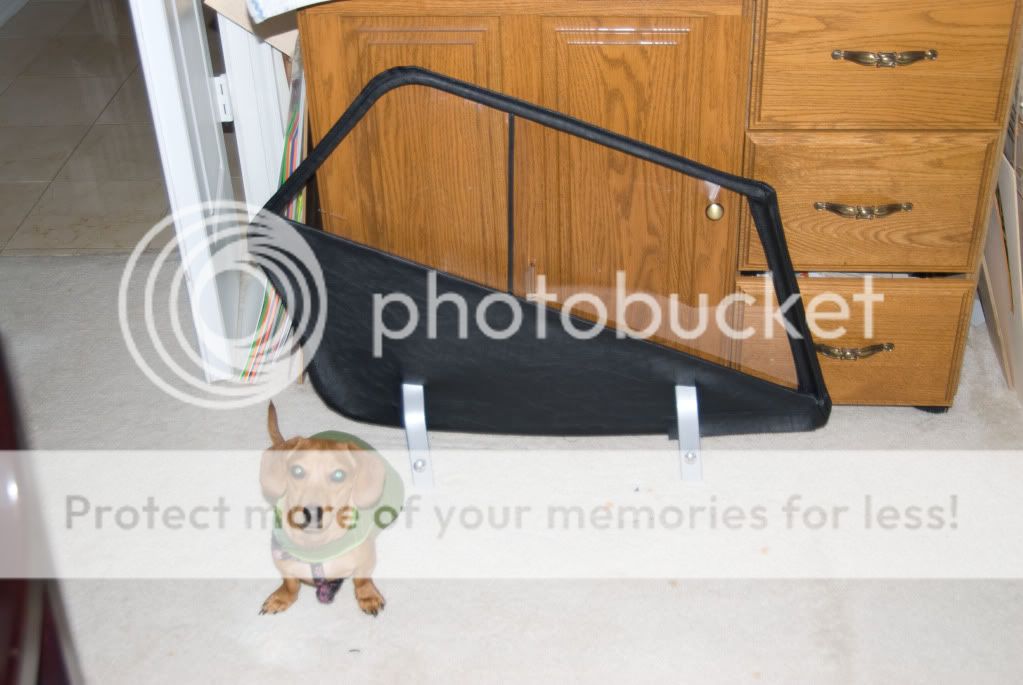
And here is the completed assembly. The channel and window took about 5 minutes per side. The final step was installing the dzeus fasteners with new retaining washers. All window hardware came from TRF. And, yes, Lollipop thinks she did the whole thing.
The cost breakdown looks something like this:
Vinyl from Robbins (1-1/2 yd) - $44.96
Channel from Up supply - $52.15
Windows, dzeus washers from TRF - $135
Sandblast sand - $5
Thread from JoAnne's - $5.50
Outside window stitching - $20
Paint - leftover from bodywork
Total - $262.61
Reward from dong an "inside job" in winter - Priceless!!
The only thing left is the snap strap, but I haven't decided if I even want to add it...I'll update later if I decide to. I'll get some pics on the car when the weather gets better.
My next "How Too" will be wire wheels...
Hey Jesus,
I see why I confused you. I was a bit off. You are correct in cutting completely around your line "B". That is where my instruction went off...
The first stitch is 1/8" inside the cut (line "B") for the portion around the window, but, along the lower frame the stitch should be exactly along the line "A". The point where your transition this stitch from "A" to "B" is at the front and rear most corners of the frame. Just make a smooth curve as you stitch around those two corners.
Finally, you are correct in your interpretation of step 8).
Thanks for offering the instructions, but I managed to complete the screens this morning. Maybe if someone else knows how to include .pdf's, we can post it for anyone else that tackles this job.
So, back to the channel. I recieved the samples from Restoration Specialties (814-467-9242), but none of them matched. I decided to take the front window to a trim shop to have it sewn...they did it while I waited for $20. It only took about 5 minutes, boy I wish I had an industrial machine like he has! Anyway, I asked him about the channel, and he directed me to the same upholstery supply that I used to order the material from Robbins. They had it in stock!
It turns out the channel we need is listed as "5P" on page 9 of the Restoration specialties Catalogue. The catalogue is available as a pdf online. You need two sticks of at least 72".
Here is a comparison of the old and new channels. The "5P" is an identical match.
This is the front window after being stitched by the local trim shop. I left the protective paper on, but pealed it back to expose the front edge that gets sewn. The shop had to use some contact cement to keep the edge of the vinyl folded properly as he stitched. IMPORTANT! make sure the rubber seal on this front window is to the inside. I had it backwards, but caught my mistake right before he started the stitching. It is easy to get turned around working on these!
The channel tucks into the frame pretty tightly. I used a small putty knife to coax it into position. I found it easiest to start at the bottom front, and work my way around the frame to the top front. I trimmed the excess at that point using tin snips.
Here is the only difficulty I had in installing the rear window. When in place, the window angle at the rear was off just a few degrees, so it did not close all the way at the top. Also, the sharp angle at the lower rear corner was too sharp. I had to trim the angle on a mitre saw, and sanded the radius a little larger. When finished it slides easily and closes completely.
And here is the completed assembly. The channel and window took about 5 minutes per side. The final step was installing the dzeus fasteners with new retaining washers. All window hardware came from TRF. And, yes, Lollipop thinks she did the whole thing.
The cost breakdown looks something like this:
Vinyl from Robbins (1-1/2 yd) - $44.96
Channel from Up supply - $52.15
Windows, dzeus washers from TRF - $135
Sandblast sand - $5
Thread from JoAnne's - $5.50
Outside window stitching - $20
Paint - leftover from bodywork
Total - $262.61
Reward from dong an "inside job" in winter - Priceless!!
The only thing left is the snap strap, but I haven't decided if I even want to add it...I'll update later if I decide to. I'll get some pics on the car when the weather gets better.
My next "How Too" will be wire wheels...