• Hi Guest!
    You can help ensure that British Car Forum (BCF) continues to provide a great place to engage in the British car hobby! If you find BCF a beneficial community, please consider supporting our efforts with a subscription.

    There are some perks with a member upgrade!
    **Upgrade Now**
    (PS: Subscribers don't see this gawd-aweful banner
Tips
Tips

TR2/3/3A Windshield difficulties

Dr_Mike

Jedi Hopeful
Country flag
Offline
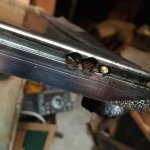
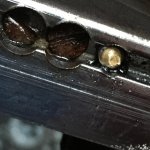
1.. I sheared off the lowest screw holding the windshield frame. I had hoped to attack it from the back by removing the corner bracket but it looks as the the miscreant screw will hold that up.. The flathead screws are pretty rusty to and i have soaked them with penetrant.. Ideas? Experience?

2. the lower seal is pretty messed up too. Any ideas how to get it off ( and replace it!).
 

Attachments

  • IMG_1855.jpg
    IMG_1855.jpg
    71.4 KB · Views: 260
  • IMG_1856.jpg
    IMG_1856.jpg
    80.3 KB · Views: 269
IMO a hand impact tool is your best bet for the other two; but it may snap them off too. Start out with fairly gentle taps on the tool, and work your way up gradually. You may have to create a custom bit for it. Here's a shot of one I made to get an antique tractor carburetor apart (and it worked great)
ledTVH3.jpg


For the broken one, I would probably try to center punch it as close as possible to the center. I'm not certain, but there might be enough hole exposed to use a "transfer punch" to hit center.
https://kk.org/cooltools/transfer-punche/

Then drill it out in small steps, stopping either when you can see threads in the hole or there is just a thin shell of the bolt left in the threads. Then break the remainder apart with a dental pick. With luck, you can save the hole.

If not, it is possible to make, in effect, a thread repair insert. I used a SS bolt in 1/4-28, drilled and tapped to suit (in my case, it was 2BA for a Tenax stud, but I think yours might be 10-32 instead), and held in a split nut so I could cut it off to length. Kind of tricky working with such a small piece, but it came out great.
 
Not for me. They almost always snap off for me, which leaves a much worse problem. The original bolt is soft enough to drill, but not an easy out!

Assuming of course that it snapped in the first place because the threads were stuck, rather than being overloaded or over tightened.
 
I would suggest ordering the kit with the 2 brackets and screws and you will see how short the screws are and how small the bracket is and the shape. I would keep juicing them up and try some of the suggestions. I never thought of a small impact wrench or a drumle – my first thought was a left hand drill bit, but that is like the easy out it could break and give problems.
 
Slot with a dremel and try a flat blade screwdriver?
I think that is the first step. Thin Dremel discs are not available in the boonies, but I got some from a Model Railroad friend. Lots of penetrant too, which i shpuld have used in the first place.

Sceond bet is to drill out the bolt as much as I can without hitting the glass.. Wish me luck!

And thank you all for the suggestions..
Dr. Mike
 
lAttempt to sot and turn screw were not successful: a combination of less than perfect eyesight, caution ( about my eyes) and the fact that the dang screw is well and truly stuck. Next is to try to drill it out and clean the threads.
Cannot loosen the screws holding the corner brace either. Patience! I don't need to change it unless I have to get to the other side of the Screw.
 
Something I mean to get are left handed drill bits, for just your situation. As you drill out the old bolt there is a much more likely chance of it unscrewing itself if you are drilling CCW. I have not chimed in here as this is about as bad as a broken bolt gets. The frame is brass, and the bolt likely steel, so you are attempting to drill a harder bolt than the surrounding material. There is no "sure fire" way of getting it out.

Once the dust settles, you are likely to have a very ugly hole, much bigger than the bolt size. At any decent bolt supply store (or Amazon) you will be able to buy an insert to make the hole useable again.
 
I like the left handed drill bits also. What you might try if things fail is a cone shaped dermel bit because all you really need is the cone off the end of the screw ground away and the frame will separate. It is kinda delicate work, but with light magnifier, you should be able to see the screw as it grinds away before you dig into the brass. If you get most the screw head ground away, you should be able to pick around what is left behind and slide the frame over. Or, a cone shaped rotary/dermel file in a drill motor might be easier to control plus I would start small and work up. I would do the CCW drill bit first.
 
Thank you John and?(sp53). Sorry, forgot your name!

The good news is that the offending screw is brass too, so it should not be too too difficult to get ou. I suspect it is cross threaded (we will never know), and that I will in any case expect an ugly hole. I am worrying about the glass and may indeed have to disassemble the corner, but , of course, the two stubby screws that hold the bracket in are also solid and they too would have to be ground away.

I have an engineer coming round this morning. He lives just up the road so no problem, and I shall see what he has to say. My go-to machinist is leaving town at the end of the month so I am reluctant to recruit him in the middle of packing. I shall see if I can get a small CCW bit here.
Getting g a bit chilly outside but the rear lights are coming together: using an LED kit so I can be seen. 2 stripped captive nuts replaced, etc.
 
Hmm, just for clarity, this is the kind of impact tool I was talking about.
41A8wmXqO2L._AC_SY400_.jpg

https://www.amazon.com/Lisle-29200-Hand-Impact-Tool/dp/B0002NYDRG

It seems to work better for slotted fasteners, I think because the impact both drives the bit into the slot and also puts pressure into the bolt as well as twisting it.

Mine uses 5/16" hex bits, so a 5/16" Allen wrench makes good stock for grinding your own bits.
 
So the brass screw drilled out quite easily (which is more than can be said for the tooth I had removed today) and there was an intact threaded stub that came out too. The threads are quite visible, but i cannot persuade a screw to enter . I shall get hold of a suitable die to clean them, or taper the hole with my Dremel and a cone. Resting now from the dentist's exertions.
 
... The threads are quite visible, but i cannot persuade a screw to enter . I shall get hold of a suitable die to clean them, or taper the hole with my Dremel and a cone. Resting now from the dentist's exertions.

Be careful, if it's the screws that I'm thinking of, the threads are most likely BA (British Association). Very similar in size and pitch to UNF, but not the same. Both pitch and thread angles are different. You'll find that a lot of screws smaller that 1/4" on the TR are BA.

https://britishfasteners.com/threads/
 
So I had to grind off the heads of those tiny screws, and realized I had gone too far and the corner brace still would not budge. It was wedged in solidly by rust and I had to pry it out. Now I can slide the top seal in (done with Dawn as lubricant) and have only (!) to remove and clean the glass and reinsert it with the glazing strip ( from TRF)and this job will be done. Any tips for inserting the glass into the frame???

As an aside:- there were extra holes in the frame that had been sealed up with even smaller screws. It looks as though someone had made a mistake in the factory and they just plugged them . Photo to follow! One was a pain as it stuck up slightly and interfered with the top seal.

Onward!
 
There are several You tube videos about putting the glass into the frame. Tush used electrical tape instead of the glazing strip. I used the TRF glazing strip . The method used was to do this on a hot day ( easy to do in Redding), it was 95 degrees or better and I did this standing in the sun. It could be that a heat gun could be used instead to get the glazing strip "pliable". I did trim back the glazing strip at the corners to get rid of extra material. And used masking tape to keep the glazing strip in place on the windshield ( like shown in the one you tube video) I then used hand pressure and eventually a hand clamp that I got from H.F. to get in in the last bit. The clamp was one that has a hand ratchet. So does not apply extreme pressure like a screw clamp might. I worked the clamp back and forth getting only small increments at a time. I had read where a clamp was used and broke the windshield, so was careful to keep the pressure down.
In hindsight I think that having the glazing strip pliable with the "heat" was a big factor.
 
Thank you. We are expecting 80-85 degrees early next week and I do have a heat gun to help. I will look out You Tube videos before i start.
 
Charley... can you give me a youtube link? I am having trouble finding anything relevant.... they are all modern and generic.
Thanks again
 
Back
Top