• Hey there Guest!
    If you enjoy BCF and find our forum a useful resource, if you appreciate not having ads pop up all over the place and you want to ensure we can stay online - Please consider supporting with an "optional" low-cost annual subscription.
    **Upgrade Now**
    (PS: Subscribers don't see this UGLY banner)
Tips
Tips

AH 3000 front shock mounting bolts

familyowltree

Freshman Member
Country flag
Offline
Enlighten me as to the bolt size for mounting original front shocks to the shock towers on the BJ8. Any helpful hints on installing helicoils at this location would be helpful. The engine is in the car. Thanks
 

BigGreen

Jedi Warrior
Silver
Country flag
Offline
From Mechanical service parts list AKD 3523 Page MK5

HZ S0608 Hex hd screw
ZincDia ; 3/8
Length ;1

Springwasher under the head
 

Brinkerhoff

Jedi Knight
Offline
Its a std. 3/8" x 24 tpi NF thread. Have you done a Heli- Coil repair ? Using the proper size drill bit and being able to squarely drill , tap and install the Heli-Coil are key. It will say what drill bit to use on the repair bottle. Work very cleanly and carefully , if you mess up the installation of the Heli-Coil and can't remove it , its time to cut the shock mount plate off and replace it.
Kevin
 

Keoke

Great Pumpkin
Country flag
Offline
Why use helicoil.
Cut access holes in the side of plate. Then using the bolt add new nuts to the back of the old stripped ones and weld n place. Front end alignment remains correct.
--OR Have the damaged plate replaced in an alignment shop.
 

Patrick67BJ8

Obi Wan
Silver
Country flag
Offline
Why use helicoil.
Cut access holes in the side of plate. Then using the bolt add new nuts to the back of the old stripped ones and weld n place. Front end alignment remains correct.
--OR Have the damaged plate replaced in an alignment shop.
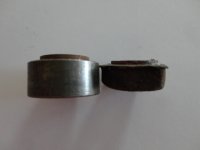
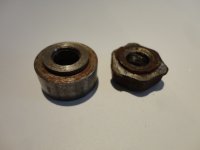
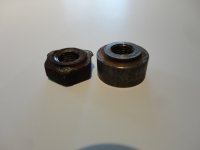
This is what I did to repair a stripped nut on one of my front shock plates. I cut open the side of the shock plate with a dremel tool and then pryed it open and with a small bit of grinding from the top I was able to remove some of the weld and then with a bolt screwed into the stripped nut I was able using a hammer tap out the stripped nut. I had the taller "round nut" made and then installed it and welded it to the shock tower plate. I ground off the plate weld smooth, closed up the plate side and welded it, primed the plate and then painted it. No more loosened bolts for over 30 years til I had a new frame made.
 

Attachments

  • DSC02692.JPG
    DSC02692.JPG
    114.8 KB · Views: 118
  • DSC02693.JPG
    DSC02693.JPG
    124.8 KB · Views: 123
  • DSC02694.JPG
    DSC02694.JPG
    114.4 KB · Views: 112
OP
F

familyowltree

Freshman Member
Country flag
Offline
Thanks for your help. I have used helicoils before and am very comfortable with their dependability. I am not a welder so welding would add another step. I will reassemble with a flat washer and then lock washer which should disperse the pressure on the alloy shock base and reduce the potential for recurring issues. Any other advise...Loctite? Thanks again for your help.
 

steveg

Yoda
Gold
Country flag
Offline
Enlighten me as to the bolt size for mounting original front shocks to the shock towers on the BJ8. Any helpful hints on installing helicoils at this location would be helpful. The engine is in the car. Thanks

Previous to my ownership, 3 or 4 10mm bolts were installed in place of stripped 3/8" bolts. They have never loosened in the 14 years I've owned the car.

I'd argue for tapping the holes for 10mm. If it works out, it's easy, if not you're no worse off than the other suggestions. Grade 8.8 metric bolts are similar to SAE grade 5.

I've been using belleville washers rather than split-rings. Have heard comments both ways on loctite or not - blue would be best.

Just my 2$ worth (accounting for inflation ).
 
Country flag
Online
Thanks for your help. I have used helicoils before and am very comfortable with their dependability. I am not a welder so welding would add another step. I will reassemble with a flat washer and then lock washer which should disperse the pressure on the alloy shock base and reduce the potential for recurring issues. Any other advise...Loctite? Thanks again for your help.

Install the helicoil(s), use grade 8 flatwashers--to increase the overall clamping force as you suggest--apply blue threadlocker to threads and torque to 35lb-ft.
 

vette

Darth Vader
Country flag
Offline
Hi Owltree, Here's my 2 cents. As Keoke mentioned, I cut the outside vertical edge out of the shock mount plate. Then with a sharp chisel i knocked what was left of the captured bolts out of the openning and got them out of the way. I cut a piece of 3/8 in steel plate to slide into the openning under the shock mounting surface. I set the shock in place where it belonged and used a "centering" punch to mark the exact center of the holes with a dimple into the 3/8 plate. Pulled the plate out and drilled and tapped it. Put the plate back in, set the shock back in place, dropped the bolts into place and tightened them up. It pulls the 3/8 plate tight to the underside of the shock mounting plate and the alighnment is as good as it was. :smile: Then to close up the slot from removing the vertical side, I welded it back into place and painted it. can't even tell that 3/8th plate is in there. You could get someone to bring their Mig over to just weld that little side edge back on. Good Luck, Dave
 

BoyRacer

Jedi Warrior
Country flag
Offline
Use a Heli-coil. It's not rocket science and they work great. Just follow the directions. We racers use them all the time.
 
Country flag
Online
Is it usually possible to run the heli-coil tap into the stripped hole, or does the hole have to be drilled out?

To properly install a Heli-coil--or similar thread insert--you should drill first; though I suppose you could ram the tap through. I'm guessing a) you don't have the oddball (25/64" ?) drill bit required, or b) are thinking you can't position a drill vertically over the hole. I used one of these to drill: https://www.harborfreight.com/38-in-90-angle-drill-attachment-69337.html and installed the coil as usual; it's held for many thousands of miles.
 

steveg

Yoda
Gold
Country flag
Offline
To properly install a Heli-coil--or similar thread insert--you should drill first; though I suppose you could ram the tap through. I'm guessing a) you don't have the oddball (25/64" ?) drill bit required, or b) are thinking you can't position a drill vertically over the hole. I used one of these to drill: https://www.harborfreight.com/38-in-90-angle-drill-attachment-69337.html and installed the coil as usual; it's held for many thousands of miles.

Thanks, Bob - I ordered a similar right-angle adapter and a stubby 13/32" drill bit from Amazon; after reviewing some YouTube videos it was apparent the hole always needs to be drilled.

My drill is different because my stripped bolt is an M10 x 1.5.
 

steveg

Yoda
Gold
Country flag
Offline
I've taken to applying red threadlocker to the (outside) of the coil.

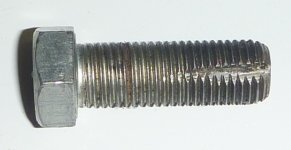
One of the Heli-Coil YouTube videos recommended chasing the dried Loctite out of the inside of the coil with a chasing tap. I've used bolts as chasing taps by grinding a sharp-edged groove in each side.

Don't expect any loosening with the Nord-Lock washers. Don't think there would be any problem with the Heli-Coil backing out if the bolt doesn't rotate.

BoltChaser.JPG
 

Chris_Masucci

Senior Member
Offline
Helicoils are great if there is enough meat left in the metal to retain strength. I don't see that in this repair though. Those welded nuts may not be that thick (cylindrically) to begin with, and although I understand many have done it with success, I would not. I still feel the best solution is to replace the whole thing with one adjustable for camber OR replace the stripped nuts with a tapped piece of flat steel plate, which also spreads the load and reduces chances of loosening.
 

steveg

Yoda
Gold
Country flag
Offline
Have decided to follow Dougie's and Vette's advice and go for the metal plate (from Tom's Toys). On removal of my right front shock, besides one stripped captive nut, the other outboard nut is partially stripped.

In addition, my right-angle drill with stubby bit is still too tall to drill straight into the hole, so I'm going to pass on the helicoil.

Will have process photos on my gallery when the work's done.
 
Similar threads
Thread starter Title Forum Replies Date
Z 3000 Front Wheel Bearings Austin Healey 3
maxwedge5281 Front Shroud Differences: 3000 vs. BJ8 Austin Healey 5
maxwedge5281 Wanted wtb....bn6,3000 front shroud Austin Healey Classifieds 10
C Wanted 3000 Front Disc Brakes Austin Healey Classifieds 4
BoyRacer front shroud templates for 3000 Austin Healey 4
D AH 3000 Front hood crack Austin Healey 2
G Correct location of front turn signal on bj8 3000 Austin Healey 3
H Wheight front shroud Austin Healey 3000+transport Austin Healey 18
rjc157 3000 front splash guard Austin Healey 9
coj 1960 Healey 3000 front and rear brakes Austin Healey 2
AUSMHLY AH 3000 Mk II front badge on boot Austin Healey 12
W Front Grill Replace 3000 Austin Healey 6
O 1960 Healey 3000 BN7 front hood/bonnet Austin Healey 2
S Wanted WTB: 3.5 ratio diff/pumkin for '67 BJ8 Healey 3000 Austin Healey Classifieds 0
E For Sale Austin Healey 100 and 3000 parts Austin Healey Classifieds 1
R 3000 Heater Valve Austin Healey 4
E For Sale Driver quality 1963 Healey 3000 mark 2 Austin Healey Classifieds 1
kodpkd For Sale Alloy valve cover for AH 100-6 3000 PRICE DROP! Austin Healey Classifieds 1
S SOLD!! For Sale 1964 AH 3000 MkIII BJ8 Phase 1 Austin Healey Classifieds 2
Bruce 3000 Rally Grille Installation Austin Healey 5
J 3000 Rear Seats Austin Healey 6
dougie 1960 Austin Healey 3000 Works Lightweight vs. 1962 Ferrari GTO Austin Healey 6
S Wanted Used Austin-Healy 100/100-6/3000 Restoration Guide By Gary Anderson And Roger Moment Austin Healey Classifieds 14
Cutrog1 For Sale Healey 3000 BJ8.... a restoration saga Austin Healey Classifieds 0
H Lucas Starter Model for 3000 Mark II, BT7 Austin Healey 3
M Engine Stand for 3000 Motor Austin Healey 7
D Healey 3000 BT7 rear panels Austin Healey 0
BoyRacer Mystery 3000 Engine Block Austin Healey 2
Scotsman Rack and Pinion Conversion for 3000 Austin Healey 7
A For Sale 1966 3000 Healey Blue BJ8 Austin Healey Classifieds 3
Zitch SOLD!! SOLD - Tri-Carb Exhaust manifold for a 3000 Austin Healey Classifieds 0
AUSMHLY For Sale - 1990 Big Healey, 3000 MK3, HMC Mk4 Austin Healey 2
Zitch For Sale AH 3000 Engine For Sale: $2500 Denver, CO area Austin Healey Classifieds 0
C Rough-Running 3000 Austin Healey 29
E 3000 Healey Door Checks Austin Healey 1
R Wanted Looking for an original AH 3000 Mk1 Drivers Manual 1102B. Austin Healey Classifieds 1
B Austin-Healey late 3000 BJ8 Electrical Diagram Austin Healey 1
B Austin-Healey early 3000 BJ8 Electrical Diagram Austin Healey 0
B Austin-Healey 100-6/3000 Electrical Drawing Austin Healey 2
E Wanted wanted Austin healey 3000 adjustable steering wheel & dash pad Austin Healey Classifieds 2
Editor_Reid In Search Of: AH 3000 BT7L 8921 Austin Healey 0
Guido36 Custom-Bodied Austin-Healey 3000 Coupe Austin Healey 17
D Wanted: Healey 3000 MkIII body and chassis Austin Healey Classifieds 0
BoyRacer Engine Swap: 3000 Engine Into a BN1 Austin Healey 25
S Grill cowl top piece for AH 3000, BT7, $65 Austin Healey Classifieds 0
Guido36 Healey 3000 cutaway display engine Austin Healey 12
pbraun For Sale Healey 3000 transmission Austin Healey Classifieds 8
O HD8 carb on Healey 3000 Austin Healey 62
S For Sale 3000 BJ8 Laycock 4 speed with 22% OD trans & 2 6 cyln engines / long blocks / BUNDLE Austin Healey Classifieds 1
S For Sale Austin Healey 100-6 and 3000 Factory Service Manual on CD/ROM. Austin Healey Classifieds 0

Similar threads

Top