"What we lack in genius is sometimes made up for by imagination"
 A photo of the most basic alternative valve installed on a B-series engine in an MGB. This alternative valve was created almost 12 yrs ago, and as you will see, many other contributors have refined it from the rather crude unit you see in these photos of my original valve. A photo of the most basic alternative valve installed on a B-series engine in an MGB. This alternative valve was created almost 12 yrs ago, and as you will see, many other contributors have refined it from the rather crude unit you see in these photos of my original valve.
You can see that it provides some better access to the area around the distributor, a bonus, and it also can be "aimed" for a better, stress free connection to the inlet hose.
Other valves have been used, many from other cars, and often because they offer some sort of mounting for a cable connection to control the valve. Altho these generally work well also, they often involve finding or fabricating some sort of L-shaped hose connection that fits in place of the OE valve base and finding hose splices to match up dissimilar hose sizes. Altho this valve is not very pretty, it does get around these problems and because this valve's design was engineered for hot water boilers and similar uses, it is quite resistant to the leakage and corrosion associated with automotive coolants.
If a cable connection is important to you, please see the discussion a bit further below for instruction on how to do this. It is not hard to do and within the capabilities of most shadetree mechanics.
 My original finished basic alternative valve. You can see all the parts required, and can gauge for yourself if it is something you could live with. It is obviously NOT for purists, but those who have daily drivers can find it delivers better results than most of the OE style aftermarket heater valves we have had available to us in recent years. My original finished basic alternative valve. You can see all the parts required, and can gauge for yourself if it is something you could live with. It is obviously NOT for purists, but those who have daily drivers can find it delivers better results than most of the OE style aftermarket heater valves we have had available to us in recent years.
What you see here is the application of my experiences with industrial boilers. As it has turned out, these valves with their stainless steel ball valves and teflon seals have proven to be at least as reliable as the OE valve and I have had many reports from those who have done this conversion who verify the claim that they have gotten more heat and better and leak free service from their units. Until we can find a consistent source of reliable, well made, and equally effective OE style valves, this has proven to be a reasonable alternative for everyday use.
*****************************************************************************

Then you might want to consider this alternative heater valve for BMC B-Series engines.
YOU WILL NEED:
Your old heater valve body (the lower, casting part, cut off as shown below).
 (BTW, note the variable quality of these castings, a likely indicator of overall quality?? You decide.) (BTW, note the variable quality of these castings, a likely indicator of overall quality?? You decide.)
1/4" pipe thread tap
1/4" tapered pipe thread reamer
7/16" metal twist drill
2 - 1/4" stubby brass pipe nipples threaded both ends, about 1" total length
1 - 1/4" brass right angle connector elbow
1 - 1/4" brass bodied/ stainless steel ball/ teflon sealed Ball Valve, lever type, 1/4" pipe thread fitting, I.D. = 13/32" or larger.
1 - Brass hose connection - 1/4" pipe threads on one end, and fit for 1/2" I.D. hose on the other end.
**Some Teflon pipe sealing tape or paste to seal up all joints. **A new heater valve to head gasket or make your own.
~ ~ ~ ~ ~ ~ ~ ~ ~ ~ ~ ~ ~ ~ ~
Making the Valve:
1.) Take the old heater valve, and cut off the base using a hacksaw. Cut it off right at the point where the base pedestal flares out into a funnel-shape. Be careful to cut it off as square as possible and then to file or grind off all rough burrs and edges. This will leave a pedestal that is about 1 1/4" high from the bottom of the mounting flange to where you will add the other components.
2.) You will next need a 1/4" pipe thread tap and a 7/16" drill bit for drilling out the interior passageway of the base to accomodate the tap. You are going to reuse the existing coolant passage but you have to drill it bigger first for the tap. You will find that it is easiest to drill this passageway if the base can be held in a vise on a drill press. If you don't have a drill press, just put the base in your bench vise or hold it with C-clamp and the drill should go through fairly easily. Just drill all the way through. When the drilling is done, finish the hole by reaming it with the tapered pipe thread reamer as this will prevent the base casting from fracturing and the pipe tap from binding when you attempt to thread it in the next operation.
3.) Tap the hole at least 1/2 way down using some lube as you cut the threads. When done, clean it all up good to clear away any shavings.
4.) Apply sealer and thread up one of the short double ended pipe nipples into the hole in the base.
5.) Apply sealer to the other end of the nipple and run up the right angle connection over this nipple and tighten until the whole affair is in the base such that it fits the head mounting holes properly. You will want to bend the right angle elbow so that it is pointing up towards the water input hose fitting on the heater box. (see photo above) This will actually provide a smoother transition from the valve up to the heater core than the OE valve did. You can temporarily bolt the base to the head to do this fitting.
6.) Thread up the second short pipe nipple into the right angle connector with sealer.
7.) Now take the Ball Valve and run it onto that second nipple, after applying some thread sealer. Orient the valve so that the swing of the valve lever is towards the outside of the car, not towards the head. Tighten until the control lever comes out on top.
8.) Apply some sealer to the pipe threaded end of the hose adapter and turn it into the valve body to where it is good and tight without accidentaly turning the valve body around.
You are now done with making the alternative valve, just bolt the old pedestal base to the head with a new gasket, connect your hose, and off you go! You will find too that you now have better access to the distributor and there is far less chance that coolant will dribble into it. This will give you a really good, long-lasting valve.
***********************************************************************************************************

I have created a simple means to hold the control cable housing and connect the inner cable to this valve. A photo of this solution is shown below. You can use any suitable piece of bar stock or heavy gauge strapping to form the bracket between the firewall and the valve. For the cable clamp, I simply cannibalized the cable clamp off of an old heater valve by drilling out the spot welds and then pop riveted it to the bracket as shown. I also inverted the valve lever, shortened it, drilled a hole for the cable at a point where its full movement coincided with the full movement of the cable and Viola!, I could work the valve from the dash, just like OEM! And it opens and shuts fully, just like "the real thing" ;-)
 Not the prettiest installation, but still capable of giving complete control of the valve. It demostrates that a "Shadetree Mechanic" with simple tools and readily available materials can create a working setup to utilize the OE cable control for this valve. Not the prettiest installation, but still capable of giving complete control of the valve. It demostrates that a "Shadetree Mechanic" with simple tools and readily available materials can create a working setup to utilize the OE cable control for this valve.
^^^^^^^^^^^^^^^^^^^^^^^^^^^^^^^^^^^^^^^^^^^^^^^^^^^^^^^^^^^^^^^^^^^^^^^^^^^^^^^^^^^^^^^^^^^^^^^^^^^^^^^^^^
Clifton Gordon has done this project too, and below are some photos of his version which may give you some other ideas of how you can adapt the valve you create to your car. With many thanks to Clifton for the use of his photos and information. rkm
 This is Clifton Gordon's completed valve. Note that the valve's acutating arm he fabricated has U-bend at the cable end so that he could use a real cable stop, just like OE! This is definitely superior to my bent wire method as it creates a freely rotating pivot point for the end of the cable making dash adjustment less strenuous for the OE cable operating system. This is Clifton Gordon's completed valve. Note that the valve's acutating arm he fabricated has U-bend at the cable end so that he could use a real cable stop, just like OE! This is definitely superior to my bent wire method as it creates a freely rotating pivot point for the end of the cable making dash adjustment less strenuous for the OE cable operating system.
 Here is a closer photo of his lever and the anchor for his cable. You can also see that even though he used a ball valve available in his area, there are some variances between manufacturers of these valves and other fittings. What will be available in your area may vary, but that should not significantly affect the final performance of your finished valve. Here is a closer photo of his lever and the anchor for his cable. You can also see that even though he used a ball valve available in his area, there are some variances between manufacturers of these valves and other fittings. What will be available in your area may vary, but that should not significantly affect the final performance of your finished valve.
 This is the simple bracket Clifton made to hold his cable clamp. The left end of the S-shaped bracket fastens to the top of the firewall shelf, and the right end holds the salvaged clamp below. Clifton used a somewhat heavier gauge bracket than I did, and the extra rigidity gained can help make the movement of the valve's operating lever that much more positive. This is the simple bracket Clifton made to hold his cable clamp. The left end of the S-shaped bracket fastens to the top of the firewall shelf, and the right end holds the salvaged clamp below. Clifton used a somewhat heavier gauge bracket than I did, and the extra rigidity gained can help make the movement of the valve's operating lever that much more positive.
 Some detail of the clamp Clifton salvaged from the dash control you see below. There are other automotive devices which use the Bowden Cable to transfer motion as with our MGs, and any appropriate existing clamp or one you design or fabricate yourself can be used. You could do as I did and salvage one from your old OE heater valve you are sacrificing for this ball valve project. (Read my description above) Some detail of the clamp Clifton salvaged from the dash control you see below. There are other automotive devices which use the Bowden Cable to transfer motion as with our MGs, and any appropriate existing clamp or one you design or fabricate yourself can be used. You could do as I did and salvage one from your old OE heater valve you are sacrificing for this ball valve project. (Read my description above)
 A nice shot of the dash mounted mechanical control mechanism for the heater control. If cleaned up and lubed when you have the chance, they will work forever. Note the similarity between Clifton's fabricated lever on his valve and the cable stop end of the lever on this control. A nice shot of the dash mounted mechanical control mechanism for the heater control. If cleaned up and lubed when you have the chance, they will work forever. Note the similarity between Clifton's fabricated lever on his valve and the cable stop end of the lever on this control.
One thing not always noted is that the two gear-driven dash controls are handed, meaning that they appear as roughly mirror images of each other. One reason some owners do not get the range of motion out of their cables or their heater valves (OE or otherwise) is that these get confused.
############################################################################


 Pretty slick! Pretty slick!
What can you come up with???
Got something much more elegant? Send me a photo and I will post it
here or post it on your own site for all to benefit from.

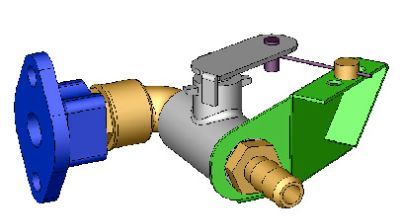
 Joe Reed of Memphis, TN did this very slick installation of a Porsche 900 series heater control valve by using hose adapters at the heater core end and a very nice elbow (pls. note the MG logo!) to the head. Joe fabricated the bracket which supports the heater control cable, this arrangement gives him full control from full ON thru full OFF. Joe Reed of Memphis, TN did this very slick installation of a Porsche 900 series heater control valve by using hose adapters at the heater core end and a very nice elbow (pls. note the MG logo!) to the head. Joe fabricated the bracket which supports the heater control cable, this arrangement gives him full control from full ON thru full OFF.
Any number of valves like this could be used, and have been. Imagination and a willingness to do some digging for an appropriate valve are the keys to coming up with a good alternative valve for your car.

Gerald O'Docharty made this version using a 3/8" ball valve rather than the 1/4" version I made originally. It is essentially the same process but with different sized fittings and tools to accomodate the larger valve. Also note that he has made a very nice clamp-on cable clamp and valve operating lever which are simple to make and give a much more positive action to the controls, much like that done by Clifton Gordon above.
You can go to this forum site for more commentary on what he did: http://www.mgexperience.net/phorum/read.php?1,1005869,1006188#msg-1006188
One thing I found out in studying what he had done was that not all 1/4" fittings and ball valves are created equal. Some match the actual openings of some 3/8" ball valves and others are smaller. The same with the 3/8" valves ~ they vary too.
A typical "good" OE heater valve's inlet from the head is 0.390" inside diameter and the valve's outlet is 0.360" inside dia. However, the Heater Core inlet and outlet tubes are 0.435" inside dia. So, the OE valve can be a restriction even if fully open.
Any larger valve, especially the 3/8" type like Gerald used, is more likely to have an I.D. that is more likely to be as large as the I.D. of the heater core entry/exit tubes or even larger, but even some 1/4" units come very close. Therefore, if you want max flow through the core, using a 3/8" valve like Gerald used is a better bet, but from what I found at several plumbing supply stores, you'd better take along a dial caliper to be sure. They ain't all created equal in either valve size.
 Here you see the completed valve assembly. As you can see, the 3/8" valve does make for a larger assembly, but it also ensures that the maximum amount of coolant passes thru the valve at full open. Some of the 1/4" ball valves can create a restriction that is about the same as the OE valve, whereas the 3/8" valve and some selected 1/4" valves actually match or exceed the max. opening of the rest of the heater's plumbing. Here you see the completed valve assembly. As you can see, the 3/8" valve does make for a larger assembly, but it also ensures that the maximum amount of coolant passes thru the valve at full open. Some of the 1/4" ball valves can create a restriction that is about the same as the OE valve, whereas the 3/8" valve and some selected 1/4" valves actually match or exceed the max. opening of the rest of the heater's plumbing.
 The Clamp seen from the side that clamps it to the valve assembly. The Clamp seen from the side that clamps it to the valve assembly.
 ...and seen from the side that holds the clamp for the Bowden cable from the dash control. ...and seen from the side that holds the clamp for the Bowden cable from the dash control.
 This is the lever that Gerald made. Pretty nice work!! This is the lever that Gerald made. Pretty nice work!!
 And here is a closer look at that lever. And here is a closer look at that lever.
Very nicely done, don't you think??
 And this is a typical cable stop as used with this lever. And this is a typical cable stop as used with this lever.
You can purchase these from Moss, Victoria British, or from Home Depot or Lowes in their display of drawers of miscellaneous hardware, or from NAPA and many other automotive retailers.

XXXXXXXXXXXXXXXXXXXXXXXXXXXXXXXXXXXXXXXXXXXXXXXXXXXXXXXXXXXXXXXXXXXXXXXXXX
Bob Muenchausen (with many thanks to Les Bengtson, Clifton Gordon, Patrick Michel, Ted Mack, and Joe Reed, and Gerald O'Docharty) , copyrights 2007, 2009.
Email Questions and comments to bobmunch64@yahoo.com
|