• Hey there Guest!
    If you enjoy BCF and find our forum a useful resource, if you appreciate not having ads pop up all over the place and you want to ensure we can stay online - Please consider supporting with an "optional" low-cost annual subscription.
    **Upgrade Now**
    (PS: Subscribers don't see this UGLY banner)
Tips
Tips

TR2/3/3A Dimmer switch mount [ or learn to leave well enough alone]

GTP1960

Jedi Knight
Offline
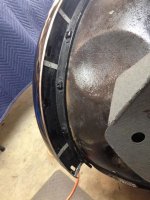
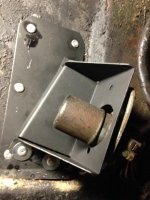
"Huh, I wonder what's behind that mount"........nothing.

in preparing to run a new headlight harness I removed the dimmer mount, to access the wires.
only to find a substantial hole where the lower bolt resided at one time: correction : a hole backed by expoxy, rotten wood or bondo. None of it good shape.
i'm not in a frame of mind to remove the outer panels, but would like opinions on my best option on scabbing, filling or avoiding this inconvenient hole.

ideas appreciated!

image.jpg
 

trrdster2000

Luke Skywalker
Country flag
Offline
Guy, Sorry to say, your bracket has rotted from it's mount and needs to be tacked back in place. Clean up the rust first.

Wayne
 
OP
GTP1960

GTP1960

Jedi Knight
Offline
[/QUOTE]
Not as bad as it looks. Clean as much rust off as possible . Easy way to fix is pop rivet the flange for time being.

Marv

I should have thought of that. I just finished riveting my front wing/apron trim bead flanges down today.
but man was that sheet metal tough! 6 holes & I was whipped.
Any tips on best drill bits and technique to use? I was using dewalt titanium 9/32"....what a work out.

thx Marv

Guy
 

Attachments

  • image.jpg
    image.jpg
    46.2 KB · Views: 80

TR3driver

Great Pumpkin - R.I.P
Offline
Those "titanium" bits are junk IMO. Maybe they last longer in a nice, well controlled environment, but at least the ones I have gotten have been noticeably weaker, to the point that I can actually see the spiral unwind and bind in the hole.

Get some old fashioned HSS with black oxide finish, preferably the extra-short kind for working with sheet metal and odd situations. Eg, https://www.mcmaster.com/?m=true#2896a16/=x6o18v

For the hole in the floor, I'd probably lay down some fiberglass cloth, using JB Weld for resin. Let it harden overnight, then put on another layer of the same thing. Obviously clean up as much rust as you can first, degrease the surface and so on. Then you can pop rivet the bracket if you want.

If the bracket wasn't shot, I'd suggest bridging the hole with one of these first and then 'glass over that. But no point if you're just going to pop rivet for now.
https://www.mcmaster.com/?m=true#90955a113/=x6o27c
 

PatGalvin

Jedi Warrior
Country flag
Offline
Drilling rust just kills your bits. If you can find competent sheet steel, I find the mid-cost range bits work fine for drilling sheet metal. Buy a new bit if you are working that hard.
Pat
 
OP
GTP1960

GTP1960

Jedi Knight
Offline
For the hole in the floor, I'd probably lay down some fiberglass cloth, using JB Weld for resin. Let it harden overnight, then put on another layer of the same thing. Obviously clean up as much rust as you can first, degrease the surface and so on. Then you can pop rivet the bracket if you want.

Thanks Randall, I'm going to try those short HSS black bits.
i couldn't find a JB Weld resin for fiberglass clothe; Is this what you were talking about?

https://www.jbweld.com/collections/plastic-composite-pvc/products/plastic-bonder-syringe

also, would you fill that hole with JB weld epoxy, before you put down the fiberglass?
 

TR3driver

Great Pumpkin - R.I.P
Offline
The plastic bonder might work just fine; but what I meant was the old fashioned JB Weld putty that takes so long to cure.
8265-S_J-B_Weld-USA_grande_5f045738-0350-44e1-8938-c67ac12c1dcf.jpg

I may be mistaken, but that hole looks much too big to me to fill with just epoxy or Bondo, so you need some sort of backing material. I've had fairly good luck in the past with making up a patch by starting with a piece of plastic (eg part of an old zip-loc bag), buttering it with mixed JB Weld, laying woven fiberglass cloth over that and pressing it down until the epoxy oozes through the pores then smoothing the epoxy over the top. Maybe add a bit more if you didn't get enough at first but you only need enough to completely cover the cloth. Now you can handle it by the plastic without getting JB Weld on your fingers (well, not as much anyway), which helps a lot in awkward places. Press it firmly in place and leave the plastic while it hardens. Don't forget to clean up your hands, tools and any spills before the putty hardens. Before it cures, ordinary soap and water will take it off; afterwards you'll need a chisel!

After the patch is hard, you can peel the plastic off if you want, file, sand and paint the surface, etc. Don't sand through the cloth, though, as that will weaken the patch.

Obviously not for purists, but the result is a strong, long lasting patch that is proof against salt, water, battery acid, and brake fluid. A single layer won't be as strong as the original steel, but it comes close.
 

sp53

Yoda
Country flag
Offline
I think that area is just in a little inset from the main panel. If you are looking for something quick and strong, I would cut a piece of sheet metal the size of the inset then drill a hole for the one good stud and screw or rivet that to what is left after you clean the carpet glue off. Then the one bolt should hold it and if you wanted you could run some self- tappers through the bracket into the kick panel. Off in future, you can fix it right. you can get a new bracket also
 

bobhustead

Senior Member
Gold
Country flag
Offline
Titanium is just a coating. It always wears off quickly no matter the quality of the bit. Cobalt is an alloy and keeps its edge much better (and better in my experience than regular high speed steel). The enemy of any bit is heat. I don't use anything bigger than 3/16 for initial penetrations and work up from there. The internal volume of a bit is where the heat builds up and the circumference is all it has to radiate the heat to air. Volume increases geometrically with diameter and radius increases arithmetically. Increased volume in the bit thus quickly overcomes the capacity of the circumference to radiate the heat.
Bob
 

PatGalvin

Jedi Warrior
Country flag
Offline
I am a huge fan of JB Weld. Haven't used it for panels but have for so many other little repairs, many in my home and not automotive related. It's just great stuff.
 
Country flag
Offline
I am also a big fan of JB weld. Especially for small holes in floors and fenders. I put masking tape on the back side. Dab the needed amount of WB in the hole. Then wet my finger with water and gentley push/ smooth the WB in. Done correctly, its hard to see it was used.

Marv
 
OP
GTP1960

GTP1960

Jedi Knight
Offline
I may regret this one day.
but for today, that bracket ain't going anywhere.
i buttered the back of my 22g plate with JB Weld, then I riveted it with 3/16" aluminum rivets.
 

Attachments

  • image.jpg
    image.jpg
    39.1 KB · Views: 77

TR3driver

Great Pumpkin - R.I.P
Offline
That looks like it will outlast the rest of the car!
 
Similar threads
Thread starter Title Forum Replies Date
Bocaray TR2/3/3A Headlight Dimmer conversion to dash switch Triumph 6
K TR2/3/3A Dimmer switch.....any electricians out there? Triumph 5
Got_All_4 TR2/3/3A Dimmer Switch Triumph 5
J Dash Dimmer Switch Austin Healey 2
T TR2/3/3A Is there a way to take apart and clean/repair TR3A headlight dimmer switch? Triumph 8
B Dimmer switch Austin Healey 0
A Dimmer switch relocation? Spridgets 14
S TR2/3/3A tr3 dimmer switch Triumph 8
Newkie T-Series Turn signal headlight dimmer switch question? MG 2
T TR2/3/3A TR3 headlamp dimmer switch Triumph 7
steveg OD switch as Dimmer Austin Healey 4
Newkie T-Series Headlight Dimmer Switch help MG 0
P TR2/3/3A TR3a dimmer switch question Triumph 25
rlandrum Dimmer Switch Mounting Triumph 6
M T-Series Gauge Light Dimmer switch thingy MG 3
F TR6 dimmer Triumph 2
EWD TR6 LED instrument conversion / Dimmer. Triumph 25
WillR MGB-GT panel dimmer removal? MG 7
H TR4/4A Dimmer control wiring for a 4A Triumph 3
S TR2/3/3A tr3 dimmer Triumph 7
T TR2/3/3A TR3a dimmer Triumph 13
S Head light dimmer swich Triumph 7
19_again turn signal/dimmer on 67 B MG 2
kyreb1862 MGB MGB Panel Light Dimmer MG 32
MrPandy Size of hole in dash for dimmer ? Triumph 6
S Hot rheostat [dimmer?] MG 6
Patrick67BJ8 Custom BJ8 Dash Switch Panel Austin Healey 7
R Bugeye ignition switch Spridgets 2
K TR2/3/3A Old school battery shut off switch....... Triumph 3
Patrick67BJ8 Wanted Looking for a used BJ8 switch panel. Austin Healey Classifieds 5
T TR2/3/3A Replacement Turn Signal Switch Triumph 4
F Wanted Dipping switch cap Triumph Classifieds 1
L What does this column switch do? Spridgets 4
G Brake Light Switch Failure Austin Healey 24
R Wanted Bugeye ignition switch Spridgets Classified 2
B Headlight Dip Switch Austin Healey 4
M Which wires fit which terminals on my Rover V8 ignition switch? Rover / Land Rover 6
R Electrical Experts - Vixen 2500 - Ignition Switch Observation? TVR 10
S Overdrive Throttle Switch Austin Healey 4
SherpaPilot TR6 Ignition Switch Question Triumph 13
Popeye General TR Connecting to Lucas switch grub screws? Triumph 5
C MGB-GT Reproduction light switch MG 13
timsgolf Center Dash Switch Plate Painting Austin Healey 5
adcronin For Sale MGB Turn Signal (lights, horn, indicator) Switch, New for 62-67, also Sprite MK 3 & 4, MIDGET MK 2-3 thru 67 MG Classifieds 0
R Bugeye Starter Switch Spridgets 7
B General MG Remote Starter Switch MG 6
P TR2/3/3A ignition switch smoking Triumph 12
O XKE series 2 thermo fan switch bung stud repair. Jaguar 9
6 E-Type brake light pressure switch location Jaguar 5
C TR6 Ignition Switch for 1972 TR6 Triumph 1

Similar threads

Top