• The Roadster Factory Recovery Fund - Friends, as you may have heard, The Roadster Factory, a respected British Car Parts business in PA, suffered a total loss in a fire on Christmas Day. Read about it, discuss or ask questions >> HERE. The Triumph Register of America is sponsoring a fund raiser to help TRF get back on their feet. If you can help, vist >> their GoFundMe page.
  • Hey there Guest!
    If you enjoy BCF and find our forum a useful resource, if you appreciate not having ads pop up all over the place and you want to ensure we can stay online - Please consider supporting with an "optional" low-cost annual subscription.
    **Upgrade Now**
    (PS: Subscribers don't see this UGLY banner)
Tips
Tips

TR6 tr6 rocker and floor replacement --?s and pictures

jackag91

Jedi Warrior
Offline
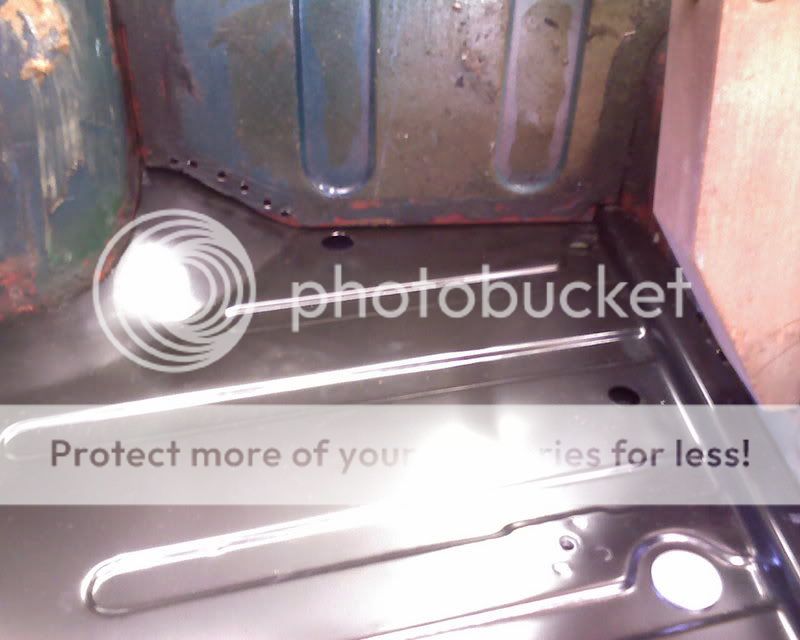
I started working on the rockers and floors. I got one set of rockers and the floorboard off.

side.jpg


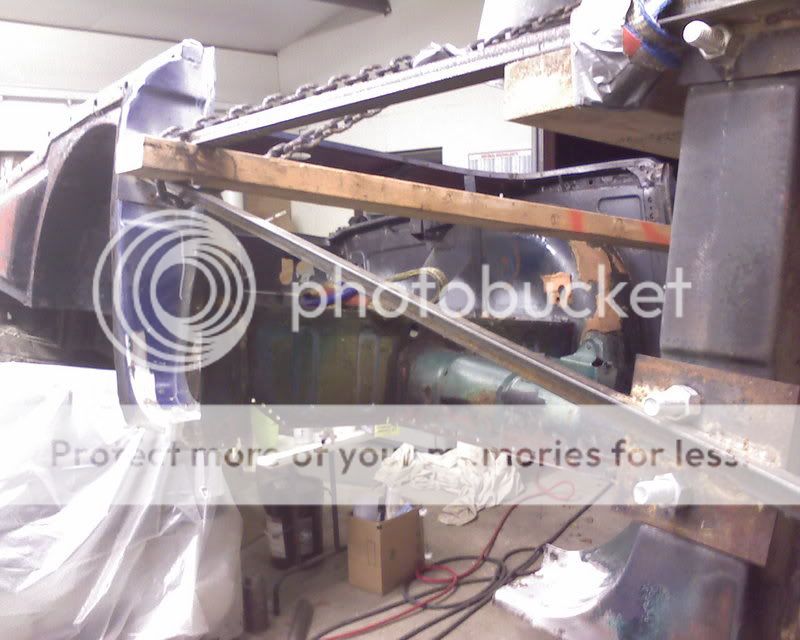
It took a while but I am pretty happy with the result.

I was going to put that side back together before I move on to the other side, but first I need some help with some questions:

1. The inner and outer rockers are different lenghts. Due to the shape, it looks like there are 3 points that you could use as a point to base thier relative positions.

Should the rockers match on the a)front edge, b) rear edge or c) the curve just in front of the front door pilar?

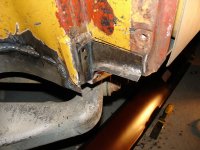
2. I am sill having some trouble trying to get the rockers to go into place (just holding them in place with a pair of vice grips)

If you look at this picture is there anything I didn't remove that needs to be removed? (Please ignore the rust, that is tomorrows effort)

rear.jpg


Thanks

Jack
 

alphatopher

Member
Offline
It looks like you are not the first person to fix the B post. I would definately put in weld some patch panels on the inner fender and wheel well while you have easy access. I believe the sequence that I put my car back together was inner sill first, then the floorpan, then the outer sill, and finally the sill caps. The last thing I welded was the brackets to connect the body to the frame. My body was still on the frame, so I had an easier time aligning everything. One thing you may want to consider is holding off welding the outer sill because you will want to check the door gaps, and with your setup you can do that now. I wasn't too particular lining everything up, but I did put together everthing before hand holding it together with vise grips and cleco's before I started welding.

If you do a search in the archives, I posted a thread or two on this subject and posted some pics.
 

crj7driver

Jedi Trainee
Offline
Looks good, that is about what I have in store as well. Please keep us posted how it goes aligning all 3 parts together. I thought it was only recommended to replace one at a time. If your method works out well I would much rather do mine in the same manner.

Good Luck
 
OP
J

jackag91

Jedi Warrior
Offline
Thanks Alpha, I will do a search.

CRJ, I always heard the same thing but I mine were rusted pretty badly and I couldn't figure out how to take one off with out taking them all off.

The first 90% of the removal went fine. It was that last 10% that took all of the effort.

Also what kind of sheet metal did you use to make your patch panel?
 

crj7driver

Jedi Trainee
Offline
I have a nice large sheet of 18 gauge (cold rolled, I think, I told the metal shop that I bought it from that I wanted the softer version (hot or cold rolled)), 4x10 ft it was the only size I could buy it in other than at Home Depot. I could have bought about 2 sq ft from depot or the 4x10 for the same price.

I think it was around $80.00. I also bought a $25.00 metal brake from el cheapo Harbor freight and it has made making bends much simpler than the vise and or hammer and angle iron.
 

alphatopher

Member
Offline
I also used 18 guage steel. This pic was taken prior to removing the lower rear section of the rear of the b post, and about 3 inches of the trailing end of the inner sill. The passenger sill was left in place while the entire drivers side sill was replaced
162203-B-post.JPG
 

PeterK

Yoda
Offline
I go to a local steel/metal fab shop and instead of buying large sheets, I pick up pieces around the the fabrication shop left from the sheering press. They charge practically nothing for "scraps" and noticed I get better deals if I show cash instead of CC or check. Same deal at the lumber mills, cash is always a better deal.

We also have a surplus shop here where I buy thicker pieces (up to a couple of inch blocks or just 1/4 plate) and pay 35 cents per pound.

For $80 I could but enough to build a go-cart!
 
OP
J

jackag91

Jedi Warrior
Offline
THanks for all of the help.

I just bolted down the floorboard and tried to fit it to the body just to see how it would go and if I needed to clean it up abit.

Here are some pictures.

the front outside
floorfit2.jpg


the rear inside

floorfit1.jpg
 

AltaKnight

Jedi Knight
Offline
Looks good.
Please keep the pics coming.
I think a few of us are vicariously rebuilding our cars; and before long I will be doing it for real, maybe.
 

alphatopher

Member
Offline
Here is part of my Bpost lower steel patch. This photo was taken prior to welding during the rough fit.

It looks like your lower bpost is really hacked up
 

Attachments

  • 8487.jpg
    8487.jpg
    101.9 KB · Views: 121

DNK

Great Pumpkin
Country flag
Offline
How come your new floors are silver. the new pieces I have in my storage area are black????
 
OP
J

jackag91

Jedi Warrior
Offline
Well, the bracing I used wasn't good enough and lower part of the b-post is torqueing in. And like an idiot, I left the doors in Dallas.

So I have to run back to Dallas and grab the doors. before I can finish putting it back together.

Other than that, it is going very slowly but fairly smoothly. I got the inner rocker on the floorboard and it seems to fit OK.

I will keep you guys updated on my progres next week.

Jack

Oh, DNK, the parts are black, they just look silver with my cell phones camera.
 
Similar threads
Thread starter Title Forum Replies Date
Scot1966 For Sale New TR6 / TR4 passenger side rocker panel & inner sill -FREE- Triumph Classifieds 2
M TR6 rocker shaft install tr6 Triumph 2
Scot1966 TR6 TR6 rocker panel fit Triumph 6
S TR6 Help! Need help from TR experts with this frustrating TR6 pushrod/rocker/valve issue Triumph 23
TR6BobNF TR6 TR6 Rocker Shaft Assembly Triumph 1
sundown TR6 TR6 rocker panels Triumph 2
O TR6 TR6 Outer Rocker Panels WTB Triumph 0
I TR6 TR6 rocker assembly questions Triumph 45
TR6oldtimer TR6 Junk TR6 rocker panels Triumph 7
TR6oldtimer TR6 TR6 Rocker panel quality Triumph 7
P TR6 TR6 sills/rocker color Triumph 5
TR6oldtimer TR6 Rocker arms for a TR6 Triumph 3
B TR6 TR6 Rocker Paint Triumph 5
J TR6 Replacing TR6 Outer Rocker Panels Help Triumph 1
wingsandwheels TR6 Alloy rocker cover, late TR6 Triumph 2
S GT6 GT6/TR6 rocker arm identification and questions. Triumph 0
S GT6 GT6/TR6 rocker shaft oil problems. Triumph 5
Y TR6 TR6 - Secondary oil feed to rocker shaft Triumph 12
tr6web TR6 TR6 - Replacing rocker panels Triumph 12
R TR6 Crazy Ignition Failure in TR6 engine… Triumph 7
mctriumph For Sale 69 Tr6 Triumph Classifieds 1
B TR6 TR6 block decking Triumph 2
A TR6 How many fuel filters-TR6 Triumph 25
Got_All_4 General Tech TR6 Transmission Troubles Pops Out of 3rd gear Triumph 2
J TR6 Repadding TR6 frame Triumph 0
S Wanted Need an HVDA conversion kit for 73 TR6 Triumph Classifieds 3
M TR6 Sorting out new TR6 Triumph 10
tr6nitjulius For Sale TR6 Clutch Master Cylinder $40 Triumph Classifieds 0
S TR6 '72 TR6 distributor issues Triumph 3
R TR6 Limit Mechanical Advance on TR6 distributor? Triumph 8
RonC General TR TR3 Shifter on TR6 Triumph 8
B TR6 TR6 convertible top frame Triumph 0
K TR2/3/3A The TR6 gearbox Ist gear.... Triumph 1
tr6nitjulius For Sale TR6 tail light assemby & Resurfaced/New Ring Gear Flywheel Triumph Classifieds 0
tr6nitjulius TR6 TRIUMPH TR6 Triumph 7
S TR6 New tr6 purchase Triumph 31
Jim_Stevens TR6 Barn find of TR6 and many TR3 parts Triumph 9
nichola TR6 Hot spot on cylinder head - 1973 TR6 Triumph 2
R TR6 Heater control bezels TR6 Triumph 2
L For Sale 1974 Tr6 for sale Triumph Classifieds 0
tr6nitjulius TR6 TR6 Parts Visualization Triumph 0
Got_All_4 For Sale 1969 TR6 Driver Seat Triumph Classifieds 0
R TR6 TR6 Choke Cable Triumph 11
Got_All_4 For Sale TR6 TR250 TR4 parts for sale Triumph Classifieds 2
B For Sale TR6 Carburetors Triumph Classifieds 0
R TR6 TR6 Triumph 6
Chrisc9 TR6 TR6 brake light Triumph 6
glemon TR5/TR250 Answering My Own Question Rear Tube Shock Conversion Numbers TR4a-TR6 Triumph 0
tr6nitjulius General TR TRIUMPH TR6 the possibilities! Triumph 12
SherpaPilot TR6 Unidentified fitting on TR6 Engine Triumph 3

Similar threads

Top