• The Roadster Factory Recovery Fund - Friends, as you may have heard, The Roadster Factory, a respected British Car Parts business in PA, suffered a total loss in a fire on Christmas Day. Read about it, discuss or ask questions >> HERE. The Triumph Register of America is sponsoring a fund raiser to help TRF get back on their feet. If you can help, vist >> their GoFundMe page.
  • Hey there Guest!
    If you enjoy BCF and find our forum a useful resource, if you appreciate not having ads pop up all over the place and you want to ensure we can stay online - Please consider supporting with an "optional" low-cost annual subscription.
    **Upgrade Now**
    (PS: Subscribers don't see this UGLY banner)
Tips
Tips

TR2/3/3A TR3A Brake drum removal: RUST! [Arghhhhhh]

Parker

Freshman Member
Offline
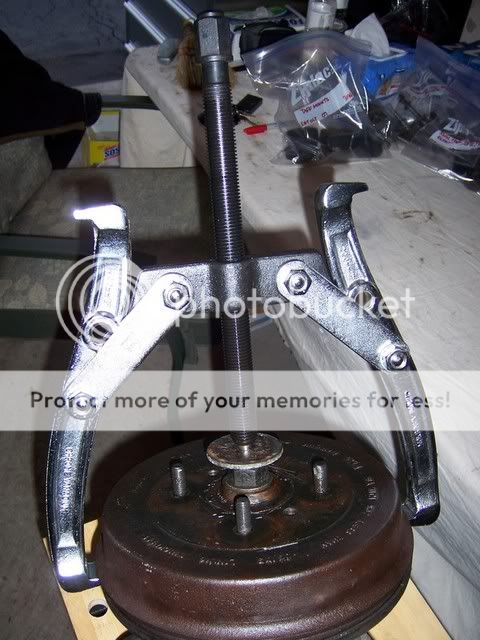
I've tried hammers, PB Blaster, propane torch, and I even removed those two little flat-head screws that hold the drums in place! I pounded with a hammer. I tried to back off the adjuster (it's rusted stuck). I pounded with a hammer. I removed the nuts that hold the adjuster to the backing plate. I pounded the studs with a hammer. I disconnected the emergency brake cable. I pounded with a hammer. I inserted a bolt into the front adjuster hole... and then I pounded with a hammer. As far as cutting with an acetylene torch, I don't have one and can't move the car to get it anywhere near one: the wheel won't turn. I even tried a winch to drag the car while the wheel was on: wouldn't release. Does anyone know of any tricks that would work on a TR3? Without a torch, I'm just tempted to take a sawzall to the drum, but I'm afraid I'd cut into something behind the drum. Any thoughts?
 

TR3driver

Great Pumpkin - R.I.P
Offline
Get a bigger hammer!
 

Andrew Mace

Moderator
Staff member
Country flag
Offline
Does it turn, or is the drum seized to the shoes as well? I'd be tempted to keep working around the rear edge and the perimeter and across the face of the drum in various spots with a suitably large hammer (think small sledgehammer or large ball-peen hammer or even a dead-blow hammer if you have one). It should begin to loosen eventually. It might be safe to assume, at this point, that the drum won't be reused, but you're better off if you don't damage the hub or backing plate.

Hopefully this is a 9" rear brake setup, as parts are cheaper and easier to find!
 

glemon

Yoda
Country flag
Offline
Try striking the drum from opposite sides with a hammer at various points numerous times. I have not heard this suggestion for brake drums, but for other stuck parts, the idea being you get much more force if struck from opposite sides rather than the force being taken up by movement (however slight0 of the whole mechanism you are striking.

If you are not worried about saving the drums pound the heck out of them. Also keep trying with heat and penetrating oil on the brake adjuster, if you can get this to move it may help, I have had very stubborn rusted on brake adjusters, but eventually heat and force has brooken them loose.

Good Luck!
 

M_Pied_Lourd

Darth Vader
Country flag
Offline
I have used a large 2 jaw puller in the past. Here is a pic from my TR6 resto.

e256a5b8.jpg


Cheers,
M. Pied Lourd
 

DNK

Great Pumpkin
Country flag
Offline
David???... How did you turn the car on its side???
 

vivdownunder

Jedi Warrior
Offline
Check in the countersunk screw holes to see if the drum has moved out a fraction from the hub. If so, tap it back home.

Often there's a thin band of rust on the lip of the drum that grabs the shoes. Tapping it back sometimes releases that grip and the drum will rotate.

Undo the bleed fitting on the wheel cylinder to release any pent up hydraulic pressure.

Work on releasing the adjuster, although they can be a pig to free up, as glemon said.

May have to get one of those big pullers. Hook it up and tap the drum from behind using a block of hardwood as a drift. If it moves, be careful not to skew it.

Good luck with it.

Viv.
 

JohnB

Jedi Hopeful
Bronze
Country flag
Offline
Parker, if your wheel won't turn at all, I think your shoes may be frozen to the inside of your drum.

When I first attempted to roll my TR2 out from the back of the barn, after it had sat there for over 30 years, I found that my rear drums were frozen solid. It turns out the concrete floor provided enough moisture for all those years to cause a lot of hidden problems.

Anyway here's what I did.......

First I took a piece of scrap angle steel, 3/16 x 2 x 2 x 24 inches long, drilled two holes in the center area to slip it over 2 of the lugs and using the lug nuts and some washers bolted it to the drum. (I placed it horizontally.) Next I set a hydraulic bottle jack under one of the extended ends and lifted the wheel and car off the floor. Carefully!

Using a propane torch and a HF non-contact laser thermometer, I heated the drum up to about 250 degrees. I especially heated the outside shoe contact circumfrance to expand the drum a tad larger. Once heated and while still on the jack I took a BFH and hit down on the end opposite the jack, as the jack was basically pushing up, to help in the rotational effort. Once the drum moved a bit, just a fraction at first, I swapped the jack to the other side, heated some more and began hitting down on the other end.

I think having the weight of the rear of the car trying to rotate that bar and drum, combined with the heat and my hammering is what did the trick. It took a lot of those cycles, but it finally loosened enough to rotate by hand and slide the drum off.

I was carefull to not get the angle bar tilted too much, didn't want to slide off that jack. And of course the car was blocked from rolling.

The whole proceedure sounds a bit crazy and complicated now, but it worked for me and I'm saving that bar just in case. Plus no damage to anything from over hammering.
 

TimK1955tr2

Senior Member
Offline
If you are going to cut or smash anything, maybe try drilling/breaking up the wheel cylinder from behind. Since the cylinders are easily available.

It would probably be a real chore but maybe drilling into the wheel cylinder until it collapses...?

Just a thought...
 

DrEntropy

Great Pumpkin
Platinum
Country flag
Offline
John's technique seems best.

For a penetrant, use a concoction of acetone and ATF, 50/50. Shake it well (the two don't go into solution) and apply. Repeatedly. Just be aware that both components are flammable.
 
OP
Parker

Parker

Freshman Member
Offline
Yes, the drum and the brake shoes are stuck together and the wheel won't turn.

Wow, John's technique seems a bit involved, but definitely worth trying. My one question is: a propane torch seems to be a bit "lightweight" for the purpose of heating the outside circumference of the drum--- is it really possible to heat things up sufficiently? I know that you'd have to keep moving the flame from one position to the other along the outside of the drum -- wouldn't the other side cool down?

I think my drum is still un-bent, so I like this angle iron idea. That big puller looks expensive, and with the amount of rust I'm dealing with, I figure that "concussive force" (along with a lot of cussing), will probably win in the end. It'll be a few weeks before I can get back to the project, so I'll also try to keep the adjuster/penetrating oil solution going in the meantime. Thanks for all of the great suggestions. - Parker
 

DrEntropy

Great Pumpkin
Platinum
Country flag
Offline
Patience and propane. :wink:

You aren't trying to cut the drum off, rather heat it enuff to expand it to let go of the shoes and hub. 250* would be adequate when done in cycles... hot-cold-hot... with stresses and the Weasel Pee penetrant in-between.
 

JohnB

Jedi Hopeful
Bronze
Country flag
Offline
Parker,

I had thought about using my welding torch but that concentrates the heat so much I opted for a wide tip propane torch instead. Once the drum warmed up, keeping it hot during the cycles was really not that hard. The drum reheated quite quickly.

And it actually sounds a lot more complicated than it was. Just work in small increments and be carefull with the jack slipping. I think I had put a scrap of reinforced rubber pad between the jack top and the angle piece.

Even though my adjusters were frozen also, I didn't use any penetrant, tried to keep everything dry and clean in case the shoes looked still useable, but they weren't.
 

sp53

Yoda
Country flag
Offline
I am not by my car now and this might not work, but maybe try and undo the adjuster holding nuts from the back and see if you can get some movement there by spraying around everything. Perhaps you can get that to wiggle some by tapping on the adjuster from the back, but it will probably trash it.
 

TR3driver

Great Pumpkin - R.I.P
Offline
My experience has been that trying to pull on the drum is counter-productive, if the shoes are locked to the drum. The shoes tip outwards (against the springs) and hence lock to the drum even tighter.

However, heavy pounding all around the outside rim of the drum (blows directed towards the center of the drum, avoid hitting the boundary between face and braking surface, or the lip at the inside edge) has always loosened them up for me. Work all around the drum a couple of times, then pull on the drum. Keep repeating the process.

Think of the drum as a bell that you are trying to ring. 2-3 pounds is about right for the hammer. Basically the rust winds up being driven into the lining of the shoes.
 

SkinnedKnuckles

Jedi Trainee
Offline
Hey, Parker. You didn't say what kind of hammer you've been using. A "dead blow", or shot loaded hammer is really right for the job - less likely to damage anything or cause pieces to fly. I've not used a torch on the drum, but repeated blows, working the e-brake lever, and solvent should eventually get it. Also, you really need to unfreeze (thaw?) and loosen the brake adjuster - that makes a big difference.
 

Moseso

Jedi Knight
Country flag
Offline
What I did, when faced with a set of frozen shoes/drum, was to undo the nuts holding the adjuster to the backing plate AND remove the hardware and the fluid line from the slave cylinder. Then, the whole thing came off, shoes, hardware, cylinder and all. Once inside from the back, it was possible to free all the frozen components.
 
OP
Parker

Parker

Freshman Member
Offline
I've removed the mounting nuts from the adjuster, but even after tapping at the studs from behind the backing plate, the adjuster remains firmly in place. I'll do as Moseso has suggested and also work on the area around the slave cylinder. Brent, I've just been using a regular old claw hammer, but I guess I should either use my smallish sledge or buy a dead blow hammer. So far I have good reason to try not to damage anything, as I don't think I've bent or destroyed anything yet.
 
Similar threads
Thread starter Title Forum Replies Date
K TR2/3/3A TR3A New Brake pads binding to New drum? Triumph 4
K TR2/3/3A Needs Picture of Rear TR3A Brake Assembly Drum Off Triumph 6
T TR2/3/3A TR3A Disk Brake Question Triumph 10
A SOLD!! TR3A Girling Type A brake caliper for right front Triumph Classifieds 0
J TR2/3/3A TR3A Girling 9" Rear Brake Initial Adjustment Triumph 9
C TR2/3/3A TR3A clutch/brake cylinder rebuild Triumph 4
A TR2/3/3A 1960 TR3A front brake dust covers Triumph 5
B TR2/3/3A TR3A Brake rotors Triumph 2
T TR2/3/3A Wanted: Tr3a lft frnt brake caliper Triumph 3
J TR2/3/3A Brake Bleeding problem on a TR3A Triumph 19
PatGalvin TR2/3/3A Brake Master Cylinder Fluid Reservoir Bracket needed, TR3A Triumph 6
Bremer TR2/3/3A TR3A: Strange brake bleeding behaviour Triumph 4
V TR2/3/3A TR3A Brake Pedal - Too Much Travel Triumph 6
Tugboat TR2/3/3A TR3A Brake Line Triumph 2
Q TR2/3/3A Using DOT 5 Brake Fluid On TR3A Triumph 34
K TR2/3/3A TR3A Brake caliper thread chaser? Triumph 2
R TR2/3/3A TR3A front brake cailper leaking Triumph 7
K TR2/3/3A Girling 10" Brake Backplate TR3A? Triumph 1
R TR2/3/3A TR3A Girling Brake Callipers Triumph 7
Got_All_4 TR2/3/3A Why is my brake light continuously on TR3A Triumph 10
T TR2/3/3A TR3A clutch&brake master cylinders Triumph 11
deadair TR2/3/3A TR3A -- Vacuum Bleeding Girling Brake System Triumph 13
deadair TR2/3/3A TR3A -- Removing front brake pistons Triumph 19
PatGalvin TR2/3/3A Toyota Brake Conversion on a TR3A Triumph 5
M_Pied_Lourd TR2/3/3A TR3A Front Brake Caliper Choice Triumph 5
T TR2/3/3A TR3A brake light activation Triumph 27
T TR2/3/3A TR3A Brake distribution block Triumph 12
JohnnyMead TR2/3/3A TR3a Brake Shoes Triumph 3
M_Pied_Lourd TR2/3/3A TR3A Rear Brake Opinions Triumph 12
Don Elliott TR2/3/3A Brake Switch TR3A Triumph 4
J TR2/3/3A TR3A Rear Brake Cylinders Triumph 1
rlandrum TR2/3/3A TR3A Disk Brake Rebuilding Triumph 9
T TR2/3/3A Brake dust - TR3A Triumph 2
K TR2/3/3A TR3A Park Brake Compensator Bar Assembly Picture? Triumph 7
trglory TR2/3/3A TR3a spark plugs Triumph 1
P For Sale 61 TR3A Triumph Classifieds 1
D TR2/3/3A 59 TR3A Gearbox lever will not move. Triumph 11
Q TR2/3/3A 61 TR3A Fuel Pump Triumph 4
71TR6 TR2/3/3A TR3A Front Bumper Mount Triumph 11
mctriumph For Sale Project car 61 Tr3a Triumph Classifieds 0
71TR6 For Sale TR3A Nose Triumph Classifieds 0
71TR6 TR2/3/3A A TR3A wiring question Triumph 17
P TR2/3/3A 1958 TR3A missing on cyls 2 & 3 Triumph 8
mctriumph For Sale scrapping two 59 Tr3a's Triumph Classifieds 15
J TR2/3/3A TR3A Finally on the Road! Triumph 6
angelfj1 TR2/3/3A TR3A Boot Millboard Install Triumph 7
G TR2/3/3A TS37903F Is my engine a TR3A engine because my starter says no. Triumph 3
B TR2/3/3A TR3A Gearbox fluid capacity question Triumph 7
Hamish Racing TR2/3/3A Harewood hill climb Yorkshire TR3a Triumph 3
Hamish Racing Harewood Hill Climb Yorkshire TR3a Racing 0

Similar threads

Top