• The Roadster Factory Recovery Fund - Friends, as you may have heard, The Roadster Factory, a respected British Car Parts business in PA, suffered a total loss in a fire on Christmas Day. Read about it, discuss or ask questions >> HERE. The Triumph Register of America is sponsoring a fund raiser to help TRF get back on their feet. If you can help, vist >> their GoFundMe page.
  • Hey there Guest!
    If you enjoy BCF and find our forum a useful resource, if you appreciate not having ads pop up all over the place and you want to ensure we can stay online - Please consider supporting with an "optional" low-cost annual subscription.
    **Upgrade Now**
    (PS: Subscribers don't see this UGLY banner)
Tips
Tips

TR2/3/3A TR3 rear fender

mcguijo

Jedi Hopeful
Offline
What would be reasonable expectation to pay for a repro. rear fender for a TR3? The quote from the body shop for my current one is $600 to fix (it's a mess).

Another option would be to find a used one in reasonably good shape. Just need to find a source.
 

Mickey Richaud

Moderator
Staff member
Gold
Country flag
Offline
Sent you a PM.

Mickey
 

Andrew Mace

Moderator
Staff member
Country flag
Offline
Look for a good used one. You might pay a lot for it, but many of the repro fenders will need a lot of "fettling" to fit, while an original is more likely to bolt right up.

Just how much of a mess is your current one -- rusted, dented, or both? Nowadays, $600 doesn't really go that far at a good body shop!
 
OP
mcguijo

mcguijo

Jedi Hopeful
Offline
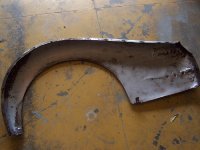
I paid $50 to have it soda blasted. .for which I have an opinion on now. Very dented. .botched patch attemp. .tack new nut cages, etc. See pic.

I trust they'd do a good job for the quoted price. However, it just seems like for the price I could find something cheaper.
 

Attachments

  • 177598-fender.jpg
    177598-fender.jpg
    45.2 KB · Views: 116

Andrew Mace

Moderator
Staff member
Country flag
Offline
Ouch! I'll assume that all the holes are from a long-ago attempt to pull some dents on the cheap? Too bad the fender wasn't pulled and hammered properly back then.

You may well get lucky and find a better used fender for less money, but I'd still hold onto that one as a spare!
 
OP
mcguijo

mcguijo

Jedi Hopeful
Offline
Yes, although I've made stupid mistakes with this car, I can not claim the holes in the fender.

You'll not the rust towards the front of the fender. Soda blasting does not take this off.
 

Alan_Myers

Luke Skywalker
Offline
Hi,

A little food for thought...

You *can* buy a repro replacement fender for $850 (TRF) to $900 (Moss), plus any shipping. Expect to wait for some weeks or months from whatever source you choose, it always seems large body parts end up backordered.

Also expect to spend another $100-200, maybe more, with the body shop to get it to fit right. (Particularly on TR3, which were essentially hand built and have a lot of variation in body panels.)

Also, repro parts are most likely made of recycled steel. Not sure if the original Triumph parts were virgin steel or not, but if they were they would likely be superior to any repro.

So, unless you can find a good used one at a really reasonable price, repairing the one you've got might be a better option than it first appears.

I've got similar holes on a front TR4 fender I'm repairing right now. In the good old days, before the spot weld dent pullers widely used today, it was common to drill and pop a dent with a pull hammer. Yeah, kinda dumb considering how easy it is to remove the fender and get to the backside with a hammer... but all paint and undercoating has to be removed to do that kind of work right and back then it was often thought the holes would help the bondo adhere better, too. (Actually, dressing the panel with 24 grit will give plenty of tooth for bondo, the holes aren't needed. )

Back in 1979, I might even have drilled the holes and popped the dent myself. I don't recall. One of the front fenders was from another car and had been repaired by someone else. I have done that sort of repair on other cars.

My point though, is that you would never have known it was there. The bondo held up fine for 25 years(in fact, it was a bugger to remove!), but I'm reworking the fender anyway.

Now I've welded up the holes, but the metal has stretched and will likely never be close to perfect. So, I plan to learn how to do body leading to get it back to perfect shape. Modern bondo properly applied would likely be just as good, though. I have hammered it all back close to shape so that any fillers will be minimal.

The ideal way to weld up holes like that is a hammer welding technique with an oxy/acetylene torch, combined with some shrinking to get the metal back close to original shape. The result can be nearly invisible, but this type of work is nearly a lost art. Clarify with your shop how they will be repairing it.

I was curious about soda blasting, didn't think it would remove rust (got to be faster than the heat gun and hand sanding I've been doing!). Walnut shells or plastic media are other alternatives for gently removing paint from old body panels, without warping them. One trick some blasters use to remove rust at the same time is to mix in a small quantity of a more harsh abrasive, along with the soda or other media. That does the trick. The shop could go back with a different media now, to carefully get out the rust, or just neutralize it chemically. Sort of depends upon how deep it is. One advantage soda blasting has over most other media, besides being gentle, is that it does a pretty good job removing oil and grease too.

Good luck with the project!

/ubbthreads/images/graemlins/cheers.gif
 

Don Elliott

Obi Wan
Offline
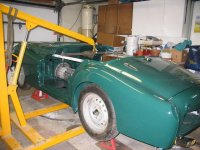
On the TR3A that I'm doing now, the left side was crashed in an accident. The best replacement rear fender I could find looked OK but after cleaning off a thin layer of bondo on the outside and 1/4" of tar undercoating inside, I found that someone had creased it about 3 feet along and 1/4" deep. To fix it, someone had punched 45 holes right through along the crease to hold the bondo in. I cleaned it all down to bare steel and MIG welded all the holes closed. Then I ground off the excess at each repair point and with a hammer and dolly, took out all the crease and the fender is now perfect. See attachment. Looking at your fender, it is better than a lot I have seen and I agree with the above comments. Fix it or have it fixed.
 

Alan_Myers

Luke Skywalker
Offline
[ QUOTE ]
Here is the attachment

[/ QUOTE ]

Great job on that fender Don! It's a good example of how well an old fender can be rejuvenated!

Yes, MIG will work in many cases (in fact I used it to fill the holes in my TR4 fender, since it will be getting a thin coat of lead in the relatively small area anyway).

I mentioned using oxy/acetylene welding instead because it's a lot easier to work afterward, if that's necessary. Often a MIG weld deposit is so hard it will damage body hammers, dent dollies and dull body files. On the other hand, a possible problem with oxy/acetylene is that the heat spread can badly warp a fender if it's not very done carefully. MIG has a lot less heat spread, but even with it the holes usually need to be filled a little at a time, skipping around the work area to minimize warpage.

If both sides of a weld will be seen and must be finished (such as on a hood or trunk lid) then hammer welding with oxy/acetylene might be the only way to go. With hammer welding, it's important to use a welding rod that stays relatively soft and workable. AFAIK, you can't hammer weld with MIG.

Another useful trick when filling holes with gas welding is to use a piece of copper as a backup to the hole, giving some support to the molten filler that's added. The weld fill won't stick to the copper. With small screw holes this might not be necessary, but when filling a little bit larger openings it can help a lot.

/ubbthreads/images/graemlins/cheers.gif
 
OP
mcguijo

mcguijo

Jedi Hopeful
Offline
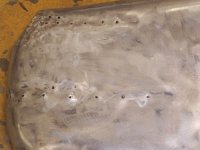
another picture of fender--close up. welding holes is beyond my level of skill.
 

Attachments

  • 177961-fender2.jpg
    177961-fender2.jpg
    39.9 KB · Views: 97

Alan_Myers

Luke Skywalker
Offline
Hi,

As far as I can tell from the photo, that looks very repairable. Your shop can advise you how they'd like to repair it. I just thought some info on some of the methods would be helpful when talking to them. Different shops use different techniques, though.

The repairer will probably do some hammer work first, then weld up the holes using one of the methods previously discussed. After that the welds would be dressed to some extent, any final shaping with hammer and dolly would be done, and finally some filler would be used to make the fender near perfect.

Bondo has gotten a bad rap over the years thanks mostly to mis-use, but is actually really good stuff *when it is applied right over a properly prepared surface*. In fact, I'd bet nearly every brand new car on the lot has some bondo or simlar filler somewhere on it. (High tensile steel body panels in modern cars bring a whole different set of challenges!) One important trick is to minimize the filler's thickness by bringing the metal's shape back close to original with hammers, dollies and other body tools. But, it's nearly impossible to hammer metal exactly back to original shape. There will nearly always be some flaws that need a little filler.

Watch an episode of Overhaulin' or American Hotrod to see how they carefully use a little bit of a bondo-like filler at any old dents or patch repairs, and then a similar but creamier product all over the car, which will be mostly hand-sanded off to get perfect results. (In the good old days we sprayed on multiple coats of sandable primer instead, to accomplish the same thing.)

Up around the tail light on that fender, I'd be tempted to use a little lead if any filling is needed. Lead is better, in my opinion, anywhere that will get repeated vibration such as close to or on doors, hoods and trunk lids. But, leading is becoming a bit of a lost art, too, and some modern bondo-type products are probably every bit as good when used right.

Cars always look their worst just before stripping off the old paint, and not much better all naked in bare metal! Primer coats start to give you an idea how good it will look, after all the preparation and most of the handwork is done. But it's not until the top coats of paint go on that things finally come together and look great! (Take another peek at Don's attachment if you need more encouragement!)

Cheers!
 

TRTEL

Jedi Trainee
Offline
Hi, I agree completely with the other guys to keep that fender and repair it. The only thing I might recommend, as it works for me, is if you mig the holes use a dremel tool with a medium grit point for leveling out the welds (spots or seams). Alan's right about the hardness taking its toll on body tools. I've found the dremel very useful (controllable) in that instance. And lastly, while lead is the thing to use at a stressed point, if you have small kids in the house it pays to be overly cautious about policing up after filing and sanding it to avoid carrying it into the house on your soles and wiping it off onto the carpet. Who knows how the next step might occur, but lead is incredibly soluble in that finely divided state in stomach acid and is as we know quite toxic. An ounce of prevention. Again fix that one, it should save at least a days worth of fitting problems.
Tom Lains
 
OP
mcguijo

mcguijo

Jedi Hopeful
Offline
Alright, you guys have convinced me. I'll keep the fender. Like everyone else (I'd assume), my limiting factor is money.

The quote was from a restoration shop who did the soda blasting. He quoted $950 to do the front and rear fender. Although I trust he'd do a great job, I'm afraid since he has so much money tied up in capital costs (like the paint booth big enough to drive an RV into) his costs are inflated. I used to use this old-timer who probably should have retired a few decades ago to do body work. . .the kind who'd rather use a hammer then filler. I'll see if he's still around. .and I'll keep you posted. Else, thanks everyone for the insight.
 

PSUTR3B

Senior Member
Offline
Forty years ago while in high school I worked in a body shop. The bodymen, not me, routinely straightened panel in much wose condition. If your guy is good he should not have trouble. By the way, back then real bodymen did not use plastic. After it was straightened, they used lead, which did not crack and fall out. If the panel is properly worked only a very thin application of body filler should be needed and it could well be straighter than it came from the factory.
 
Similar threads
Thread starter Title Forum Replies Date
Kleykamp TR2/3/3A TR3 rear fender bolts Triumph 2
S TR2/3/3A rear fender vinyl tr3 Triumph 6
Kleykamp TR2/3/3A TR3 rear fender needed Triumph 18
luke44 TR2/3/3A TR3 Rear Fender Alignment at Front Edge Triumph 8
mountainman TR2/3/3A TR3 Rear Fender Mounting? Triumph 4
mountainman TR2/3/3A TR3 Rear Fender Bolts Triumph 2
M TR2/3/3A TR3 Rear inner fender dent repair Triumph 8
fad64b TR2/3/3A TR3 rear fender stone-guards Triumph 22
jfarris For Sale TR3 Rear Sway Bar Triumph Classifieds 0
Donald1107 TR2/3/3A TR3 Rear Shocks Triumph 11
B Wanted TR3 Hardtop Rear Stiffener Brackets Triumph Classifieds 0
J TR2/3/3A TR3 Rear seat Triumph 11
K For Sale TR3 rear rebound brackets Triumph Classifieds 0
J For Sale Triumph TR3 rear differential and rear brake assembly - Northern Illinois Triumph Classifieds 1
E For Sale Tr3 rear axle, rear end Triumph Classifieds 6
K For Sale TR3 rear cockpit center capping Triumph Classifieds 0
J Wanted Need tr3 rear axle housing Triumph Classifieds 0
D TR2/3/3A TR3 Engine dumping Coolant out its rear end - HELP Triumph 5
A TR2/3/3A Newbie wrestling with TR3 rear wheel studs Triumph 3
Tinkerman TR2/3/3A TR3 A REAR WING BOLTS order of assembly? Triumph 3
Got_All_4 TR2/3/3A Tr3 rear differential seal Triumph 7
J TR2/3/3A Tramp bar for rear of TR3 or?? Triumph 7
mgedit TR2/3/3A Steady Springs Rear Brakes 56 TR3 Triumph 0
jfarris TR2/3/3A Wanted - TR3 Monza Muffler - Rear Section Only Triumph 1
M TR2/3/3A TR3 overdrive trans rear speedi sleeve Triumph 6
K TR2/3/3A TR3 Exhaust header's proximity to rear of generator? Triumph 4
J TR2/3/3A Strange fiberboard panel behind rear seat in TR3 Triumph 10
1937dodge TR2/3/3A Anyone have any photos of TR3's sporting rear finned aluminum brake drums? Triumph 8
T TR2/3/3A TR3 Rear wheel cylinder attachment clips Triumph 6
mgedit TR2/3/3A Rear Drum Brakes 56 TR3 Triumph 2
rckuhlman TR2/3/3A TR3 Castle Nut on Right Rear Axle Triumph 3
K TR2/3/3A TR3 4:11 gears in rear Diff Triumph 6
S TR2/3/3A rear brakes tr3 Triumph 1
S TR2/3/3A tr3 rear main Triumph 24
M TR2/3/3A Topping off rear shocks on TR3 Triumph 11
RickAnderson TR2/3/3A Wanted: TR3 Rear Bumper Overrider - any condition. Triumph 2
M TR2/3/3A TR3 rear axle hub gasket ???? Triumph 4
mgedit TR2/3/3A Rear capping 56 TR3 Triumph 4
M TR2/3/3A Topping off rear shocks on TR3 Triumph 13
K TR2/3/3A TR3 rear overider distance from body? Triumph 3
Tr3aguy TR2/3/3A Rear Lettering TR3 post 60000 Triumph 3
luke44 TR2/3/3A TR3 Rear Bumper Overriders - Upside Down? Triumph 12
T TR2/3/3A The light came on: my TR3 rear apron. Triumph 12
S TR2/3/3A tr3 rear interior panels Triumph 6
J TR2/3/3A TR3 Rear Apron Replacement Triumph 4
K TR2/3/3A TR3 Rear Overider Bracket "distance tube"? Triumph 10
J TR2/3/3A stainless steel rear spring pins for TR3 Triumph 19
O TR2/3/3A TR3 Rear Main Seal Triumph 5
A TR2/3/3A More TR3 Rear main seal problems. Please Help!! Triumph 8
J TR2/3/3A '56 TR3 Brakes and rear axle advice Triumph 7

Similar threads

Top