• The Roadster Factory Recovery Fund - Friends, as you may have heard, The Roadster Factory, a respected British Car Parts business in PA, suffered a total loss in a fire on Christmas Day. Read about it, discuss or ask questions >> HERE. The Triumph Register of America is sponsoring a fund raiser to help TRF get back on their feet. If you can help, vist >> their GoFundMe page.
  • Hey there Guest!
    If you enjoy BCF and find our forum a useful resource, if you appreciate not having ads pop up all over the place and you want to ensure we can stay online - Please consider supporting with an "optional" low-cost annual subscription.
    **Upgrade Now**
    (PS: Subscribers don't see this UGLY banner)
Tips
Tips

TR2/3/3A Set Static Timing on TR3B - Car Runs Poorly

af3683

Jedi Trainee
Country flag
Offline
My TR3B was running OK until I thought I'd check the timing and try to make it run better. Here is what I did. I lined up the timing marks, checked the point gap, and have the rotor pointing toward #1 spark plug. I then turned the vernier knob to the 3rd division of the scale which is 1 division (4 degrees) retarded from center. Then I used the below "Igition On" method to set the timing and finally turned the vernier knob 1 more division back to the center.

<span style="font-style: italic"><span style="font-weight: bold">Ignition "on" Method

Keep lead from coil to distributor connected.
Clip lead from test light to distributor connector noted above & other lead to Positive (Ground) side of the battery.
Turn ignition on.
If test light is on, turn distributor CCW until light goes off. Then turn distributor CW until light just comes on.
</span></span>

The car starts but will barely stays running. One troubling thing that I have noticed is that prior to messing with the timing the vacuum advance unit was basically parallel with the engine block. After setting the static timing the vacuum advance unit is now pointing toward the front left headlight. This must have something to do with the poor running of the car. I've checked and rechecked mt steps many times and the end result never changes.

I know folks get tired of timing related questions but I'm getting frustrated and would appreciate any help. Thank you.

Art
 

bobhustead

Senior Member
Gold
Country flag
Offline
Try rotating the distributor back to where the vacuum advance was when you started. Unless you actually pull the distributor from the block and get it back a tooth off, change in the position of the advance should not be perceptible.
Bob
 

TomMull

Darth Vader
Silver
Country flag
Offline
I'd check for actual spark at no. 1 plug in that distributor position. It may be that the dizzy is not really aligned with no 1. Tom
 

TR3driver

Great Pumpkin - R.I.P
Offline
My guess is that your front pulley has been assembled incorrectly, the timing mark is no longer accurate.
 

Geo Hahn

Yoda
Country flag
Offline
If the timing mark is suspect you may be able to time by ear -- as suggested, putting the distributor back into the original position might get you close enough to dial it in. If that gets it running decently a look with a timing light (to see where the mark is) may be revealing.

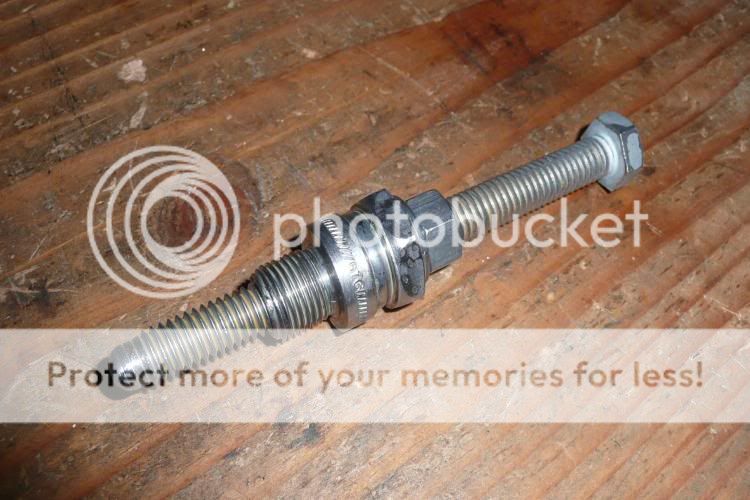
A simple piston stop can be made by pounding out the center of a spark plug and threading it to accept a long bolt.

PistonStop.jpg


The piston is then <span style="text-decoration: underline">gently</span> offered up to the stop from each direction with the TDC pointer position noted on the pulley each time. Midway between the two resulting marks will be TDC.
 
OP
af3683

af3683

Jedi Trainee
Country flag
Offline
I only loosened the distributor adjusting clamp and not the bolts that hold it to the block. I know there was a time when I pulled the distributor body out a little bit. Could that have resulted it moving it over a tooth or two? I thought that as long as you didn't remove the bolts that hold it to the block there was only 1 way the distributor could go back in?

Art
 

TR4nut

Yoda
Country flag
Offline
Can't see how you could slip a tooth even if you pulled the distributor body out fully - its the drive gear below that positions everything, so unless it was stuck to the distributor I doubt that is the issue.

My guess is you accidentally rotated the distributor body too much, and you may be timing on the trailing edge of the rotor, not the leading edge. I would orient the distributor closer to what you recollect then try again.
 
OP
af3683

af3683

Jedi Trainee
Country flag
Offline
Thanks to all. Normally when the pointer and the pully hole are lined up correctly shouldn't the rubbing block be resting on the highest point of the corner of the lobe? If that is true, then even if my pulley was installed incorrectly causing the small hole to be misaligned, shouldn't I be able to turn the engine until the rubbing block is on the highest point of the corner of the lobe near #1 plug and then place a mark on the pulley just below the pointer, ignoring the small hole in the pulley? Correct? Then I could set the static timing with the test light. Thanks agin.

Art
 
OP
af3683

af3683

Jedi Trainee
Country flag
Offline
I don't think I rotated the distributor body too much. I've been very carefull to stop at the exact moment that the test light comes on. I actually try it numerous times to make sure.

Art
 

TR3driver

Great Pumpkin - R.I.P
Offline
af3683 said:
Thanks to all. Normally when the pointer and the pully hole are lined up correctly shouldn't the rubbing block be resting on the highest point of the corner of the lobe?
No, that is nowhere near the right relationship. With the pointer & hole lined up and the engine turning forwards (there is a fair amount of backlash in the system, so it is important to turn the engine forward to the mark), the cam should just (like 4 degrees earlier) have pushed on the rubbing block hard enough to open the points. Peak lift doesn't happen until many degrees later (roughly 26 degrees at the crank pulley).
<div class="ubbcode-block"><div class="ubbcode-header">Quote:] If that is true, then even if my pulley was installed incorrectly causing the small hole to be misaligned, shouldn't I be able to turn the engine until the rubbing block is on the highest point of the corner of the lobe [/QUOTE]

Also not true. The relationship of the rubbing block, lobe and timing mark is exactly what you change when adjusting the timing. If the timing mark is not accurate, then you have to either go back to piston position as Geo suggested; or give up using the mark and set the timing with either a vacuum gauge or by doing a road test (which is my favorite method of doing the final adjustment anyway, since so many things have changed since the cars were new).
 

Geo Hahn

Yoda
Country flag
Offline
af3683 said:
I don't think I rotated the distributor body too much. I've been very carefull to stop at the exact moment that the test light comes on...

But wasn't that process based on the assumption that your pulley was correct and the mark (hole) really is TDC?

If I were doing this I would ignore the book and try to put the distributor back where it started:

af3683 said:
...prior to messing with the timing the vacuum advance unit was basically parallel with the engine block...

If it will run there then small rotations of the distributor can be done -- I think you want to find the spot where the idle RPM is greatest, then retard it a bit from there (perhaps enough for a 100 RPM drop).
 

bobhustead

Senior Member
Gold
Country flag
Offline
The little hole is just a proxy for TDC. You have to find TDC from the crankshaft side of things, using the hole or observed piston and valve position. You can't do it from the distributor side of things. Remember that any of the measured methods of timing are just a starting point. You finish by getting up to about 30 mph and nailing the throttle. If you hear more than 2 or 3 valve train clatters, retard the timing until that is all you hear.
Bob
 

TR4nut

Yoda
Country flag
Offline
af3683 said:
I don't think I rotated the distributor body too much. I've been very carefull to stop at the exact moment that the test light comes on. I actually try it numerous times to make sure.

Art

Art-

I made my guess assuming your car ran reasonably well before, but now doesn't - and you said the distributor is now oriented differently. So it sounds to me like it has been moved pretty significantly? Eliminate the thought that it was by accident, perhaps your test procedure is slightly different:

The way I read the static test when the light goes on you have hit just when the points open and you have lost ground on the lead from the coil to distributor. SO the current instead flows through the light - if hooked up in parallel. Did you by chance hook up your test light in series with this lead? That would change the test to finding just when the points close. Just trying to figure out why the distributor position is different now - I don't think you slipped a tooth the way you described your work.

Randy
 

sp53

Yoda
Country flag
Offline
I would suggest you purchase a timing light and dwell meter and see where you are at with this thing. Heck put some gloves on and turn the distributor while it is running, and it will probably be right back where it was when it ran good. In addition, remember that if the points are wrong, they will affect the timing. What are the points set at? Points first then timing, these are simple engines you will not hurt anything by moving the distributor when the engine is hardly running. Play around with it; get a feel for it and then you will understand how to road set the timing.
 
OP
af3683

af3683

Jedi Trainee
Country flag
Offline
Randy,
Thank you for responding. Sorry for any confusion. When I completed my static timing the orientation of the dizzy was significantly different from the way it was before I messed with it. The car was running decent, but of course that was not good enough for me.

I read up on the proper static timing methods and did the following: Put one lead from test light to distributor connector where the wire from the coil attaches (leaving coil wire connected), put the other lead to positive side of battery (positve ground), turned ignition switch to on, turned distributor CCW until test light went out and then CW until it just came on. I checked this procedure several times and was very carefully to stop turning the dizzy once the test light came on.

The end result was that the dizzy vacuum advance unit was "pointing" toward the from left headlight. Prior to messing with the timing, I recall that the dizzy vacuum advance was basically parallel with the engine block or maybe a hair CW of parallel which seems to be the proper orientation based on photos I've seen. I know many years ago the car was in a front end accident, so it wouldn't surprise me if the pulley was incorrectly installed.

Art
 
OP
af3683

af3683

Jedi Trainee
Country flag
Offline
As suggested I went out the garage and attempted to orient the distributor the way it was prior to my attempt to static time the ignition. After many attempts at turning the distributor a very small amount at a time, I now have the distributor in a position where the car runs.

I vacuum advance unit is basically parallel with the engine block or maybe a hair CW of parallel which I believe is the proper orientation and the way it was prior to my attempt to static time the ignition. Also, I have the vacuum advance vernier fully retarded which is about where it was before.

I not sure if I should start to mess with the vacuum advance vernier at this point. I do realize that I will need to do the road test to and adjust the vernier.

I have not attempted to drive it yet. Just taking a brake now. I don't have a timing light and am not certain exactly how to use it. A co-worker of mine may have one and I'll ask him tomorrow. Assuming the pulley is not aligned correctly, it sure would be nice to locate the proper point on the pulley to line up with the pointer. I guess the timing light can help locate that point.

Thanks again for all your help. Any additional comments would be appreciated.

Art
 

TR4nut

Yoda
Country flag
Offline
Art-

From what you describe, it certainly sounds like you are static timing it 'by the book'. So yes, if you can grab a timing light it will be interesting to see where that pulley mark shows up. I don't use timing lights much anymore, but I have one of the newer ones now and I have found it useful as it lets me check advance vs rpm - I can see what total advance is doing at 2000+ rpm just to check things.

Randy
 
OP
af3683

af3683

Jedi Trainee
Country flag
Offline
If I'm able to borrow a timing light, how would I be able to put a paint mark on the pulley for future reference since the timing light is used while the engine is running? Again, I've never used one so this may be a stupid question.

Art
 

TR4nut

Yoda
Country flag
Offline
Art-

Normally I put marks on the pulley prior to using the light then you can use the marks as reference while using the light. Or if you can get hold of one of those newer lights, they let you dial in the advance on the light itself so you still can use the hole in the pulley (assuming it is where it is supposed to be). Randall or someone else I think posted a while back to give a good measure of degrees/inch based on the pulley diameter.

Randy
 

Geo Hahn

Yoda
Country flag
Offline
From some notes I made awhile back:

<span style="font-style: italic">Pulley: Diameter = 5.5”
Circumference = 17.279”
1° = .048”
4° = .192” (13/64”)
24° = 1.15” (1 5/32”)
</span>
That was for a TR4, hence my interest in 24°, but the measurements are the same for the TR3 pulley.

With a timing light with an advance knob you should be able to see how much (if any) the timing hole/mark is off -- then calculate the location of true TDC and try a spot of paint. Once that is dry you can go back to the timing light (set to 0° and see how close you got it.
 
Similar threads
Thread starter Title Forum Replies Date
M Test light to set static timing Triumph 39
S TR2/3/3A old 4 bolt axle set up Triumph 12
S For Sale twin Weber 40 DCOE 31 set Other British Classifieds 0
S Weber carb set Other British Cars 7
dwpirkeyjr Red? Bue? Purple? Yellow? Poly Bushings Complete Set For 1979 MG midget 1500 Spridgets 6
Gatheringtree TR2/3/3A Gauge Set Triumph 17
Gatheringtree TR2/3/3A Billet Pedal Cover Set w/ Triumph logo Triumph 0
S For Sale Bugeye wheels, steel with round holes set of 5 available Spridgets Classified 0
M Wanted WANTED...New TR6 piston set. Triumph Classifieds 2
HealeyPassion For Sale Tri-Carb Complete Set including manifolds Austin Healey Classifieds 13
K TR2/3/3A An Unusual Brake and Clutch MC Set Up? Triumph 2
71TR6 Set of 4 TR2/3/4 Connecting Rods Triumph Classifieds 0
J TR2/3/3A Confirming Cam Set Up Triumph 5
Walter74 Insulation set from Koolmat Austin Healey 3
G Valve adjustment and easiest way set cam position Austin Healey 15
Michael Oritt HD-6 support set Austin Healey 4
TRopic6 For Sale Vandervell .010 Rod Bearings, MG TB, TC, TD, TF [Partial set] MG Classifieds 0
S TR2/3/3A understanding the float and needle set up better Triumph 6
ArchieMcAllister Wanted Rebuildable set of HD8's Austin Healey Classifieds 4
R For Sale Italian Triple Weber Set Triumph Classifieds 1
6TTR3A TR6 TR6 Trunk lock set screws Triumph 2
S TR2/3/3A paint gun set up Triumph 15
histerical Wanted WTB Set of Later Spridget Rear Brake Backing Plates Spridgets Classified 0
H For Sale Rear end bearing and seal set Austin Healey Classifieds 0
B Wanted Need '58 TR3 adjustable steering set up Triumph Classifieds 4
K TR2/3/3A Rear bumper over rider set up. Triumph 2
Got_All_4 For Sale Triumph Austin Healy Jaguar 15"x5.5" Complete Wire Wheels Set & Hubs Triumph Classifieds 1
D BT7 tri-carb linkage set up Austin Healey 23
Michael Oritt Moss Motors rear brake "set" Austin Healey 11
Basil SOLD!! Set of Whitworth Sockets for sale Other British Classifieds 1
S For Sale Triumph Weber DGV dual Carb Set Up - $325 Triumph Classifieds 0
J For Sale Wire wheel set Triumph Classifieds 2
J Wanted HD8 SU carb set Austin Healey Classifieds 6
M For Sale Aston Martin wheels for Sale - $1600 - Full set in the original boxes Other British Classifieds 1
H Third Member - Differential - Carrier Housing - Center Section - Gear Set Cleaning Spridgets 4
Griz Carpet Set Questions Austin Healey 9
DrEntropy For Sale Midget/Sprite carb set Spridgets Classified 0
D For Sale TR3A-B Side curtain set - white Triumph Classifieds 1
T Wanted tube shock set-up/brackets for MGB MG Classifieds 1
K Wanted A set of TR3A windshield tenon plates. Triumph Classifieds 1
Jim_Gruber Did I find another need for a Whitworth Wrench Set/ Did I screw up intake manifold Spridgets 5
T TR2/3/3A 3rd. brake light set up Triumph 12
Jim_Gruber Am I set up as Positive or Negative Ground? Spridgets 12
Gliderman8 TR6 Valve clearance- How often do you set them? Triumph 4
floyd TR6 need of used carpet set Triumph 0
F Great set of videos showing the superb resoration of a Austin Healey 100-6 - a must Austin Healey 3
Boink Set off a car alarm... Spridgets 2
T TR4/4A Access to a professional sandblasting set up - why the heck did I wait so long... Triumph 4
B Carpet set Austin Healey 7
Editor_Reid WTB Bugeye Dash Knob Set Spridgets 13

Similar threads

Top