• The Roadster Factory Recovery Fund - Friends, as you may have heard, The Roadster Factory, a respected British Car Parts business in PA, suffered a total loss in a fire on Christmas Day. Read about it, discuss or ask questions >> HERE. The Triumph Register of America is sponsoring a fund raiser to help TRF get back on their feet. If you can help, vist >> their GoFundMe page.
  • Hey there Guest!
    If you enjoy BCF and find our forum a useful resource, if you appreciate not having ads pop up all over the place and you want to ensure we can stay online - Please consider supporting with an "optional" low-cost annual subscription.
    **Upgrade Now**
    (PS: Subscribers don't see this UGLY banner)
Tips
Tips

Seat Runner Location

Dace

Member
Offline
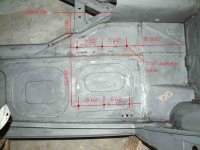
Some time ago I replaced my rusty floor pans on my BN7. Having cut out and replaced the old ones I put them to one side to be used as templates for drilling the new panels to accept new seat runners. Some considerable time, and a house move later I haven't got the original templates and now want to drill the floor for the seats. As this is new metal I want to make sure I only drill them once.

Can anyone point me in the direction of some dimensions or a diagram for the seat runner positions?

Thanks in advance
Dace
 
B

BUNDYRUM

Guest
Guest
Offline
Hello Dace

If I remember tomorrow (Thursday here in Calif) I'll measure my BN7 and send you the dimentions tomorrow night.

I'll measure from the inside face of the inner sill and forward from the vertical panel behind the seats.

I'm usually only on here late at night after work which for you works out fine with you being 8 hours ahead.

Regards

bundyrum.
 
Country flag
Offline
Did you also replace the (floor) metal on the inboard side of the frame rail?

When I did my floors, I only had to replace the (long) main portion of the floor, and was able to use the inboard set of holes to line up where to drill the outboard holes in the new sheetmetal.

I'll watch this thread, and give you the dimensions from my BN6 in case bundy can't get to it soon enough.
 
B

BUNDYRUM

Guest
Guest
Offline
Hello Dace.

Lets start off by getting ourselves all on the same page so we know what's going on.

To start with the Healey chassis has 2 main rails that run the full length of the car. Give or take an inch or two.

Outboard of these main rails are 2 more rails called outer rails which is what the sills and front and rear scuttles are attached to. The floor panels are welded to the top of the main rails and to the inner side of the outer rails as well as the front and rear outriggers.

So are you still with us on all of this.

Measuring from the inner face of the outer rail it is 3.4" to the longitudinal centreline of the outer set of holes.

It is a further 12.75" to the centreline of the inner set of holes.

From the inner face of the forward most vertical panel of the rear scuttle (where the scuttle attaches to the rear outrigger) it is 8.9" from there forward. The holes are 5.5" between centres.

The hole size is .437" (7/16ths) diameter.

Let me know if and where I confused you (apart from at the start) and I'll try again.

Oh yes make sure you take the burr off the hole after it's drilled otherwise the shouldered nut will not sit flat up against the panel.

Regards

bundyrum.
 

GregW

Yoda
Platinum
Country flag
Offline
BUNDYRUM said:
Outboard of these main rails are 2 more rails called outer rails which is what the sills and front and rear scuttles are attached to.
That confuses me a bit. The outer rails <span style="font-style: italic">are</span> the inner sills. See Moss chassis diagram HERE . Look at item #28. Be aware that when making measurements off the inner sill that it doesn't run parallel to the frame rails. The sills taper away from the frame rails as you move towards the rear of the car. So if you make the drill holes parallel to the sills, you may have a problem with the front of the seats hitting the trans tunnel.
 
OP
D

Dace

Member
Offline
Guys,
Thanks for the time and effort in clarifying the hole positions. Its much appreciated,
regards
Dace
 
OP
D

Dace

Member
Offline
Hi Bundyrum,
In my haste to get into the garage I missed the fact that Jerry's excellent anotated picture is not for a BN7. Therefore the dimension from the vertical rear panel is greater than on the 2 seater (Jerry's 13 9/16").

Armed with the BN7 version of this dimension and confirmation of the distance from the chasis centre line (Jerry's 7 7/8" dimension) the rest is set by the spacing of the seat runner bolts and seat base frame holes.

Sorry to trouble you again, could you confirm the two critical dimensions. Also I'm assuming the holes run parallel to the chasis rail axis and not the tapered outer panel (the one the sill panel attaches to).
regards
Dace
 
Similar threads
Thread starter Title Forum Replies Date
shadowfever Seat runner with lever Spridgets 2
D TR2/3/3A seat runner placement Triumph 1
J ??Purpose of extra holes in wooden seat runner spacers?? Austin Healey 4
jhorton3 Seat Runner Spacer Spridgets 4
AUSMHLY seat runner Austin Healey 14
C MGB Re strapping a MGB seat bottom MG 2
T TR4/4A TR4 seat buffer problem Triumph 5
Scotsman TR4/4A Moss seat covers for TR4A missing spring tensioner pocket Triumph 0
A MGB Seat Cover Installation MG 1
tr6nitjulius For Sale 4$ale: 3 Point Seat Belts Red Triumph Classifieds 0
D TR2/3/3A layout for lap type seat belt Triumph 5
R Vixen 2500 Seat Buckets TVR 3
TunaJ Will MGB Upper Seat Runners work with Midget seat rails? Spridgets 1
Celtic 77 MGB Seat webbing replacement. MG 1
WHT BJ8 Rear Seat Surround Drain Tube Grommets Austin Healey 0
B BJ8 Seat Sliders Austin Healey 4
Got_All_4 For Sale 1969 TR6 Driver Seat Triumph Classifieds 0
D TR2/3/3A tr3a occasional seat padding Triumph 10
AUSMHLY BJ8 Rear Seat Squab Austin Healey 0
TomMull MGA Rumble seat MGA MG 3
T Three-Point Seat Belts Austin Healey 8
B Seat Inserts Austin Healey 6
Michael Oritt Best Seat Trim Adhesive Austin Healey 8
Celtic 77 MGB Seat Diaphragm replacement MG 0
D New seat covers Spridgets 11
Celtic 77 MGB 1977 seat webbing replacement. MG 1
F TR4/4A Seat rail extension Triumph 4
KVH General Tech Seat Upholstered Panel Triumph 2
shadowfever Midget seat nuts and bolts Spridgets 2
shadowfever Moss Motors MG Midget seat covers Spridgets 6
shadowfever 65-69 Spridget seat Diaphragms Spridgets 5
Challenger TR4/4A Seat Retainers Triumph 1
S Wanted BT7 Front Passenger Side Seat Pan Austin Healey Classifieds 0
JohnGone Wanted '80 MGB without seat belts? MG Classifieds 3
D Rear Seat Side Panels, BT7 Austin Healey 3
M For Sale vintage 3-point retractable seat belts MG Classifieds 0
Mickey Richaud Wanted Wanted: BJ8 Seat Track Sets (Both Sides) Austin Healey Classifieds 5
A For Sale '74 TR6 original seat frames Triumph Classifieds 0
J For Sale Triumph Tr2/3 seat foams Triumph Classifieds 1
C Seat Slide Bearings Austin Healey 3
F Wanted TR3A rear seat peg and clip Triumph Classifieds 2
EricJNewman MGB Modern Seat Tracks in MGB Solution MG 8
crispy BJ8 Rear Seat Back Upholstery Hardware Austin Healey 7
Jim_Gruber Bugeye Seat Pans needed Spridgets 1
J BJ8 Rear Seat Changes, 1964 to Later Austin Healey 9
mrv8q TR2/3/3A TR3A TRF vinyl seat reupholstery kit Triumph 7
J TR4/4A TR4A seat retaining clip Triumph 5
R BJ7 Back Seat-Rest Austin Healey 1
A TR2/3/3A Seat position Triumph 2
jlaird Wanted One Bugeye seat Spridgets Classified 0

Similar threads

Top