• The Roadster Factory Recovery Fund - Friends, as you may have heard, The Roadster Factory, a respected British Car Parts business in PA, suffered a total loss in a fire on Christmas Day. Read about it, discuss or ask questions >> HERE. The Triumph Register of America is sponsoring a fund raiser to help TRF get back on their feet. If you can help, vist >> their GoFundMe page.
  • Hey there Guest!
    If you enjoy BCF and find our forum a useful resource, if you appreciate not having ads pop up all over the place and you want to ensure we can stay online - Please consider supporting with an "optional" low-cost annual subscription.
    **Upgrade Now**
    (PS: Subscribers don't see this UGLY banner)
Tips
Tips

Removing Rear Hub on BJ8

pkmh

Jedi Warrior
Country flag
Offline
Hello again,

I am sure it has been discussed here many times but I seem to need a little guidance on removing the rear hub assembly so that I can inspect and repack the bearings, if that is all that is needed.

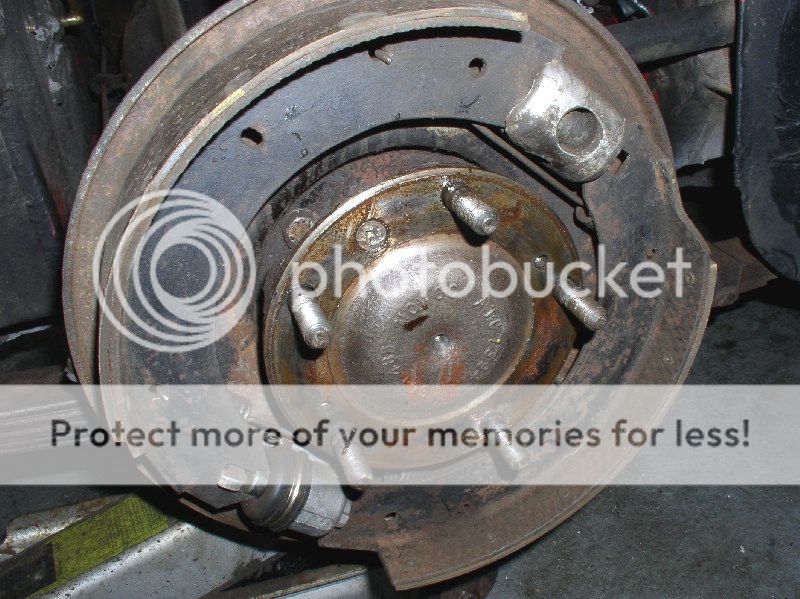
The following photo shows my present hub assembly with the Hub Extension already removed. According to the good book, it mentions about removing the Half Shaft. It also makes reference to using a special tool (18G258). Can a substitution be offered if this tool is not easily accessible?

Aside from that, my simple question is, is it just a matter of using a puller to remove the shaft or is there other preparation I need to do before this stage like dismantling anything from inside the center axle. The book does mention how if damage is done to the paper [joint] washer, then a new one must be installed.

If anyone has done this procedure before and can advise, I would much appreciate and thanks so much in advance!

Paul,
BJ8, Phase II

AustinHealeyRearWheelHub1.jpg
 
Country flag
Offline
Take out the Philip's screw and the axle shaft can be removed. A slide hammer bolted to the wheel/adapter studs will extract the hub.

The rear wheel bearings are lubricated with the axle fluid, so they are not packed with grease, as such. If all you're doing is taking it apart to look at it, i.,e., no symptoms of noise or leaks (and it looks plenty dry to me) I recommend leaving it alone__just put the drum and wheel back on and go for a ride instead.
 
OP
pkmh

pkmh

Jedi Warrior
Country flag
Offline
Randy,

Thank you so much for that advice. I honestly thought they also get packed with grease just as I did with the front bearings, even though I am very much aware of how different the front hubs are by design.

There is no noise or leaks or any other problems I can foresee so thanks for the "what-to-look-for" syptoms as well, including the technique for removal. All good to know and remember.

Just for curiosity, if that Philip's were to be out, is it possible for the axle shaft to actually slide out?!

Paul
 
Country flag
Online
pkmh said:
Randy,...

Just for curiosity, if that Philip's were to be out, is it possible for the axle shaft to actually slide out?!

Paul

Yep, the 1/4" screw is the only thing holding the axle shaft on the rear end. Well, that and the 5-7/16" SAE fine bolts on the axle hub.

BTW, in case you're really curious DON'T pull the axle. There is a paper gasket and possibly an O-ring to keep the diff oil in the axle housing and if you break the seal you'll need a new gasket at the least.

Like Randy said, be happy you've got dry, clean shoes and go for a drive.
 

Michael Oritt

Yoda
Gold
Country flag
Online
Paul--

I'll agree with Bob that there is not much sense in pulling an axle without good reason, though I have never experienced damaging the lip seal when removing and replacing an axle.

However the paper gasket that goes between the two flange faces rarely survives as oil seepage seems to make it stiff and impossible to remove and reuse, though I dispense with it and simply use gray RTC silicone sealant. Also when replacing the axle be sure that the O-ring which sits just inside the circumference of the paper gasket is in good condition and seated within the groove.

BTW you can use the axle as a hub puller: simply slip the axle flange over the studs with the shaft facing out and carefully tighten the nuts in opposite sequence much like installing a cylinder head. Tightening the nuts will start the hub off the bearing surface of the axle housing and you can then use the shaft as a handle with which to complete pulling off the hub.
 
OP
pkmh

pkmh

Jedi Warrior
Country flag
Offline
Thanks for all the great advice offered.

I will leave the axle well enough alone since all seems dry and quiet for now--One of the few things on this car that has had a need of leaving as is.

Paul
 
Country flag
Online
Michael Oritt said:
Paul--

I'll agree with Bob that there is not much sense in pulling an axle without good reason, though I have never experienced damaging the lip seal when removing and replacing an axle.

However the paper gasket that goes between the two flange faces rarely survives as oil seepage seems to make it stiff and impossible to remove and reuse, though I dispense with it and simply use gray RTC silicone sealant. Also when replacing the axle be sure that the O-ring which sits just inside the circumference of the paper gasket is in good condition and seated within the groove.

...

Actually, by 'breaking the seal' I meant pulling the axle and opening the oil seal formed by the paper gasket and O-ring. Sorry, should have been more clear--you won't hurt the lip seal just pulling the axle shaft.
 
OP
pkmh

pkmh

Jedi Warrior
Country flag
Offline
Got it Bob, Thanks.

Almost tempted to pull out the axle shaft for experience, but no, I'm leaving what's not broken for now.

Paul
 

Patrick67BJ8

Obi Wan
Silver
Country flag
Offline
pkmh said:
Got it Bob, Thanks.

Almost tempted to pull out the axle shaft for experience, but no, I'm leaving what's not broken for now.

Paul
The brake adjusters do stick from corrosion and it might be a good time to check it's operation. They are quite costly to replace!
 
OP
pkmh

pkmh

Jedi Warrior
Country flag
Offline
Patrick,

These brake adjusters are the two screws found behind the backplate, also referred to as "steady posts", correct?

If so, then is it true that once set, there should be no further need to do anything further? Or, as you mention, is it a matter of the corrosion process? Is it simple enough solution to apply some PB Blaster and a wire brush to the screwthreads or do I need to do something further?

On the subject of these steady posts, is there some sign I should be looking for at the inside drum area such as uneven wear and what how does one set these steady posts to the proper depth? The shoes themselves seem to show even wear as shown in the photo, (or am I missing something?!).

Now you got me wondering and asking all these questions. Gee!

Paul
 

Patrick67BJ8

Obi Wan
Silver
Country flag
Offline
pkmh said:
Patrick,

These brake adjusters are the two screws found behind the backplate, also referred to as "steady posts", correct?

If so, then is it true that once set, there should be no further need to do anything further? Or, as you mention, is it a matter of the corrosion process? Is it simple enough solution to apply some PB Blaster and a wire brush to the screwthreads or do I need to do something further?

On the subject of these steady posts, is there some sign I should be looking for at the inside drum area such as uneven wear and what how does one set these steady posts to the proper depth? The shoes themselves seem to show even wear as shown in the photo, (or am I missing something?!).

Now you got me wondering and asking all these questions. Gee!

Paul
The brake adusters are held on with two nuts behind the backplate. There's a sqaure post between the two nuts and thats for adjusting the brakes. BCS sells the special wrench for that and I'd get it as you could round off the square post with any other wrench. Your pic shows the two pistons touching and I would assume that you backed the adjuster off to remove the drum, and/or, they are in need of adjustment. If they move when you turn the square post on the backside you might put a litle bit of oil on them. I had one that wouldn't adjust and had to diassemble it completely with a hammer, etc., to free it up and then hone the cylinder and reinstall it. I wish my rear brakes looked as clean as yours does(before I restored them).
 
Country flag
Online
pkmh said:
Patrick,

These brake adjusters are the two screws found behind the backplate, also referred to as "steady posts", correct?

If so, then is it true that once set, there should be no further need to do anything further? Or, as you mention, is it a matter of the corrosion process? Is it simple enough solution to apply some PB Blaster and a wire brush to the screwthreads or do I need to do something further?

On the subject of these steady posts, is there some sign I should be looking for at the inside drum area such as uneven wear and what how does one set these steady posts to the proper depth? The shoes themselves seem to show even wear as shown in the photo, (or am I missing something?!).

Now you got me wondering and asking all these questions. Gee!

Paul

There's only one adjuster, it has a cammed bolt that wedges out a couple of shafts that engage the brake shoe ends. It's at about 1 o'clock in your photo.

The steady posts are two threaded studs, one under each shoe. They can be adjusted in or out to change the angle of engagement between the shoe friction surface and the inside of the drums. They should have a small, cylindrical piece of felt on their ends that can be oiled to facilitate movement of the shoes. If they aren't adjusted correctly you'll get uneven friction surface wear on the shoes, from 'inside' to 'outside.'

The single slave piston--about 7 o'clock in your photo--can slide fore and aft when the brakes are applied (the other end--the adjuster/anchor--is fixed). This allows one shoe to reenforce braking action on the other (a sort of servo action). Otherwise, the leading shoe would do most of the braking and wear much faster.

Your brakes are wearing very evenly, everything's clean with no leaks; unless you have a problem I'd leave well enough alone. Trust me, you'll have plenty of stuff to work on sooner or later.
 
OP
pkmh

pkmh

Jedi Warrior
Country flag
Offline
Very true about other things to work on so yes, I will leave well enough alone.

What may not be obvious is, is that the slave piston you see in the seven o'clock position was replaced last year along with a new double flared brake line behind it.

In fact, I redid all of my brakes including all new flexible lines, new master and refurbishing the reservoir. Oh, and a new emergency brake cable, too.

I hope I'm done with that stuff for a while.

Paul
 
OP
pkmh

pkmh

Jedi Warrior
Country flag
Offline
Well, today was a nice day to take the Healey out for a spin. Unfortunately, I experienced a klunking sound coming from the rear as I was driving, but luckily while driving slow when the klunking started.

I had the car towed home and once in the garage jacked up the rear to inspect.

I figured it was either a bad universal joint or something having to do with the hub bearings. Turning the drums by hand yielded no noise or roughness from the universals so on to the next, the wheel bearings.

First, from visual observation, the driver side rear brake drum had a radiating swirl design appearance (grease markings radiating from the center) and I had a feeling it had something to do with the bearings. BTW, the photo I show at the beginning of this post is the passenger side, which is unaffected by today's events.

When I removed the brake drum, I noticed how the brake shoe was completely wet. I also noticed how one of the hub studs actually sheared off while some of the remaining nuts were loose.

I believe it is possible that the hub nuts may not of been completely tightened or have somehow become loose during driving and caused the klunking sound to start and subsequently, causing the paper thin hub seal to become broken, possibly explaining why some of the lubricant escaped the way it did.

As much as I didn't want to touch the hub bearings, now I feel I better. I would attempt to try just retightening the nuts to the hub and see if the klunking goes away, but now I have a ruptured seal and one broken stud so shouldn't I just go through removing the half shaft and place new bearings and seals, etc.?

I would be curious to learn from anyone that may possibly have a photo of a device used to remove the hub and maybe other things to be aware of during the removal and installation process. I could insert two threaded rods and attach a plate of some kind to whack out the shaft and if that is the ideal way, then what would be the ideal way of placing back.

Anything else I should know before I order parts or start to dismantle?

Thanks for any input offered.

Paul
 
Country flag
Online
pkmh said:
...
As much as I didn't want to touch the hub bearings, now I feel I better. I would attempt to try just retightening the nuts to the hub and see if the klunking goes away, but now I have a ruptured seal and one broken stud so shouldn't I just go through removing the half shaft and place new bearings and seals, etc.?

Somehow, I'm getting the feeling you just really want to pull the hubs. If you do, plan on doing both sides.

From your description, it sounds like one or more of the studs wasn't torqued correctly, or maybe you just got a bad one. You don't need to pull the hub unless the bearing is shot and/or the lip seal on the backside is leaking. It's a big job getting the hubs off; various methods are described including reversing the axle and pulling the studs against the axle and the axle housing, but this only gets the hub out part way and you'll need to use a puller at some point.

Once out, you need a pretty good-size hydraulic press to press the bearing out, which you have to do to get to the seal. There are better ways, but I've always replaced the hubs using a suitably sized drift on the inner race of the bearing and a large hammer. It helps to warm up the hub or even cool the axle housing; pound only as much as necessary.

If it was my car, having pulled hubs several times, I'd check the bearing for wear and if it's OK and the lip seal isn't leaking I'd replace all 5 studs and put a new gasket and O-ring in (it looks like it would be easier to replace the studs with the hub on the bench, but it looks like you could carefully drive them out in situ). The brake shoes are a tossup; once thoroughly soaked with oil you'll never get all the oil out, if it was just on for a while you MIGHT be able to clean them up. Use brake cleaner and sand them down and let sit overnight; if more oil surfaces the shoe is shot.
 
OP
pkmh

pkmh

Jedi Warrior
Country flag
Offline
Hey Bob,

No, honestly, it gives me no pleasure to pull out the hubs, especially if there is nothing really wrong with them.

At the moment, I am trying to determine if the leaking is the result of a bad seal (or bad bearings) from within the shaft portion, not just the seal at the outer hub disc.

I have taken good photos of the present condition, but I seem to have a problem posting them for better discussion/clarity at the moment. When and if I can, I will.

So with that in mind, I will first attempt to remove and install a new stud to the hub disc (and hopefully, I can do this without having to remove axle shaft) and then see if it is possible to seal the outer paper thin seal with Permatex or maybe something other? I know that the seal is damaged to some extent from the evidence in one stop. How bad, I will figure out later after cleaning up all the wetness.

After accessing the cause and effect with what happened yesterday, I am hopeful the leaking is the direct result of the lug nuts loosening, therefore weakening the seal and shearing off one stud.

I will test drive it after that stage, and if I do not hear anymore klunking, then I will let to go, unless I still have a leak. Then I assume the next step is to remove the hub.

I figure I ask for more thoughts on this so I can build up the 'courage' to go forward if I have to remove the shaft, etc. I can see this as a lot of work.

And thanks for the pics Randy, on the device for removal. Looks to be similar with what I had in mind.

Paul
 
Country flag
Online
With the hub off, the only thing holding the axle shaft in place is a single screw. There is no C-clip in the differential.

My guess is loose hub nuts(s) caused the 'klunk' and the leak and possibly the broken stud. If the machined surfaces look OK a new paper gasket and O-ring should fix the oil leak. Gasket sealer usually isn't necessary on smooth machined surfaces, but if you use it use a thin coat only (maybe a little to hold the O-ring in place during assembly).

Check the bearing--if it turns smoothly with no grating or drag it's likely OK.
 
OP
pkmh

pkmh

Jedi Warrior
Country flag
Offline
Hello Folks,

With the rear of the car off the floor, I am able to manually rotate both
wheels freely and my feeling is I notice an ever so slight sound of the bearings spinning. I am taking that as the normal sound of parts moving, unless one tells me no sound of any kind should be heard.

The klunking sound starts almost immediately when I accelerate from a stop.
I also noticed how abrupt this klunking started instead of it starting off gradually or one of progression. One last clue, the klunking would disappear as I accelerated from a stop but then the klunk sound would return as I let off the gas. Of course, I never went fast or left first gear when this developed.

The aftermath of the hub appears to be okay. Nothing bent, scored, etc., resulting from the small distance I traveled. Only the sheared stud, a couple of nuts in an untighten state, a small portion of that paper seal damaged, lose of lubricant (hopefully not much) plus the saturation of lubricant to the brake shoes and drum area.

One last note, I purposely wound push and pull against the hub to see how much play or give was made of the axle shaft. I'm guessing about 1/16" in distance of total play. Hope that is normal.

Paul
 
Similar threads
Thread starter Title Forum Replies Date
drooartz Removing the $@#! rear hub oil seals Spridgets 3
BN6_2197 Removing connecting link between shock absorber and rear axle Austin Healey 4
Gliderman8 TR6 Removing Left Rear brake line... help! Triumph 9
maxwedge5281 Removing Complete Rear End From BN6 Austin Healey 5
pkmh Removing Passenger Rear Bearing Nut Austin Healey 26
Jim_Gruber Removing the Rear Axle Seal Spridgets 4
KVH TR4/4A Removing Rear Differential Seal--Solid Axle Triumph 1
busybrit Removing the drain tube fron the rear mains cap. Austin Healey 4
R Removing rear quarter elliptical Spridgets 5
M Having a hard time removing the rear bumper [pic] Triumph 4
TR4 TR4/4A Removing a rear fender on a TR4 Triumph 7
66healey removing rear fender Austin Healey 3
TR3MT Removing rear fenders Triumph 10
Ohiobugeye Whats the key to removing the rear radius arm bush Spridgets 6
Guinn removing rear rubber bumper MG 6
T Help removing the rear drive flange Triumph 2
HAN8L1965 Removing backing plate on rear drum brakes Spridgets 3
sultanoswing T-Series Removing Rear Hatch - tight screws!! MG 1
bluemiata90 Removing rear springs Triumph 3
L Removing Master Cylinder Without Paint Damage Austin Healey 27
D Removing the steering wheel hub Spridgets 12
J General MG Thoughts on removing a stubborn 2-ear spinner MG 5
K TR2/3/3A Removing scratches and scrapes fro the wind wings that screw to the windshield? Triumph 9
Gatheringtree TR2/3/3A Removing the headlamp bezel rim Triumph 2
R TR6 Removing the charcoal cannister considerations Triumph 7
S TR2/3/3A Removing a stuck oil drain plug Triumph 13
K TR2/3/3A Removing TR3 windshield stanchions Triumph 4
KVH General Tech Removing Piston Wrist Pin Triumph 2
C Removing AH Sprite Mk 1 windscreen washer pump Restoration & Tools 2
M Need help removing the pinion assembly from a late 1275 steering rack Spridgets 7
jfarris TR2/3/3A Removing choke cable from dash insert Triumph 3
doakley Spitfire Removing facia Triumph 2
7 Wedge Removing sunroof frame Triumph 5
D Removing the last rust from pitted steel Restoration & Tools 11
D Removing Old Radio Austin Healey 4
S Removing Overdrive Shaft Lever Pin Austin Healey 7
L TR2/3/3A Any trick to removing TR3 doors? Triumph 12
M TR2/3/3A Removing Wires From Stator Tube Triumph 7
T TR2/3/3A Requesting help on removing TR3A steering column and box Triumph 21
longbridgehealey Removing BN4 Bonnet Austin Healey 9
C Removing the Healey "Flash"? Austin Healey 11
Jim_Gruber Removing a Spridget Engine Checklist Spridgets 5
S TR2/3/3A removing the temp gauge needle Triumph 5
Sarastro General Tech Any good ideas for removing liners? Triumph 20
R TR2/3/3A Removing WD-40 Triumph 6
F Removing oil and water guage from BT7 dash Austin Healey 17
R TR2/3/3A Removing transmission Triumph 3
Joe Schlosser Removing Control Knobs Spridgets 9
W TR2/3/3A Tell me there is a trick to removing lower control arm pin... Triumph 45
Bona42na Spitfire Removing Transmission/Gearbox from underneath Triumph 3

Similar threads

Top