• The Roadster Factory Recovery Fund - Friends, as you may have heard, The Roadster Factory, a respected British Car Parts business in PA, suffered a total loss in a fire on Christmas Day. Read about it, discuss or ask questions >> HERE. The Triumph Register of America is sponsoring a fund raiser to help TRF get back on their feet. If you can help, vist >> their GoFundMe page.
  • Hey there Guest!
    If you enjoy BCF and find our forum a useful resource, if you appreciate not having ads pop up all over the place and you want to ensure we can stay online - Please consider supporting with an "optional" low-cost annual subscription.
    **Upgrade Now**
    (PS: Subscribers don't see this UGLY banner)
Tips
Tips

Ray's rods

Offline
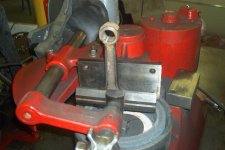
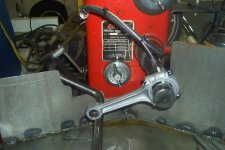
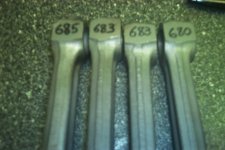
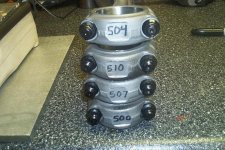
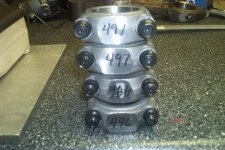
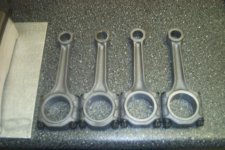
In Drew's engine I showed some of the rod prep, on rays engine, I'll try to go more in depth of what goes into prepping a connecting rod for a rebuild. Now some of you may think wht we're doing here to be taking it to the hilt, but the orocedure you see me doing to Ray's rod, would be what I consider the norm that should be done during rebuild. Now in this build the assembly will be balanced, and that is considered above the norma as the factory does balance the rotating mass, we'll just do it to a tighter tolerance, but evryhting outside the balancing, I consider to be the absolute minimum of what you need to do in a rebuild of a high milegae street engine. What I find the most in high mileage street engine connecting rods, that that the rod's "housing bore" (housing bore is the size of the rod's big end with the bolt torqued) has became somewhat egg shaped, the rod doesn't holds the bearing shell correctly, and while most of the time, this isn't the end of the world, in extreme cases this could cause a turned bearing, and a engine failure. Rod bolts is a interesting deal on a 1275, as the factory chose to use nylock nuts as a rod fastner, this was a iffy choice at best, I think it's a good idea to replace rod bolts when doing a rebuild, and sizing the rods. Now if you go to any of your favorite spridget part vendors you going to get a quick education in replacement rod bolt, the facotry replacement are ungodly expensive, so much so, it's cheaper to use the far superior ARP rod bolt set. Now over the years, a few clever folks have discovered that a ARP big block Chevy rod bolt will fit a 1275, however this is not a wise choice, even though the cost is much less the head of the bolt is different, and the nut is too large, the only reason some vendors chose to go this route is for larger profit ranges, I use the correct ARP A-series 1275 rod bolt kit, ARP # 206-6001. I once let a very well known race engine builder talk me into using the big block Chevy rod bolts, he even prepped them for me at my shop in front of me, wouldn't you know it, on failed and took out the bottom end of a race engine, while many have sucessfully used the BB Chevey rod bolts, sorry I', not staking the life of a engine on making another 50 bucks profit, so it's nothing but ARP 206-6001 rod bolt for my rods period.

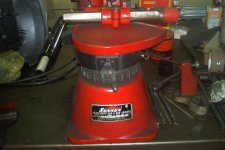
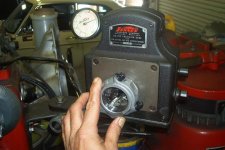
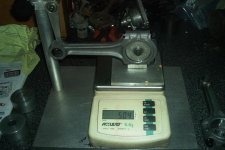
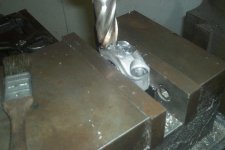
Ok first step on rays rods as to degrease them, I did this in the parts washer, and then air blew them dry. I then pslit the rods and removed the rod bolts, 1275 rod bolts are basicly just tap in, not press in, so a couple tps of the hammer and they are out of our way. The the rods go to the bvead blast cabinet for a blasting. After the rods are blasted and cleaned again in the part washer, they go to the Sunnen cap grinder. To size the big end of a connecting rod, you first must make the housing bore smaller, so you can hone it back out to the desired size. The Sunnen cap grinder use a stone to face the parting line of the rod top and cap to put a new face on it it, normally you take very little off the rod and the cap, maybe a couple of thousands of a inch.

Here's a photo of the Sunnen cap grinder.
 

Attachments

  • 13666.jpg
    13666.jpg
    50.9 KB · Views: 666
OP
Hap Waldrop
Offline
Here's a photo of a rod top in the Sunnen cap grinder. Basicly here's how it works, you level up the rod or cap on a mounting pad, then clamp it in place, the cap grider has a stone that you can move upward towards the rod or cap's parting line, until it touches off, then with the clamp handle you can swing the rod or cap across the rotating stone, and continue to fee the ston higher in one thousands of a inch increments to complete this portion of the job.
 

Attachments

  • 13667.jpg
    13667.jpg
    50.1 KB · Views: 662
OP
Hap Waldrop
Offline
One the cap and rod parting line are freshly refaced on the Sunnen cap grinding, the next thing is to deburr the parting line, this is done with a simple hand file, only thing you aredoing here is getting the burr off the parting line, if you ignored this you could get a false reading later in the job. After the rods have been deburred, and clean yet again, you can now instll the new ARP rod bolts, ARP suggest that you use their assembly lube on the threads or 30wt oil, and torque the bolts three time to cycle them in, after the third torque, you now ready to size the rod's big ends on the Sunnen rod hone. There are different size mandrels for different connecting rods, I own two big rod mandrel, one for MG A-seires and one I use for MGB and Triupmph rods, Sunnen CR mandrels are pretty expensive the to I own cost well over a $1000 dollars, when you go to your local machine shop and see a dozen or more CR big end mandrels, this could easily equate to $7500 woth of mandrels, this is whay I don't have nay more mandrels than the ones I use to build the engines I rebuild, tooling can be big time expensive.

Basiclt here's hopw the sunnen hone works, and I'll also go into the Sunnen AG 300 rod gauge. First thing you do is get the correct mandrel for the rod you are sizing, for the 1275 rods it is a CR-1750, then you set up the AG 300 rod gauge to the desired size you want. In the case of Ray's rods, I went to the small size of the spec of the housing bore which is 1.7005", the AG-300 gauge reads in tenths of one thousnds of a inch, by sizing Ray's rods to 1.7705", with the size of his rod crank journal, this will net us a rod journal clarence of .0015"-.0017", if this was a racing engine this clearence would be a bit bigger, depending on the engine somewhere around .002"-.0025" for a racing engine.
 

Attachments

  • 13668.jpg
    13668.jpg
    60.7 KB · Views: 670
OP
Hap Waldrop
Offline
Here's a photo of one of Rays rods being measured on the AG-300 rod gauge, this is a $2000 tool, but one I deemed necessary to have, they is no better tool on the planet to measure connecting rod big ends with. You set the tool up using a micrometor, and lock it in palce. here you can see see me measuring one of Rays rods, notice the dial indicator is zeroed out, meaning we're good to go.
 

Attachments

  • 13669.jpg
    13669.jpg
    60.7 KB · Views: 646
OP
Hap Waldrop
Offline
Ok, now that we hae the rods sized to where we wnat them, the next move is to balance them, we start off with just weighting them, I was toaught many yeas ago, how to balance rods by a very smart race engine builder when I worked with him, he sank the procedure in my head, made me do it it different ways so in the end I fully understood what I was doing. You'll notice I take two weights, total, and big end, I only eqil;aize my total weight by removeing material from the small end side of the rods, what this does, is match samll end and total end weight at the smae time, and then all bottom end weight will be removed from the cap of the rod. Here a look at a matched set of factory 1275 rods (Ray's rods) that a re in fact matched balanced by the MG factory, my job will be to get all these weights to within a single gram of a ounce.
 

Attachments

  • 13670.jpg
    13670.jpg
    46.6 KB · Views: 636
OP
Hap Waldrop
Offline
Here's a picture of one of Ray's rod having the big weighted.
 

Attachments

  • 13672.jpg
    13672.jpg
    53.4 KB · Views: 626
OP
Hap Waldrop
Offline
Ok next move now is to actually do the balance job on th rods. Here's a photo of the Ray's after the sizing was finished.

Ok back to the coal mines :smile:, I post more photos of the balancing procedure, and of the final product.
 

Attachments

  • 13673.jpg
    13673.jpg
    42.1 KB · Views: 628
OP
Hap Waldrop
Offline
Ha, ha, :smile: I just realized I posted all this on the MG page rather than the Spridget page, but it good info for all you bigger MG guys as well. Maybe one of you moderators could move this to the Spridget forum for me :smile: Thanks.
 

1965_MGB

Jedi Warrior
Offline
Now those are some fine looking rods. It is amazing (to me anyway) just the amount of work that goes into doing that job.

Great stuff there.
 

Steve_S

Yoda
Offline
I don't see this as a Spridget-specific topic at all. I appreciate the pics and info no matter what type of cars the process applies to!
 
OP
Hap Waldrop
Offline
Ok, well since I started here, I guess I finish this thread here :smile:. The next step in the procedure was balancing. I do alot of prepping of stock connecting rods for SCCA racer, in SCCA production class they have a engine prep level called "limited or restricted prep", this level of prep requires you must use stock connecting rods in most engines, but you are allowed to lighten them, polish them, even convert them from press fit to floating pins, well needless to say alot goes into those rods, and if you get all the bell and whistles you can almost put as much money into a set of stock rods as you can a set of some aftermarket rods, these racing rules are always designe with the intention to make racin cheaper, bt rarely does it ever work out that way. Anyway in my SCCA race prepped stock rods, when it cam to doing all the polishing to them, and then taking the rod caps to the grinder to match big end weight, it seemd like a crime to take a grinding wheel to a work of art, so I developed a way to take weight off the bottom end with a end mill on the Bridgeport mill, as it turned out it ended up being a pretty easy way to do it, and now on most rods sets, I use this method to remove weight form the rod cap, now mind it looks cooler than than grinding marks on the cap, and that was my intial reason for doing it, it no better way than the using the grinder, just a easier way for me to do it, so if your builder use the bench grinding to balance your rods, it A-Ok, and you'll see I do my samll ends with the grinder. Here's a photo of a rod cap getting miiled in the mill.
 

Attachments

  • 13674.jpg
    13674.jpg
    32.3 KB · Views: 600
OP
Hap Waldrop
Offline
Ok, here's a look at all the big ends with their big end weight within a gram.
 

Attachments

  • 13675.jpg
    13675.jpg
    62 KB · Views: 581
OP
Hap Waldrop
Offline
OK, here's a look at the small ends, as described in a earlier post, by limiting my total weight reduction to the small end I effectively accomplish both small end and total weight together. When I first learned how to do rods, my mentor, I think wanted to get me out of his hair for a week or so, so he gave me a box full of 2300 Ford rods, that had been mismatched as far as caps and rods, had me match everything back up, then grind the parting lines of the rods and caps, then hone the big ends, then balance them, there must have been 50-60 of those rods, during the balancing stage of this project, he first had me match total, small end and big end weights, then he taught me the trick of getting total and small end at the same time, and proved to me how it was in effect the same method, just a time saver, needless to say, I never did it the other way ever again. At the time of the Ford 2300 rod ordeal, I felt like my mentor was just giving me a big ole chore to do, to get rid of me, and I think he thought that too, but what it did as make me own this job, had I had to do this job, a set of rods at a time over time, it would have taken me much longer to learn this, so what seemed like punishment, really was a great learning tool. Notice on the samll ends, two are untouched, as they both worked out to be the same, and were the lightest two ( you don't always get so lucky) one was a just a single gram over, and the worse of the bunch was like 8 grams off the target, you can see the two small end that needed grinding and how much the two rods got ground on to achieve the target weight.
 

Attachments

  • 13676.jpg
    13676.jpg
    63.5 KB · Views: 573
OP
Hap Waldrop
Offline
Ok, after the work, here ya go, so next time, you have a machinist do this job for you, you know have a idea of what the job intels, and where your money is going.
 

Attachments

  • 13677.jpg
    13677.jpg
    46.7 KB · Views: 572

14dna

Luke Skywalker
Country flag
Offline
Hap;

A good friend of mine is an engine builder. As a mechanic for the last forty years, and a racer, I have the highest respect for your job.
If anyone doubts your ability. let this post remind them, you are very thorough and very, very good!

My kudos to you sir!

Dave :cheers:
 
OP
Hap Waldrop
Offline
Dave thanks for the kind words. You, being a mechanic for 40 years I have much respect for your work as well, I constantly remind folks that I'm a rebuilder, not a mechanic. I'm as lost as the next guy when it comes to an electrical problem, heater core, etc. I have it easy, I get to spread my work out on a bench, you have to work on the car as a whole, alot of the time on a lift, a much tougher task in my opinion. Hats off to you sir, for keeping folks on the road for 40 years.
 

vping

Yoda
Bronze
Country flag
Offline
...and I wish I could do either.

Nice looking work Hap, real nice.
 

jlaird

Great Pumpkin
Country flag
Offline
And a big Thank You for Hap, again he is teaching us neat, intresting stuff.
 

Bruce74B

Jedi Knight
Offline
The Phrase "more of an art than science" comes to mind here. I learned something alright...I can't balance a set of rods, but I can surely respect the work of a good machinist more now. While I can do arbitrage rebate calculations for a municipal bond issue, I hope to find a talented rebuilder when it comes time to have Dolly Clementine's engine done.

Thanks for taking the time to explain and document this process...you are truely an artist!
 
Similar threads
Thread starter Title Forum Replies Date
Hap Waldrop Ray's rods MG 0
M Ray Juncal Valve Covers Austin Healey 5
T Hey Ray! My new hubs arrived also Triumph 8
RobT TR5/TR250 So Ray Magliozzi Owned a TR250! Who wodda thought Triumph 6
RickB Lookie what came today from Ray McCaleb!!! Spridgets 12
Hap Waldrop Ray's engine is done Spridgets 27
Hap Waldrop Ray's head Spridgets 1
Hap Waldrop Ray's bottom end Spridgets 5
Hap Waldrop Ray's oil pan Spridgets 20
Hap Waldrop Ray's engine, more goodies Spridgets 4
Hap Waldrop Ray's external oil system Spridgets 3
Hap Waldrop Ray's oiling system MG 5
Hap Waldrop Ray's motor is coming along Spridgets 14
Hap Waldrop Ray's McCaleb's "The Spridget Project" motor build Spridgets 23
M Ray: I got the part today! Spridgets 1
tony barnhill What a Guy Ray [mccalebr] Is!! Spridgets 3
mccalebr Ray's Garage Spridgets 17
apbos Ray has been hiding something from us! Spridgets 1
mccalebr Hap's 1275 engine builds for Ray and Drew Spridgets 15
Hap Waldrop For Ray and Drew Spridgets 18
Bret Another X-Ray Image! Other Cars 15
Bret Classic Motorsports MAG; X-Ray Specs! MG 6
Bret Truck X-Ray! Other Cars 10
Bret MGB MGB X-Ray! MG 25
kodpkd Adjustable Tie Rods Austin Healey 20
6 Master Cylinder Actuator rods Spridgets 2
71TR6 Set of 4 TR2/3/4 Connecting Rods Triumph Classifieds 0
B RHD BJ8 Throttle Control Rods Austin Healey 9
B TR4/4A Outer tie rods Triumph 8
R TR4/4A CP-Carrillo or Pauter Connecting Rods Triumph 2
rr64 Wanted Early MGB Inner Steering Track Rods Wanted MG Classifieds 1
K TR2/3/3A New Tie rods and Ends Triumph 3
AH67AH Tie Rods / Alignment Austin Healey 3
I Wanted emergency brake rods from later Spridget Spridgets Classified 0
PAUL161 T-Series Bent Push Rods MG 34
S TR2/3/3A shifting tower shifting rods on an early tr3 tower Triumph 11
John Turney Alumifix Flux-cored Rods Restoration & Tools 4
Got_All_4 TR6 Ballancing the connecting rods and pistons. Am I lucky? Triumph 4
R Upgraded rod bolts for stock rods Austin Healey 1
G Wanted TR4/4A[?] Stay Rods and Fuel Line Triumph Classifieds 1
bcbennett Wedge Bonnet and trunk prop rods Triumph 0
T timmers 67, push rods and lifters Austin Healey 4
P TR2/3/3A "MaXpeedingRods" con rods good or bad? Triumph 3
S Difficulty removing end rods and cross rods Austin Healey 11
KVH TR4/4A Rocker Shaft Lubrication, and Issue with Push Rods Triumph 1
Rut later brake rods on a Bugeye Spridgets 7
R Tie rods zerk Austin Healey 32
S TR2/3/3A copper gasket sealer and push rods Triumph 10
J Healey 100 -- Broken rocker and bent push rods !!! Austin Healey 7
B Stainless hood / bonnet and trunk / bood support rods Austin Healey 2

Similar threads

Top