• The Roadster Factory Recovery Fund - Friends, as you may have heard, The Roadster Factory, a respected British Car Parts business in PA, suffered a total loss in a fire on Christmas Day. Read about it, discuss or ask questions >> HERE. The Triumph Register of America is sponsoring a fund raiser to help TRF get back on their feet. If you can help, vist >> their GoFundMe page.
  • Hey there Guest!
    If you enjoy BCF and find our forum a useful resource, if you appreciate not having ads pop up all over the place and you want to ensure we can stay online - Please consider supporting with an "optional" low-cost annual subscription.
    **Upgrade Now**
    (PS: Subscribers don't see this UGLY banner)
Tips
Tips

Proper use of the Gunson Colortune

M

Member 10617

Guest
Guest
Offline
I have searched the forum for references to the colortune, and have found several. But all they say, basically, is "us the colortune" to tune your carbs.

I have a new colortune and have read the instructions... several times... but to little satisfaction.

Can anyone step me through the use of the colortune in tuning my TR3?

And, the instruction book makes no mention of this, what is the solid cross section gas seal washer that is included with the colortune for and how is it used?
 

mallard

Luke Skywalker
Country flag
Offline
Ed great timming, I plan to do my carbs this weekend with one. I've never used one before so I can't help with the set up though. Hope we can learn together on this.
 

poolboy

Yoda
Country flag
Offline
I just don't think there is one mixture setting that is perfect for all rpms and engine load.
You pretty much have to pick your poison when it comes to setting the mixture with these old side drafts.
 

hondo402000

Darth Vader
Offline
yea its either it idles smooth and misses at high RPM or Misses at idle and runs like a chain saw at WOT that wide open throttle

Hondo
 

tomgt6

Jedi Warrior
Offline
As far as I have used it all I have done it try and get the color of flame I want. Not to white and not to blue. I also use the air flow meter as well when I am tuning. But if I remember the first things you want tuned are the points, dwell and timing.
 

TR3driver

Great Pumpkin - R.I.P
Offline
hondo402000 said:
yea its either it idles smooth and misses at high RPM or Misses at idle and runs like a chain saw at WOT that wide open throttle
Then either your carbs are worn out, or your engine is modified enough that you should be looking for different needles and/or springs.

For ZS carbs (which have woefully few needle choices), you may need to modify some needles to match your other modifications.
 

PC

Obi Wan
Country flag
Offline
Here's a link to an old article by David Vizard on using Colortune.

Hmm, I don't like the font. So I'll just copy and paste it here:

Mixing it on your Own Dyno
by David Vizard

The average home tuner's most frequent problem, if the letter
we get are anything to go by, is getting the fuel/air ratios
(mixture) right after having tinkered wit hthe motor. After
printing this article, we do not expect to get, ever again, a
Technical Query asking what needles or jets to use on a
modified motor, becuase this really should be the end of your
mixture problems!

When tuning the engine, it is more than likely that the
fuel/air demand of the engine is changed. Becuase of this it
is neccessary to "calibrate" a carburetter so that it passes
fuel into the engine in the correct quantities for the amount
of air being consumed. Over its operating range, a
carburetter may have to pass a volume from say two to two
hundred cubic feet of air a minute! At tickover, the
consumption of air is very low, but at full throttle the
opposite applies.

At every point between the two extremes the air flow
requirement is different, yet at all these points the
carburetter is expected to mix the correct amount of fuel with
the incoming air. There is little point in trying to set up
the mixture at tickover becuase very few, if any, of us drive
on tickover and there is absolutely no guarantee that the
mixture is right throughout the range.

How do we know or how can we tell what the mixture is like
anyway? Up until now, the most common method has been to
"read the plugs". If you have had years of practice and are
an expert plug reader (not the print on it) you can just about
pull off the job of mixture setting. The trouble, however,
with a plug count is that one is never too sure what the plug
is saying.

For instance, a dark, very slightly sooty plug can look like a
mixture that is just a shade rich, but it could be that the
mixture is just right and the plug type is too hard (runs too
cold) for the motor. Unless you are an expert then, reading
the plug is, to say the least, just shade dodgy.

An alternative to reading a plug is to get your engine set up
on a dynomometer; either the rolling road type or the engine
type. When an engine is on a dyno, it can be run at various
rpm and against various loads, thus simulating the conditions
met on the road. While all this is going on, an electronic
gas sampler can be analysing the exhaust and indicating the
fuel/air ratio.

Going from reading plugs at a dollar a time to using three
grand worth of dyno might seem like going from one extreme to
the other or to use a comparison, going from an abacus to an
electronic computer. What is needed to use the analogy again
is a slide fule ie: a method between the abacus and computer,
or to come back to reality, a method of setting the mixture
which is more akin to the dyno and mixture analyser than the
plug reading method.

A dynomometer measures horse power, commonly called brake
horse power becuase a dyno is nothing more than a brake,
calibrated to read out the work absorbed and the rate of
absorbtion. Here we have a clue; all cars have brakes (or
should have) so what we have, in effect, is an uncalibrated
dyno fitted to our car. To simulate road conditions whilst
standing still, all we need do is to jack up the driving
sheels of the car, put it in gear and use the throttle as if
we were driving along the road.

To simulate road levels we need only apply varying pressure on
the brake pedal. Such action will, of course, get the brakes
hot. For our purposes we need to be able to hold full power
for about fifteen seconds maximum. If your brakes cannot cope
with this from the heat point of view, then you are sadly
lacking in that department so see to it. It's probably better
brakes you need and not more power!

Okay, so we have our dyno. The fact that it does not read out
in horsepower is, for our purposes, irrelevant. What we need
now is a mixture analyser. Up until a few years back this
would have cost a tidy sum. These days we have a device known
as a "Colortune" and within the price range that can be
afforded by the enthusiast, this is the _only_ device we know
of that will do the job in hand.

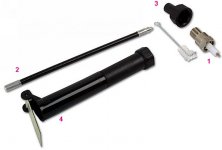
For those who man not know, a Colortune is a device which
replaces the sparkplug in the cylinder. The top of the
Colortune is made of a Borosilicate glass and this allows you
to see what is going on in the mixture combustion chamber.
Different mixture strengths burn at different colours.

By looking into the combustion chamber through the Colortune
we can get a good indication of the mixture strength
prevailing. Inspection of the flame color shows that four
fairly distinct stages occur. when the flame colour is
blue/white, the mixture ration is between 16 and 14:1; a blue
colour indicates a mixture strength between 14 and 12,5:1; a
blue/orange colour indicates 12,5 to 11:1 and orange indicates
11:1 or less.

The Colortune, then, is indicating at the colour transition
points the mixture strength of the ingoing charge. Maximum
power occurs when the fuel/air ratio is between about 12,5 and
13,5:1. The exact point varies from engine to engine, but
most cast iron tuned production engines seem to be best around
12,8:1. The best economy is achieved on weaker mixtures than
that giving maximum power, and fuel/air ratios between 14 and
16:1 seem to be the easiest on the pocket.

To set up the mixture in the manner about to be described you
will need an accomplice. The first and essential step is to
part the car in some place which is poorly lit, so that you
can see the combustion colours. Jack up the driving wheels of
the car until they are just clear of the ground and in the
interest of safety, securly blockthe car so that it cannot
move under any circumstances.

At this point, warm up the engine, the remove a spark plug and
replace it with a Colortune. Set up the mixture so that you
have a fuel/air ratio of about 12 to 12,5:1 (orange/blue) at
normal tickover revs. If you have multiple carbs you will
have to do this for each cylinder or set of cylinders having a
carb.

Next, get your accomplice to put the car into gear, usually
third gear is best, and increase the throttle opening but at
the same time put on the brake. (Continue opening the
throttle and increasing breaking pressure until your
accomplice ends up with the throttle wide open and the revs
pulled down by braking to 2000 rpm). You can now look ath the
Colortune and at this point it will reveal what the fuel/air
ratio is under the prevailing conditions.

It can then be noted, preferebly by colour rather than
reference to its fuel/air ratio. After this, let the brakes
cool for a few minutes, then repeat the procedure at 3000 rpm
then at 4000 rpm and finally at 5000 rpm, stopping to let the
brakes cool between each run.

As far as brake overheating is concerned, it should not take
more than fifteen seconds to ascertain the mixture ratio at
each rpm interval, so they will be well within their capacity.

Once you have an indication of the state of affairs of the
fuel/air ratio up the rev range to 5000 (5000 rpm is the limit
on the Colortune) the necessary corrections can be made to get
it right. Not only can the full throttle conditions be
catered for in this manner, but so can part throttle and
transient conditions. For instance, a hesitant pickup when
going from parth throttle to full throttle could indicate that
the mixture is too weak during the transition from one state
to the other. During the transition period and for a short
while after the Colortune should show a rich mixture
condition. If it doesn't, then you can bet your life that on
a fixed jet type carb, the accelerator jets or pump stroke are
inadequate.

On carbs like the SU and Stromberg CD variety, a lean mixture
during the acceleration phase would indicate that the damping
is insufficient. A thicker oil is usually required to
compensate this.

A couple of cars were used as guinea pigs to test the method.
Both cars were modified and therefore required different carb
settings. In each case the carburation has been originally
set up by the owners who had only an average working
knowledge of what was required. After use of the Colortune by
the mothod just described, both power and economy were better
between 5-8bhp and 10-15 miles per gallon.

The reason that consumption was so much better after use of
the Colortune stemmed from the fact that the mixture was
originally set rich for maximum power and unfortunately
becuase of the guesswork method of setting, it was too rich.
The performance increase was better than the power increase
alone suggesting that the mixture was right (within limits)
throughout the rev range. As a side effect this led to a
smoother running engine with a snappier throttle response.

To sum up, the Colortune proves to be a very useful device.
It can, at a price of 4-87,5 UKP easily justify its place in
the tool kit of any self-respecting enthusiast, and its
intelligent use can only bring about an increase in
performance.

Editor's note:

Whilst David Vizard has used this tuning method successfully
with both a Mini and Austin 1100 its use on many other types
of car could possibly be dangerous. Firstly therefore we
recommend that the suspension characteristics and drive
shaft-prop shaft geometry of the car in question be checked
carefully ebfore even considering use of this method.

On rear wheel drive IRS cars which may have large wheel
angularity, attempt to jack the car at points on the
suspension that will allow the wheels to assume a position in
angle similar to that which exists in normal use.

On a non-IRS rear wheel drive car jack under the springs on
either side at the axle location point.

Make sure jacks are very secure and will not move under
testing vibration, also make sure any car to be tested has
alternate props underneath in case of jack failure -- ie:
spare wheels and tyres which should be first tested using the
full weight of the car. One advantage of the DV method is of
course that during load tesing the wheels on the ground have
the brakes applied.

On a Mini the best method Vizard found was to put a piece of
wood on top of trolly jack lift point and jack up from the
Mini sump. Once having jacked car up, jam wheels and tyres
underneath car for safety. Car does rock but cannot thus fall
over. Drive shafts will assume peculiar angles during testing
and this can be minimised by supporting bottom suspension arms
on axle stands --these can however move and you may have to
take the risk of the odd shaft angles for the few moments of
testing.

This method does not apear to be practical with swing axle IRS
cars ie: Herald, Spitfire, Vitesse Mk 1, GT6 Mk1.
 

Geo Hahn

Yoda
Country flag
Offline
I've used the Colourtune quite often and it works fine though I can't swear it is superior to the lift-the-pin method and in any case checking the plugs after a drive is my final step.

Have not tried the above described method but sounds like it would be useful.

It has been the source of some entertainment on tech days when we get everyone's problems fixed and are looking for ways to fool with perfectly running engines.

The one situation where it is esp useful is a friend's Lotus that has a single-carb Coventry Climax engine. On that motor there is a serious risk of running lean on 1 & 4 if setting the mixture by ear. The Colourtune is pretty handy for avoiding that.

The TR3/4 engine is an easy one as you get a nice straight look into the tube (don't have to use the mirror):

Colortune%20A.JPG


The pretty blue effect:

Colortune%20B.JPG
 
OP
M

Member 10617

Guest
Guest
Offline
Keith,

Great... I hope someone can give us a simple step-by-step procedure.

Luke,

Sorry, the instructions you kindly provided are not much clearer than the ones that came with the Colortune... and I don't think I want to be looking at a sparkplug while someone is gunning the car in third gear with the brake on!

There must be a simpler, more straight-forward way.

What I would like to know is: how to assemble the colortune (there are several components that are not explained in the instructions), and how to use it to get a basic reading on air/fuel mixture.


George,

Now we're getting somewhere. Your picture is worth a thousand words -- as they say -- and I see that you don't have to use the mirror Any idea what the little brass washer is for?


Randall,

The reason I'm asking is that I am confused about my carburetor settings at the moment. The car is just back from the shop and I find the rear adjustment nut is about 15 flats down from full up, but the front adjustment nut is all the way down (full open). I've never seen it so unbalanced before, although the car seems to be running fine. Any idea what's going on here?
 

DrEntropy

Great Pumpkin
Platinum
Country flag
Offline
Vizard the Wizard!

I may have every book his name was on. I have TWO ColourTune kits (multiple carbs, easier on brakes and nerves). That was a long time ago, the things got a LOT of use in a production shop over the years. With patience (and a good collection of jets) you can even dial in a set of DCOE Webers with the same method.

The MotorCraft publications on SU and Stromberg carbs have needle charts and needle section graphs and can even allow you to "tune" needles with a drill press and some #600 wet-or-dry (as a surrogate lathe). Our resident Morgan guru ESchneider thought I was nuts when I posted the suggestion about "customising" needle profiles with that method.

...then he tried it. :wink:
 

eschneider

Jedi Warrior
Offline
DrEntropy said:
Our resident Morgan guru ESchneider thought I was nuts when I posted the suggestion about "customising" needle profiles with that method.

...then he tried it. :wink:

And it actually worked!
 

TR3driver

Great Pumpkin - R.I.P
Offline
LexTR3 said:
And, the instruction book makes no mention of this, what is the solid cross section gas seal washer that is included with the colortune for and how is it used?
I believe that would be the washer used to seal the ColorTune to the cylinder head. As the instructions note, it may be easiest to use some grease to hold it in place.

Maybe this will help get you started. To install the ColorTune, first place the washer over the threaded portion of #1 below, then screw it into the spark plug hole just slightly more than finger tight (not as tight as a normal plug). Then screw #2 onto #1. If you want, you can place #3 and then #4 on top of it (to help see the color in brighter light).
 

Attachments

  • 26395.jpg
    26395.jpg
    29.7 KB · Views: 517

hondo402000

Darth Vader
Offline
and with the appropiate set of micro drill bits you can tune DCOE webers with out ordering a ton of jets, about 60 dollars worth of micro bits and you got the whole jet sizing covered, then when you get the weber jetting right if you feel the need order the final size jets so they have the correct numbers on them its your choice( wish I would have stumbled across that web site sooner). or just keep a list of what they were drilled to for the next guy.

Made life so much easier today dialing in my 40 DCOE

Hondo
 

DrEntropy

Great Pumpkin
Platinum
Country flag
Offline
:lol: Age and guile, Hondo! Good onya! :wink:

But air correctors sometimes need to be smaller, too. Hard to do wifa drillbit. :jester:
 

RJS

Jedi Warrior
Country flag
Online
I have a little write up on what to look for on the Colortune that I can post when I get home tonight. I included comments on whether you want best power or best MPG.

Have to say Colortune is probably the single best tool I ever invested in for my garage. In 11 years more than one "British" mechanic completely messed up my mixture. And never could get the "lift the pin" method to work. Since adjusting the mixture myself with the Colortune, the car has never run better.

Also, agree with Randall. Getting the mixture right at idle and high rpm/load is all about the profile of the needle. If you have the right needle, you will have the right mixture at idle and up the rev band.

Bob
 

DrEntropy

Great Pumpkin
Platinum
Country flag
Offline
Bob said:
Also, agree with Randall. Getting the mixture right at idle and high rpm/load is all about the profile of the needle. If you have the right needle, you will have the right mixture at idle and up the rev band.

But needle profiles do not always account for cam/compression combinations. We deal with 40+ year old engines, modern cam profiles, who-knows what else. A "standard" needle for the stock engine from the factory may be completely inadequate with what's been done to the mill over time. Only way to know is to gather emperical data and go from there.
 
OP
M

Member 10617

Guest
Guest
Offline
But even with grease on it, the washer is so large that it slips off the colortune and stays in the spark plug hole. Can I just do without it?
 

RJS

Jedi Warrior
Country flag
Online
Good point and totally agree with you. I was not implying that a "standard/stock" needle is good or appropriate for a worn-out or highly modified engine. Only trying to say that these carbs can be tuned to give the right mixture at all revs, given the proper needle - stock, modified or otherwise. The ability to replace the needles on these carbs make them very flexible.

Bob
 

Geo Hahn

Yoda
Country flag
Offline
Instead of the washer I use a greased O-Ring -- any old O-Ring that fits snugly over the threads will do -- then finger-tight will be tight enough to seal.

Also, #3 in Randall's illustration is (I think) used as a 'wrench' to do the finger-tight, IIRC you pull it off before putting the tube over the 'plug'.
 

RJS

Jedi Warrior
Country flag
Online
Here are my simplified guidelines for using the Colortune. I stand on the right side of the engine bay, holding a little mirror in one hand while adjusting the mixture nut with the other hand.

Testing and Adjusting Mixture using Colortune

• Warm engine just enough to run without choke.
o Do not exceed “normal” temp. Overheating will cause rich idle. Allow engine to cool for 10 minutes for every 5 minutes running.
• Idle should be between 700-900 RPM. Adjust as necessary
• Adjust at idle: the profile of the needle on SU’s is what determines the mixture up the rev range. Assuming the correct needle, then correct mixture at idle will properly set mixture at all revs. However, once idle mixture is set properly you can rev slowly to 2,000 rpm to verify. Open the throttle very slowly to bring revs up. Never snap the throttle.
• After making an adjustment or revving the engine, allow at least 10 second for it to stabilize. Adjustments to mixture may not be visible immediately.
• Use Colortune to achieve “Bunsen Blue” Flame
o Up to weaken/lean
o Down to richen
o 12 flats down (2 full turns) from fully up is recommended starting adjustment from scratch
o Ideal for Power = Bunsen Blue with an occasional splash of Yellow
o Result is slightly rich with slightly fouled plugs and not the absolute smoothest idle
o Ideal for spark plugs and absolute smoothest idle and MPG
o Turn 2-3 flats towards Lean after achieving Bunsen Blue with occasional splash of Yellow (as achieved above)
o Reconfirm with audible observation of exhaust note
• Ideal = regular, even note with smoothest idle possible
• Avoid misfire or splashy irregular note. No “blatting”.
o In my experience on this car, 9 flats down (1 ½ turns) from fully up is ideal
• Carburetors rarely go out of tune. Generally, they only require adjustment if some other part of the engine has been altered (thus, changing the fuel/air requirements). Periodically (annually) double check mixture setting by:
o Listening to exhaust note
o Too weak: irregular note, splashy misfire
o Too rich: regular or rhythmical misfire
o Correct: regular and even note, smooth
o Observe condition of spark plugs
o Observing fuel mileage (mpg)
o Checking with Colortune (every 3,000 miles)

Remember, each carb feeds two cylinders so it will be a bit of a compromise to get each pair of cylinders to read nearly the same on the Colortune. I also go up and down all four cylinders a couple of times to check all is properly adjusted.

Hope this helps.

Bob
 
Similar threads
Thread starter Title Forum Replies Date
R TR6 Proper alignment of gearbox front cover plate Triumph 3
sundown TR6 Proper ring gaps Triumph 6
R Proper Aluminum Sump Installation Austin Healey 13
TulsaFred Proper attachment of Demister tubes and vents Spridgets 3
M Proper running temp for 1275 Spridgets 28
Bob_Spidell Proper Engagement of Overdrive Austin Healey 8
M Hauling a Spridget - Proper tie down technique? Spridgets 15
M Proper oil? Spridgets 6
Got_All_4 TR2/3/3A Which oil cap decal is proper to use with this cap Triumph 7
M What is the proper oil for Bugeye engne and transmission Spridgets 6
M Choosing the proper inner tube Spridgets 6
T Proper location for rocker shaft 'Screw-Locating' Spridgets 3
KVH TR4/4A Proper Ring Gap Triumph 4
bugedd Fuel Leak and Proper Routing Spridgets 9
M '69 Sprite Proper Seats Spridgets 3
R Proper Timing Technique '60 BN7 Austin Healey 0
bighealeysource Proper way to "seat" ball bearings in OD operating valve Austin Healey 3
britlover proper tire size to replace 5.90-15? Austin Healey 16
Got_All_4 TR2/3/3A Is this the proper Boot lid seal? Triumph 9
K TR2/3/3A Proper size of "set screw/bolt?" for top of trans..... Triumph 1
J TR2/3/3A Proper distributor for 1960 TR 3A Triumph 5
K Proper SU Adustment Austin Healey 16
T proper jump starting technique Austin Healey 2
F Proper location of chrome loop for spare tire strap? Austin Healey 2
M Proper torque for cylinder head nuts Triumph 20
R proper antifreeze? Spridgets 2
B MGB Proper MGB Overdrive speedometer MG 3
A Proper Gear oil? Triumph 9
brgrmyster Proper finish on luggage floor angle assembly? Triumph 0
M Restoring proper order to spark plug wires Triumph 36
brgrmyster GT6 Proper stock color oil filter canister 68 GT6? Triumph 7
G Proper Torque for Water Pump Install MG 4
tri_carb_healey brake drum work, proper jack points Austin Healey 12
tri_carb_healey proper type of gasoline Austin Healey 6
bighealeysource Pics needed on proper way to fold up top on BN2 Austin Healey 1
M Proper Brake Fluid For 1960 Morris Minor Pick Up Spridgets 8
J Proper brake fluid Austin Healey 19
af3683 TR2/3/3A Proper Use of Jack Stands on Rear of TR3B Triumph 9
M Proper servicing of overdrive Triumph 15
M Proper use of British Crimping tool Triumph 21
af3683 TR2/3/3A Proper Oil for TR-3 Steering Box Triumph 22
M TR2/3/3A Proper servicing of TR3 air filters Triumph 20
T proper use of exhaust clamps Austin Healey 11
rggav Proper way to remove and reinstall wire wheels? MG 6
pjsmetana Spitfire Proper Jack Points? Spitfire Triumph 8
H Proper Installation of shock mounting plate Austin Healey 3
P TR2/3/3A Proper screws for a TR3A interior Triumph 4
A Proper Oil Filter MG 22
6 Whats the Proper Way to Remove Tie rods on AH BJ8? Austin Healey 17
RJS Oil Pressure Relief Valve - Proper Function Triumph 2

Similar threads

Top