• The Roadster Factory Recovery Fund - Friends, as you may have heard, The Roadster Factory, a respected British Car Parts business in PA, suffered a total loss in a fire on Christmas Day. Read about it, discuss or ask questions >> HERE. The Triumph Register of America is sponsoring a fund raiser to help TRF get back on their feet. If you can help, vist >> their GoFundMe page.
  • Hey there Guest!
    If you enjoy BCF and find our forum a useful resource, if you appreciate not having ads pop up all over the place and you want to ensure we can stay online - Please consider supporting with an "optional" low-cost annual subscription.
    **Upgrade Now**
    (PS: Subscribers don't see this UGLY banner)
Tips
Tips

TR2/3/3A Pictures Under TR3A Dash

Tugboat

Senior Member
Country flag
Offline
Hello All,

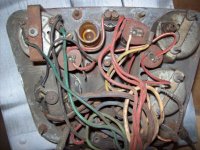
Due to my recent electrical investigations recounted in another post I am going to revisit my dash panel wiring tomorrow. As part of that process I intend to impose order upon the spaghetti mess of wiring from the overdrive, heater, and dash panel currently hanging down. Does anyone have a good picture looking up from the floor at the area behind the dash so I can see how it ought to be done?

Thanks Much
 

JFeher

Senior Member
Offline
Here'a picture of mine when I took it apart.
 

Attachments

  • 23490.jpg
    23490.jpg
    70.2 KB · Views: 880

ekamm

Jedi Warrior
Offline
That looks pretty stock here are a few of mine. I used some wiring numbers and short pieces of wire to mark where I removed a wire and then marked the corresponding wire on the harness. If you search the archives you can see where some guys have cleaned up the mess quite a bit.
dash021.jpg

dash003.jpg

dash023.jpg
 

martx-5

Yoda
Country flag
Offline
Looking at those pics, spaghetti seems to be the norm... :devilgrin:
 

mrv8q

Luke Skywalker
Country flag
Offline
If your temperature gauge is working, you'll want to be careful w/ the sender tube behind it. It's filled w/ ether, and a good kink in the tube might crack it enough to release the ether... Be gentle there.
 

Geo Hahn

Yoda
Country flag
Offline
Here's a pic I swiped off of eBay once upon a time.

center-panel.JPG


Not exactly stock (e.g. connectors) but does demonstrate that is does not have to be pasta.

Of course as you look at examples bear in mind that the rear view changed when the panel lights got a rheostat (at TS60000?).
 
OP
Tugboat

Tugboat

Senior Member
Country flag
Offline
Thanks Fellows,
I have some stuff working but am working my way through the stuff that does not - wipers and dashlights - and find these pictures invaluable.
Mike
 

mrv8q

Luke Skywalker
Country flag
Offline
Does your car have the inline fuse directly under the 4 gauge panel? Later TR3s had an in-line fuse there.....
 
OP
Tugboat

Tugboat

Senior Member
Country flag
Offline
Kevin,
Yes, I have the in-line fuse. I am finding that there are subtle variations in the various wiring diagrams. It is foggy up here today so I hope to work it all out over the course of the day.
Mike
 

TR3driver

Great Pumpkin - R.I.P
Offline
Tugboat said:
I am finding that there are subtle variations in the various wiring diagrams.
If your car has the rheostat for the dash lights, this diagram should be close (except for LHD vs RHD).

Otherwise this one should be right.
 
OP
Tugboat

Tugboat

Senior Member
Country flag
Offline
Thanks Everybody,
After burning though a weekend, 6 fuses and many brain cells I think I am almost there. The breakthrough was a post by Randall on another site in 2007 about connecting the panel switch to the headlight switch. Once I did that everything seemed to work so I reinstalled the dash panel and reattached the oil line to the oil pressure gauge and then started it up. Everything worked, even the temperature gauge, and the new voltage stabilizer which got me started on this wild goose chase in the first place. The only hiccup is that when I went to turn the key to kill the engine, it did not work, i.e the engine continued to run. Which is odd because I don't recall doing anything with that particular switch while I had the panel out. Fortunately, that is the one switch I can most easily access, hopefully without having to pull the panel again. Appreciate all of the help.
Mike
 

TR3driver

Great Pumpkin - R.I.P
Offline
Tugboat said:
Which is odd because I don't recall doing anything with that particular switch while I had the panel out.
At the risk of stating the obvious, the problem isn't necessarily with the switch, or even near the switch. For example, a mixup at the fuse block could cause the same problem. Basically anything that feeds power into the white or green circuits.

BTW, that inline fuse is supposed to be between the panel switch and the headlight switch.
 
OP
Tugboat

Tugboat

Senior Member
Country flag
Offline
Randall,
Yeah, I now know about the in-line fuse thing. Must have seen it on all of the potentially applicable wiring diagrams, including the ones you sent me, but it did not click until I saw your 2007 post. In response to your subsequent post, I agree with you about the green circuit. I am thinking the problem has to do with the wiring coming off of the fuel gauge and/or the wiper switch. The various diagrams show one green wire going from the fuel gauge to the wiper switch but when I do that I can never get the switch to work (the other two wires go to the sender and the fuse box). The wiper switch will work when I do not run a green wire from the fuel gauge but instead run a wire from the switch to the nearby ground post. Running both the wire from the switch along with the green wire from the fuel gauge to the ground post blows a fuse (number 7!). Sooo, I am in a bit of a quandary. On the positive side (sorry) I can now pop that panel out in less than a minute, including the oil pressure line. Any (further) wisdom is greatly appreciated.
Mike
 

TR3driver

Great Pumpkin - R.I.P
Offline
Tugboat said:
The various diagrams show one green wire going from the fuel gauge to the wiper switch
Only ones that are for cars much earlier than yours! Some of those differences aren't all that subtle :laugh:

<div class="ubbcode-block"><div class="ubbcode-header">Quote:] The wiper switch will work when I do not run a green wire from the fuel gauge but instead run a wire from the switch to the nearby ground post.[/QUOTE]Which is the way it should be.
<div class="ubbcode-block"><div class="ubbcode-header">Quote:] Running both the wire from the switch along with the green wire from the fuel gauge to the ground post blows a fuse (number 7!).[/QUOTE]Hopefully, that one is obvious? A direct short from the green circuit to ground ...
 
OP
Tugboat

Tugboat

Senior Member
Country flag
Offline
Randall,
None of this is obvious to me. I only dimly understand electronics so I try to follow the instructions (and occasionally freelance and blow fuses). The later wiring diagrams show two green wires attaching to the fuel gauge. I have three. One goes (I assume) to the sending unit. As to the paired two on the other post, one goes to the fuse box but where does the other one go? Sorry to be obtuse about all this but you're not dealing with a rocket scientist.
Thanks
Mike
 

TR3driver

Great Pumpkin - R.I.P
Offline
Most likely, the mystery green wire goes to the heater (which not shown on the factory diagrams). Of course it's possible that some previous owner has tried to follow the early wiring diagram and mistakenly ran a green wire to the wiper switch, but the heater would be my guess. One way to find out would be to disconnect it, and see what stops working.

BTW, the wire to the sender should be green with a black tracer. It's important which is which, as the gauge won't work right if it is hooked up backwards.

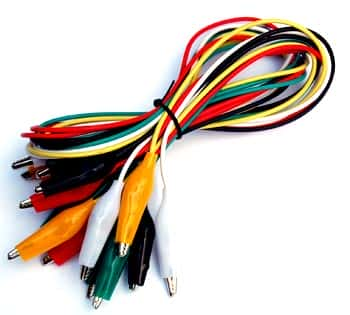
Also BTW, one way to avoid using up fuses is to use a headlight bulb as a temporary fuse. If nothing is shorted, the bulb will only glow dimly or not at all. If you have a short, the bulb will light brightly. You can use a couple of test leads
test-leads.jpg

to hook it up. I keep a selection of "burned out" headlight bulbs for just that purpose; almost always only one filament is bad so you can use the other one for testing.
 
OP
Tugboat

Tugboat

Senior Member
Country flag
Offline
Thanks Again Everybody,
Mission accomplished. Randall, you were correct, the mystery green wire coming off the fuel gauge connects to the heater. It still took me a couple of days to run off various gremlins - but for now, everything works.
Mike
 

af3683

Jedi Trainee
Country flag
Offline
Can anyone please verify the size of the 6 dash bulbs and whether they can be purchased at your local auto parts store. Thank you.

Art
 
Similar threads
Thread starter Title Forum Replies Date
F BJ8 Exhaust Hanger Pictures Wanted Austin Healey 9
K TR2/3/3A Front brake hub removal to access Vertical Link bolts(screws) Attached pictures. Triumph 1
Basil Admin Note Posting Pictures on BCF MG Classifieds 0
B Brake Line Pictures Austin Healey 1
LAW75 Engine Pictures Austin Healey 33
Hamish Racing TR2/3/3A Pictures through a corner. Triumph 7
steveg TR6 Hood release pictures needed Triumph 22
A Disc Brake pictures Austin Healey 1
HealeyRick Disoriented Pictures FORUM Navigation Questions 11
Cutrog1 Attaching pictures while editing FORUM Navigation Questions 7
trrdster2000 Spitfire Added a few pictures to my Photo Album of the Spit6. Triumph 0
2 TR2/3/3A Non OD speedometer cable routing diagram/pictures. Triumph 7
T General TR Request pictures of TR3B & TR4 electric temperature gauges Triumph 15
Jim_Gruber Pictures of Clutch Slave Plumbing with Gerard's Kit Spridgets 4
T Trouble inserting pictures to post FORUM Navigation Questions 2
V Last few months in the UK Pictures TVR 5
D looking for pictures / info 62 BT7 Austin Healey 5
T TR2/3/3A Clutch and oil line Pictures requested Triumph 9
T TR2/3/3A Pictures of my TR3 with over riders on front Triumph 14
J pictures of a 3000 on a rotisserie ?? Austin Healey 5
K TR2/3/3A Auxillary dash switch pictures? Triumph 14
M Off Topic TRA National event pictures Triumph 6
T TR2/3/3A Before and after lever shock absorber pictures Triumph 12
V TVR Vixen S2 New Pictures TVR 1
J TR2/3/3A 1957 rear seat carpet pictures Triumph 7
B Longbridge 100-6 Throttle Linkage Pictures - Any Out There? Austin Healey 27
gbtr6 TR6 Need pictures of heater hose routing Triumph 0
T TR2/3/3A Requesting some Pictures for metal work Triumph 9
Basil TR2/3/3A Karls59tr pictures Triumph 9
B Rear seat backrest pictures Austin Healey 6
T TR4/4A Anyone have pictures handy of TR4a with TR6 steel rims? Triumph 13
S General TR British Car Show Pictures - Is there Interest in Posting? Triumph 7
Tinkerman TR2/3/3A Pictures needed Triumph 4
boxofparts TR2/3/3A Pictures of my own Garage Find TR3 Triumph 10
7 unable to upload pictures - Java problem? FORUM Navigation Questions 7
RickB General Tech Need pictures showing how to connect choke on HIF carbs. MG 2
Randy Forbes Randy's Healey pictures links... Austin Healey 7
Basil Posting pictures on BCF Triumph Classifieds 0
Basil Posting pictures on BCF Spridgets Classified 0
Basil Posting pictures on BCF Jaguar Classifieds 0
Basil Posting pictures on BCF Other British Classifieds 0
Basil Posting pictures on BCF Austin Healey Classifieds 4
M TR2/3/3A TR3 progress pictures Triumph 26
T Any pictures of Rx7 E-brake cables? Spridgets 6
D Pictures of Trailer hitch install on a BJ8 Austin Healey 0
J One of you guys had great pictures of front apron Triumph 20
drambuie Adding a backup fuel pump Anyone have pictures? Austin Healey 6
AH67 62 MKII Tri Carb, done with some pictures Austin Healey 9
cdsmith Pictures of brakes? Spridgets 3
66healey Aftermarket brake booster pictures Austin Healey 7

Similar threads

Top