• The Roadster Factory Recovery Fund - Friends, as you may have heard, The Roadster Factory, a respected British Car Parts business in PA, suffered a total loss in a fire on Christmas Day. Read about it, discuss or ask questions >> HERE. The Triumph Register of America is sponsoring a fund raiser to help TRF get back on their feet. If you can help, vist >> their GoFundMe page.
  • Hey there Guest!
    If you enjoy BCF and find our forum a useful resource, if you appreciate not having ads pop up all over the place and you want to ensure we can stay online - Please consider supporting with an "optional" low-cost annual subscription.
    **Upgrade Now**
    (PS: Subscribers don't see this UGLY banner)
Tips
Tips

Painting tips anyone?

RickB

Yoda
Offline
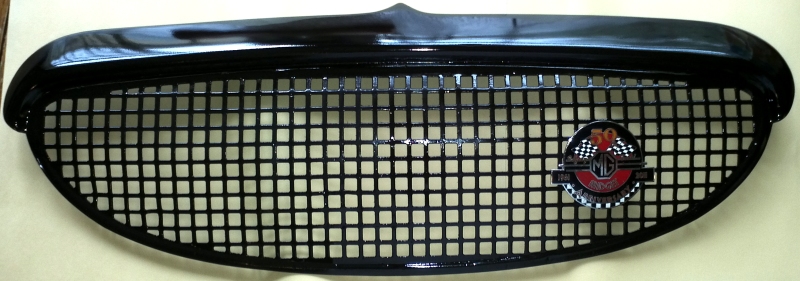
Painting a piece for my Midget this weekend and it was going very nicely right up to the last coat of clear.
Almost the whole things looks absolutely great except for one run about 2" long on the left side of the piece.
This has several coats of primer, several coats of color and three coats of clear.

The directions say it is dry in 1 hour and can be handled in 3 hours, so I think I'd be safe trying to sand it out after a day.

I am going to try and sand the run down then buff it out, anyone have suggestions about doing that? Thought I'd start with some 320 grit wet/dry keeping it wet by using a sponge as the backing on my sandpaper. This has worked ok for me in the past.
Thinking about it though, maybe starting with finer grit paper would be wise.

I know if I sand through the clear into the color I'll be waiting a week and painting it again.
 

dklawson

Yoda
Offline
You are on the right track but I would not start with 320 grit. Try 600 grit first. If the run is on a relatively flat surface, wrap your wet/dry on something firm and flat so you can selectively hit the high-spot. When the high-spot is down to just about flush, switch to 1000 grit, then 1500 or 2000 grit. Follow that up with a high quality fine polishing compound and finally a glazing compound. Be sure between each change of abrasive and/or compound that you thoroughly wash the surface and don't use the same polishing bonnet/pad for the rubbing compound as you do for the glazing compound.
 
Country flag
Offline
You can also remove the thickest part of the run with a razor blade. Use a methodical drag type scrape motion. DO NOT try to slice it off with the blade.
 
OP
RickB

RickB

Yoda
Offline
Thanks, I'll start out with 600.
It's on a rounded surface, there's a great chance I'll screw it up and end up repainting next weekend but I suppose there's not much to lose in trying to buff it out.
Scraping it sounds like a good idea, I'll have to be careful not to scratch the surrounding area - I'll blue tape the sides and leave the run exposed.
 

PC

Obi Wan
Country flag
Offline
If the run is thick it may take much longer to harden than the rest of the surface. If it seems gummy when you try to work it, it hasn’t hardened enough.

For sanding out a high spot like a run you want to concentrate the abrasion on the high point without abrading the surrounding area. So it’s better to have a stiffer backing that touches only the top without conforming and hitting the lower areas.

You can use a foam block if it’s a <span style="font-style: italic">very</span> stiff one. But I still prefer something more substantial, like a short section of wood dowel.

Meguiar’s makes sanding blocks from a bulk abrasive material specifically for the job. They work great.

I don’t think I’d ever want to sand clear with anything rougher than 1000 grit.

Using a sponge and bucket to wet the surface tends to contaminate the work area with swarf. I much prefer a spray bottle. Add a few drops of liquid soap the water for lubrication.


pc
 
OP
RickB

RickB

Yoda
Offline
Ok, thanks guys.
I'll take it slow and careful and maybe I'll get it done.
 
OP
RickB

RickB

Yoda
Offline
I ended up wet sanding the whole thing then a few more coats of filler primer then wet sanding then a few coats of color and a couple coats of clear.
It turned out great, but glossy black is a cruel mistress of a finish. It's very hard to get right.

Here's a pic, I am letting it cure indoors for a week then will apply wax and then finally install on the car.

bugeyegrille.jpg
 
OP
RickB

RickB

Yoda
Offline
Really?
I didn't realize it took that long.
Is this different with different paints? This one has directions that say if you wait longer than one hour between coats then you must wait 7 days for the paint to stabilize. I thought that meant the paint was stable after 7 days.
 
Country flag
Offline
I just means that after 7 days the solvent in the fresh paint will not break the binders in the previous coat. I'd say two weeks would be sufficient given the number of edges ... unless you have a real heavy build up.

Sure looks better than my black grill.
 
OP
RickB

RickB

Yoda
Offline
This poor thing had a lot of bumps and bruises, it would be a good core for re-chroming in the future but for right now it will serve as the bow piece of the great ship froggy-midget.
 

rulle7

Jedi Knight
Country flag
Offline
Have you tried the emery boards from the beauty/nail section in most shops?
The ones to get are the ones with two different grades on each side ( total of four grades ). The core is usually a stiff Styrofoam that bends just a bit if needed.
Anyway, cut that emery board in half so you have two pieces with a different grade on each side, and you have the perfect size 'sanding block/paper'
to tackle fiddly paint runs. The coarsest side is usually a bit too coarse, but the other three grades are just right.
Costs only a dollar or so : )
 
OP
RickB

RickB

Yoda
Offline
Had it sitting inside the house all week, planned on putting it on the car today.
Picked it up and there was a chip on one end, primer showing through.
I was PO'd so I sanded a little and then just sprayed on a couple more black layers and a couple more clear and let it dry and put it on the car.
 

Attachments

  • 28643.jpg
    28643.jpg
    136.7 KB · Views: 108
Similar threads
Thread starter Title Forum Replies Date
Basil Tips on painting gas tank? Restoration & Tools 12
timsgolf Center Dash Switch Plate Painting Austin Healey 5
LAW75 Painting the Grille Surround Austin Healey 12
J Shroud Painting ["Finally done with these"] Austin Healey 3
GeorgeC Painting the Battery Austin Healey 0
J Painting Underside of Shrouds Austin Healey 13
J Painting a Frame and Substructure Austin Healey 12
Jim_Gruber Bugsy IV - Painting, Cutting, Buffing is done Spridgets 20
S TR2/3/3A painting the floors of my tr3. Triumph 2
S Painting a BJ8 Radiator - any advice? Austin Healey 17
J TR2/3/3A Painting floor pans Triumph 2
S TR2/3/3A Painting the body tub exposed parts again Triumph 19
J TR2/3/3A Painting Triumph 11
S TR2/3/3A how to position pieces when painting Triumph 7
T TR4/4A Painting front hubs Triumph 2
S TR2/3/3A tr3 painting --spraying: vertical, horizontal ect... Triumph 8
69MGC T-Series MGTA Digital Painting 2 MG 0
B TR6 TR6 Painting/Restoration Triumph 2
69MGC MGC MGC Digital Painting MG 0
69MGC AH 3000 Digital Painting Austin Healey 0
69MGC Newest Digital Painting Aston Martin Other British Cars 0
B TR6 Painting a '74 TR6 Triumph 1
H Healey 100 Painting Austin Healey 5
KVH General Tech Questions About Painting Triumph 6
kennypinkerton General MG Rostyles. Painting question. MG 2
KVH General TR Painting the Engine Compartment with Spray Can Triumph 3
S TR2/3/3A painting the body tub “inside” Triumph 31
B Painting the Car - Corner Bead Advice Austin Healey 21
S TR2/3/3A I hate painting Triumph 8
J Final painting detail questions Austin Healey 16
dcoplan Suggestions for painting letters on dash knobs? Spridgets 6
Bob Claffie MGB Painting rubber bumpers MG 4
T TR6 Painting the car with the fenders on Triumph 7
B Painting underside of front and rear shroud - Original prep and color? Austin Healey 3
B Final painting of all body panels - with panels on or off car? Pros and Cons? Austin Healey 7
madhouse Painting Wheel Wells of my 100-6 Austin Healey 8
drooartz General Tech Painting my Rostyle wheels MG 7
R TR4/4A Painting engine in the car Triumph 7
Lbp TR2/3/3A Painting Help Needed for Restored Steering Wheel Triumph 5
J Painting transmission Austin Healey 7
glemon New Painting Method Restoration & Tools 2
J Painting the car Austin Healey 8
Jim_Gruber Painting inside a BE Boot Spridgets 8
bighealeysource Anyway to fix very slight dent in body without painting ? Restoration & Tools 7
Brinkerhoff Painting or dyeing to change interior color? Restoration & Tools 2
D Live and learn… then learn some more… [painting] Spridgets 28
D Wheel painting frustration Spridgets 25
af3683 TR2/3/3A Painting Original Lucas TR3 Starter Triumph 3
DornTRoriginal TR2/3/3A TR3 Engine Painting Triumph 8
wangdango inner body panel painting/welding/etc Austin Healey 3

Similar threads

Top