• The Roadster Factory Recovery Fund - Friends, as you may have heard, The Roadster Factory, a respected British Car Parts business in PA, suffered a total loss in a fire on Christmas Day. Read about it, discuss or ask questions >> HERE. The Triumph Register of America is sponsoring a fund raiser to help TRF get back on their feet. If you can help, vist >> their GoFundMe page.
  • Hey there Guest!
    If you enjoy BCF and find our forum a useful resource, if you appreciate not having ads pop up all over the place and you want to ensure we can stay online - Please consider supporting with an "optional" low-cost annual subscription.
    **Upgrade Now**
    (PS: Subscribers don't see this UGLY banner)
Tips
Tips

Overdrive problems

higgins

Senior Member
Country flag
Offline
I've been reading the forum for the past couple of weeks and it has helped me in the restoration of my 100/6 BN4 1957 Longbridge model.
But, as has happened, I now need help and decided to join the forum.

Although I have read all the threads on Overdrive, I've encountered a problem which hasn't seemed to have been discussed yet.

I've changed the overdrive relay, the solenoid, as well as the gearbox switch.

1) Now the problem.

Before I took out the engine, the overdrive was working fine although engaging approximately with a delay of 3-4 seconds.The engine was out of the car for more than 7 months.

Now, all I can here is the solenoid engaging once and then .... nothing. When I put the switch from the overdrive back to the normal position, I am unable to here the solenoid disengaging (is that normal) and if I try to reengage into the overdrive position, the solenoid cannot be heard /ubbthreads/images/graemlins/confused.gif

2) I also would like to remove the throttle switch and I've read some threads on others not using them. However, what does the wiring need to look like? Also, is the relay necessary?

I'm looking forward to your replies. Best regards to all.
 

Keoke

Great Pumpkin
Country flag
Offline
Hi Higgins, I would postulate the following; Because the energising current in the Solenoid is high you should hear it engage.Contrastingly, when power is removed the solenoid gradually releases and you might not hear it.If you were to throw the switch back to on shortly after switching off it is possible that the residual magnetism in the solenoid reduces its travel distance and again you may not hear it engage.---Keoke
 
OP
H

higgins

Senior Member
Country flag
Offline
That solves the solenoid question (many thanks) but one thing I forgot to mention is that the overdrive doesn't engage anymore. I've checked the oil level, I've checked that the oilpump is working, and I've cleaned the operating valve.
I haven't yet checked the non-return valve as I didn't want to open the overdrive just yet. I remember that at some stage I put the wrong Oil into the gearbox but drained it straight away and put the one as indicated by the manual. Could this be the problem?
I've also read threads on setting the gearbox switch but I am not sure how this is done.
Higgins
 

Keoke

Great Pumpkin
Country flag
Offline
Well Dar100, it would seem that if all those other functions are operating correctly it just might be that the non return valve is stuck open. However, I do not think the oil change contributed to the problem. OH! by the way, the only way I know to tell if a pump is operating at specification is to use an oil pressure guage--Keoke-?
 
OP
H

higgins

Senior Member
Country flag
Offline
I was afraid you were gonna say that /ubbthreads/images/graemlins/crazy.gif There goes the weekend /ubbthreads/images/graemlins/frown.gif
 

Dave Russell

Yoda - R.I.P
Gold
Offline
Hi Higgins,
There is an article about the electrical operation of the OD in the "Knowledge Base" on the forum. See https://www.britishcarforum.com/lore/attachment.php?id=13

In addition here are a few notes on OD operation. Pay special attention to the part about "control valve adjustment". If this doesn't work, it's time to get out the gage.

First the oil viscosity
A comparison of several oils. Gear oil viscosities are rated at 100 degrees F. Motor oil viscosities are rated at 210 degrees F.

SAE 5W-30 would have a viscosity of 90 SUS at 100 degrees & 35 SUS at 210 degrees

SAE 30, the originally recommended oil, would have a viscosity of 480 at 100 degrees & 65 at 210 degrees.

SAE 20W-50 would have a viscosity of 300 at 100 degrees, & 100 at 210 degrees.

RL MT-90 a 75W-90 gear oil, would have a viscosity of 200 SUS at 100 degrees, & 100 at 210 degrees.

The transmission will hopefully be operating at somewhere between the two temperature/viscosity ratings.

Many folks have good results with a non exotic SAE 20W-50 motor oil.

Any oil that contains friction modifiers such as some of the synthetics is likely to cause slippage of some of the internal parts. The transmission synchronizers require friction to work. The two OD clutches require friction to work.

MT-90 is preferred by some because it specifically does not have friction modifiers & gives more positive synchro & OD clutch operation.

Control valve adjustment
The control valve located under a brass cap near the front RH side of the OD must be correctly adjusted. Under the brass cap is a spring, a spring follower, a control ball, & a long operating rod. The ball should be 5/16 diameter. The ball lift is what controls shifting. The book method of putting a pin through the RH arm & adjusting the LH operating arm is not a very reliable method of setting the ball lift. Wear in any of the parts will change the required setting from the original pinned arm method.

The ball must seal on the end of the aluminum bore when the OD is not operated & on the end of the tubular operating valve when the OD is operated. The non operate seat may be improved by tapping a 5/16" ball down into the seat. The operate seat may be improved by lapping a 5/16" ball to the end of the operating valve. Use a new ball after this procedure. Balls are readily available from bearing supply stores.

The spring on top of the ball should be about .750" in length. If it is shorter it can be stretched or replaced.

The most accurate & reliable method of setting the valve lift is:
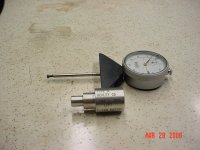
a- Set control valve ball lift to .030" to .040". Measure with dial indicator. Cap & spring removed. Adjust clamped operating arm. Verify movement with the solenoid plunger, not the arm. I machined an adaptor to fit snugly in the plug hole & to extend high enough to provide a flat surface for a dial depth gage to sit on. I made a cup shaped end for the gage so that it would easily center on the ball. See the attached pic.

b- Set solenoid control arm (on solenoid plunger) to .160" drop. Adjust stop or add stop below the plunger if needed to accomplish this. (Arm drop is not the same as plunger drop due to slack in lifter.)

OD operate solenoid
a- The OD soleniod is designed with two electrical coils. The first coil (operate coil) is energized by the OD circuitry. It momentarily draws about 20 amps. As soon as the solenoid is operated, a contact on top of the solenoid opens & transfers current to the second (holding) coil which draws about two amps. If the switching contacts are dirty or damaged, the solenoid will be operating on the holding coil only & will not have enough power to engage the OD. The contacts are located under the top rubber boot.

b- If the switching contacts do not open due to contact problems or the solenoid travel not being adjusted to give a full soleniod stroke, the solenoid will remain energized by the operate coil & burn out quickly.
D
 

Attachments

  • 194444-DSC00806.JPG
    194444-DSC00806.JPG
    145.5 KB · Views: 85
OP
H

higgins

Senior Member
Country flag
Offline
Thanks for the well detailed info and help from all of you.
With regard to the OD solenoid, when I hear (and see) the solenoid engaging, it moves the control arm. Does this mean that the solenoid is functioning normally or could there still be the two circuit problem that you described?
Higgins
 

bighly

Jedi Knight
Offline
Have you tried just driving with the tunnel removed and pulling the the lever manually by hand? This will tell you if it engages. The adjustment of most of these needs to be beyond the alignment hole.
 
OP
H

higgins

Senior Member
Country flag
Offline
I'm planing on doing that this weekend (weather permitting, it's pouring down at the moment)and I'll let u know what happened.--Higgins
 
OP
H

higgins

Senior Member
Country flag
Offline
I am a happy Healey Driver once again after I got the overdrive to work. /ubbthreads/images/graemlins/driving.gif

I just wanted to share what I did and hopefully help somebody else save a lot of time and trouble. After reading carefully what you told me, I took off the gearbox tunnel (once again)and checked the solenoid as well as the lever. While nothing had changed from the above described problem and as it was still pouring down with rain overhere, I decided to change the overdrive harness ( the new one has been lying around for the past six months) /ubbthreads/images/graemlins/rolleyes.gif.
Although the old one is in very good shape, I discovered a crack in it which would have been impossible to find had I not removed it.

I then went ahead and energised the solenoid, which moved the lever. I then pushed the lever as far forward as possible to see how far it was overshooting the setting, moved it back and forth a couple of times and gave up as I decided that I would most likely need to open up the overdrive to check the non-return valve.

While I degenerised the solenoid, I saw it move the lever back and it clearly made the distinctive noise of "disengaging". /ubbthreads/images/graemlins/thumbsup.gif
I reenergised the solenoid at least another 10 times and it was working without any problems. Unfortunately I had to wait a couple of days before being able to drive the car. The first opportunity I got to drive, I went into overdrive mode and.....it worked /ubbthreads/images/graemlins/cool.gif.

I drove a 100 mile touring rallye this weekend and the overdrive worked perfectly, engaging and disengaging within a split second.
Is this a coincidence or sheer luck or a combination of both.

I'm guessing that the old overdrive harness was possibly shorting out the solenoid as I found a crack. So make sure you always check the exact state of the harness.

Secondly, I'm convinced that through moving the lever back and forth, I either pumped pressure back into the overdrive or I deblocked possibly the non-return valve (Please let it be this simple) /ubbthreads/images/graemlins/wink.gif.
No matter, I'm happy it's working again and I just wanted to thank you all for your help and information. Cheers /ubbthreads/images/graemlins/cheers.gif
 

Healey 100

Jedi Warrior
Offline
I can't add much to this thread except to say that the solenoid resistance in the "pull in" mode is very very small, just a fraction of an ohm. What that means is that the slightest extra resistance in the wiring, connections, or those teeny little contacts in the solenoid that direct current to the "pull in" coil can drastically reduce the oomph that this solenoid has to engage the overdrive. And it needs quite a bit to open that high pressure valve.

I have found myself that little things like cleaning the ground under the solenoid or tightening the connections on the relays can make a huge difference in how smartly the unit engages or if it engages at all.

I suspect this is why your harness change made so much difference. It was probably not a short, just some corroded or broken wires adding an ohm or two.
 

John_Progess

Jedi Warrior
Country flag
Offline
My drive train is out of the car (complete restoration) and is there any way to check the operation of the overdrive and it components out of the car? I am unfamiliar with an overdrive as none of my cars has ever had one. Thanks and have a good day!

John
 

Dave Russell

Yoda - R.I.P
Gold
Offline
Hi John,
It's a lot easier to check while it is in the running car. The guys who rebuild them usually belt the output shaft to an electric motor for testing. Since the OD operating oil pump is driven from the OD output shaft, it has to be turning to operationally check anything. These things are so complex & parts critical that all the careful assembly In the world will not absolutely guarantee that the OD will work correctly, without testing.
D
 

Ed_K

Jedi Knight
Offline
For what it's worth, I recently finished rewiring all of the circuts in the car to add fuses. One of the reasons I did this is that I found that the wires to the OD switch had been so hot at some time in the past that all of the insolation had expanded from the heat and had pulled back away from the connectors. In other words, I had some bare ended wires behind the dash just waiting to be grounded and starting a fire. The wire to the overdrive solenoid had been replaced some time in the past. My point is that there are several circuts in the car that are prone to overheat and since there is no fuse protection, the wires and switches get hot and damaged as the result. At a the very least, the OD power feed needs to be protected with a 15 amp fuse,
the fuel pump with a 10 amp, and the red wire to that feeds the parking lights with a 15 amp fuse. For someone that does not want to take on the task of rewiring the whole car, these three circuts can be fused without too much trouble and that will prevent all of the burnt up wiring that I found in my car. I will also tell you that everything was working in my car, even with all of these damaged wires. They were all potential " time bombs " waiting to happen during the 1st wet weather or drive through a deep puddle on the road.
 

Ed_K

Jedi Knight
Offline
The ground for the OD relay is one of three ground wires that are attached to the firewall via a screw and a star washer near the lower right of the voltage regulator. If this screw is removed when removing an engine or after a restore and repaint of the body and either the star washer is not reinstalled between the closest wire to the firewall and the firewall, or the paint has not been scraped away in a circle around the screw hole, then a poor connection is the result. On a modern machine this design would be called a " vulnerable " single point of failure. At the 1st sign of od problems, I would recommend that this screw be removed, and the surface around the ground screw on the firewall be " roughed up " with a piece of sandpaper or a piece of a scotch brite pad. If the star washer or any of the three wire lug connectors are dark colored, (corrosion), then either clean it with the sandpaper until it is shinny or replace it with a new one, then reassemble the three wire lugs onto the screw with the star washer closest to the firewall and tighten it back up. It doesn't cost anything to do this and it will probably solve a significant % of " unexplained " electrical problems in our cars.
 

John Loftus

Darth Vader
Offline
[ QUOTE ]
the wires to the OD switch had been so hot at some time in the past ... The wire to the overdrive solenoid had been replaced some time in the past.

[/ QUOTE ]

Ed,

Something to check is the gage of the overdrive harness wires. When I compared my original harness to my new harness I found the old had 28 strand wire and the new had only 14 strand. I provided pictures to the vendor (British Wiring) and they had the factory make me a new OD harness with 28 strand. They said I was the first to bring this to their attention so look closely .. count the strands and make sure it is the right gage.

Cheers,
John
 

Ed_K

Jedi Knight
Offline
I am almost certain that I had an original harness, except the places where my dad had repaired it years ago. For some reason which I cannot understand, the ground wire was a noticeably smaller gage than " looked " right. I replaced it with a larger gage when I was rewiring the car to add fuses.
 
Similar threads
Thread starter Title Forum Replies Date
T Overdrive Problems Austin Healey 18
H Overdrive Problems Austin Healey 9
H Overdrive Problems Austin Healey 0
B Overdrive Problems Austin Healey 16
S Overdrive Problems Austin Healey 10
Torsten Overdrive install problems MG 4
7 overdrive problems MG 7
D BJ 8 Overdrive problems Austin Healey 16
G J-type overdrive problems, again! Triumph 0
B Overdrive problems Again! Austin Healey 3
RickPA Overdrive Oil Pressure Austin Healey 8
bighealeysource Leaking Overdrive and Gearbox Drain Plugs Austin Healey 19
71TR6 TR6 Type-J Overdrive identification Triumph 4
luke44 TR2/3/3A Calling all Wiring experts TR3 Overdrive Wiring ver A or ver B or are they the same? Triumph 8
T Wanted Working overdrive unit Austin Healey Classifieds 2
D Overdrive Stops Working After Oil Change Austin Healey 26
S TR2/3/3A overdrive does not function Triumph 45
T TR2/3/3A A type overdrive hard engagement Triumph 36
S Overdrive Throttle Switch Austin Healey 4
KVH General Tech Overdrive--Afraid it's Serious Triumph 45
M Overdrive Pressure Test Austin Healey 2
BN6_2197 Gearbox/Overdrive Removal Austin Healey 25
T For Sale MGB Black Label Overdrive For Sale Or Trade For New RB Parts MG Classifieds 2
Fanch00 Non-Overdrive Benefits? Austin Healey 10
AUSMHLY BJ8 Overdrive Oil Passages Austin Healey 2
R TR6 J-Type overdrive will not disengage when warm Triumph 8
S Overdrive Relays Austin Healey 2
AUSMHLY Overdrive Buffer Pad Austin Healey 3
L Stuck in Overdrive Austin Healey 10
AUSMHLY Flushing the Transmission/Overdrive Austin Healey 7
T Weight of BJ7 Transmission/Overdrive Austin Healey 10
P Overdrive Not Engaging Austin Healey 4
S BJ8 Overdrive Stays Engaged Austin Healey 35
AUSMHLY BJ8 Overdrive Accumulator Spring Tube Austin Healey 1
RonC TR2/3/3A J Type Overdrive in TR3A Triumph 4
AUSMHLY BJ8 Overdrive Pressure Loss Austin Healey 11
AUSMHLY BJ8 Overdrive Oil Pressure Austin Healey 14
John Turney Overdrive Pump Austin Healey 6
S Removing Overdrive Shaft Lever Pin Austin Healey 7
nevets Reversing With Overdrive "On" Austin Healey 8
Healey Nut Overdrive Relay Austin Healey 1
T Clutch or Overdrive Slip Austin Healey 8
G TR4/4A "Engine seized after engaging overdrive at low speed. Triumph 26
A TR4/4A TR4 Overdrive Solenoid Triumph 19
H TR4/4A A-type overdrive pump Triumph 4
B COMPLETE DROP-IN Rebuilt 1975/6 MG Midget 1500 engine PLUS rebuilt Spitfire Overdrive trans NEVER INSTALLED Spridgets Classified 2
Rob Glasgow New Fangled Electric Overdrive Austin Healey 9
Got_All_4 TR6 Refurbishing gearbox with A type overdrive Triumph 7
J Transmission and Overdrive Rebuild Austin Healey 6
C Overdrive Failure Austin Healey 18

Similar threads

Top