 Hey there Guest!
 Hey - did you know if you click on the title of a thread it will take you to the first unread post since you last visited that thread?
 but were afraid to ask:
  STOP!! Never post your email address in open forums. Bots can "harvest" your email! If you must share your email use a Private Message or use the
  smilie in place of the real @
 Pretty Please - add it to our Events forum(s) and add to the calendar! >>
TexasSprite
Jedi Hopeful
Offline
I'm sure glad I'm approaching the 59 BE rebuild as a journey rather than a destination, because the destination seems to recede further each day.
I'm learning a lot about basic auto mechanics working on this car, so every session has a lesson or two. Some of them are more expensive that others.
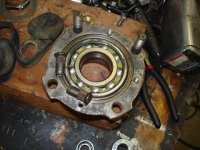
I have the rear axle on jackstands on the workbench where it is easy to work on. Got the hubs off with no problem thanks to tips I read about here. I took lots of pictures to make sure everything went back properly. That was my first mistake. Only after everything was reassembled and looking fine did I stumble across a thread on this forum (while looking for something else) about proper setup of the rear brake. Of course, the PO had the springs hooked up wrong and I had carefully put it all back together the "right" way according to my pictures. I must say that is a LOT easier to fit the brake shoes, springs, etc. when the hub is out of the way. With some help from my wife, I got all the pieces back together and felt all was right with the world. Second mistake. I noticed that the half shaft and the hub interface wasn't really squeezed together enough, so I mounted the brake drum and tightened up reversed lug nuts to give it a good squeeze while the gasket cement set up. Given that the axle was rolling around on top of the jack stands, I couldn't get good leverage to tighten them up. Thinking that the impact wrench would be a good way to get torque on the nuts without having to tie down the axle, I proceeded to make the big mistake of the night. See the attached picture. No problemo, I thought. I have an extra set of hubs in the storage shed. Went over today to get them and found the studs to be too short (they were from a wire wheel car). So unless VB can deliver by Wednesday, no maiden voyage over the holidays.
However, it sure looks pretty all repainted and with shiny new parts!
I'm learning a lot about basic auto mechanics working on this car, so every session has a lesson or two. Some of them are more expensive that others.
I have the rear axle on jackstands on the workbench where it is easy to work on. Got the hubs off with no problem thanks to tips I read about here. I took lots of pictures to make sure everything went back properly. That was my first mistake. Only after everything was reassembled and looking fine did I stumble across a thread on this forum (while looking for something else) about proper setup of the rear brake. Of course, the PO had the springs hooked up wrong and I had carefully put it all back together the "right" way according to my pictures. I must say that is a LOT easier to fit the brake shoes, springs, etc. when the hub is out of the way. With some help from my wife, I got all the pieces back together and felt all was right with the world. Second mistake. I noticed that the half shaft and the hub interface wasn't really squeezed together enough, so I mounted the brake drum and tightened up reversed lug nuts to give it a good squeeze while the gasket cement set up. Given that the axle was rolling around on top of the jack stands, I couldn't get good leverage to tighten them up. Thinking that the impact wrench would be a good way to get torque on the nuts without having to tie down the axle, I proceeded to make the big mistake of the night. See the attached picture. No problemo, I thought. I have an extra set of hubs in the storage shed. Went over today to get them and found the studs to be too short (they were from a wire wheel car). So unless VB can deliver by Wednesday, no maiden voyage over the holidays.
However, it sure looks pretty all repainted and with shiny new parts!

 A friendly reminder - be careful what links you click on here. If a link is posted by someone you don't know, or the URL looks fishy, DON'T CLICK. Spammers sometimes post links that lead to sites that can infect your computer, so be mindful what you click.