• The Roadster Factory Recovery Fund - Friends, as you may have heard, The Roadster Factory, a respected British Car Parts business in PA, suffered a total loss in a fire on Christmas Day. Read about it, discuss or ask questions >> HERE. The Triumph Register of America is sponsoring a fund raiser to help TRF get back on their feet. If you can help, vist >> their GoFundMe page.
  • Hey there Guest!
    If you enjoy BCF and find our forum a useful resource, if you appreciate not having ads pop up all over the place and you want to ensure we can stay online - Please consider supporting with an "optional" low-cost annual subscription.
    **Upgrade Now**
    (PS: Subscribers don't see this UGLY banner)
Tips
Tips

One step forward - and one step nowhere

JPSmit

Moderator
Staff member
Silver
Country flag
Offline
So, planned on turning the engine on the stand but couldn't find the chain. Did however get the water pump housing on to put the lifting loop.

Then turned my attention to the rear axle. Got the second side brakes rebuilt & installed, bearing installed, hub still needs to be painted but soon.

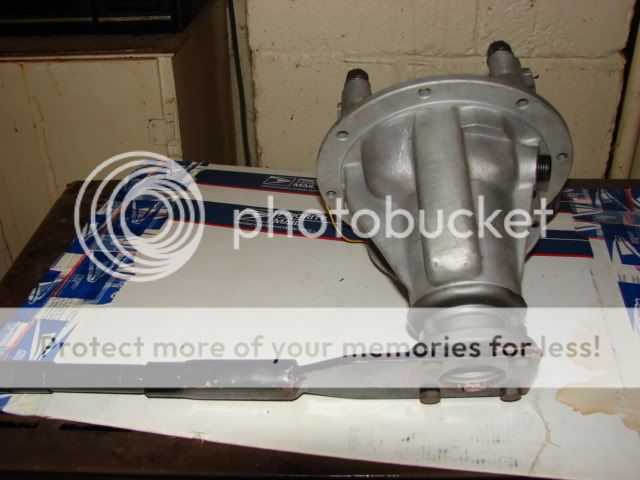
Here's tonights question. I can't get the axle stable enough to torque the pinion oil seal up to 140 lb. have it to 70 lb. but that's it - any suggestions?

thanks all
 

jlaird

Great Pumpkin
Country flag
Offline
Assume the rear end is out of the car, wedge it in a door way.
 
OP
JPSmit

JPSmit

Moderator
Staff member
Silver
Country flag
Offline
Not exactly picturing it Jack - It will solve the axle torquing around, but I still need to hold the pinion from spinning. All I can think of right now is a reasonably heavy steel flange with two holes - to grab 2 of the four holes, bolted to a long 2X4 - or something
 

jlaird

Great Pumpkin
Country flag
Offline
How about a pipe wrench, thats is what I used, brace it on the floor.
 
OP
JPSmit

JPSmit

Moderator
Staff member
Silver
Country flag
Offline
tosoutherncars said:
I'm so confused... we need pictures!

Duncan - it's the nut on the end of the flange that connects to the drive shaft - (bottom right corner - by part # 28)

The prob is at 140 lb torque it wants to spin the whole axle - even with my son & I standing on it
 

jlaird

Great Pumpkin
Country flag
Offline
Put the pipe wrench on the outside of that flange braced against the floor, have son stand on axle, go for it.
 

Bugeye58

Yoda
Offline
Or, make a tool like this:

DiffTool001.jpg


DiffTool003.jpg

DiffTool004.jpg


Jeff
 

jlaird

Great Pumpkin
Country flag
Offline
Agree, the tool is the answer.
 

JerryB

Jedi Warrior
Offline
""""""axle stable enough to torque the pinion oil seal up to 140 lb. have it to 70 lb. but that's it - any suggestions?"""""

As long as your manhandling things ....2 5/16 bolts in two adjacent holes in the pinion yoke flange and a long pry bar. Nut on either side of the flange.

Now the problem with trying to torque to 140 ft/lbs is that it's pretty tough to do this with a 1/2" drive torque wrench.

You shouldnt be using any particular torque reading....you should be replacing the nut in the exact same postion (o-clocking) on the pinion snout as was originally. you say you didnt mark the nut and the pinion shaft nose and count the revolutions? The correct way then is to remove the pumpkin and ring gear carrier and tighten the nut so just barely compressing the crush sleeve yo ar getting 30 in/lbs drag when rotating the pinion. then you stake the nut top to prevent rotation and use green Loctite after priming the showing thrads on the pinion snout.

You probably will find the torque reading using an OLD crush sleeve is well BELOW the 140 pounds. 140 is the starting crush point oin a NEW sleeve.

Plan b is to just do as you were doing.
 
Similar threads
Thread starter Title Forum Replies Date
WillR MGB 1 step forward 1 step back? MG 4
Westfield_XI 2 steps forward, one step back Spridgets 14
drooartz Tunebuggery Day 5: 1 step back, 2 steps forward Spridgets 4
Hooper11772 One step forward ...two steps back! Spridgets 18
JPSmit one step forward four @#$%* steps back Spridgets 16
TexasSprite One step forward, two steps backward Spridgets 5
T Two steps forward, one step back Triumph 2
S Two steps forward, one step back Spridgets 8
ecurie_ecosse One step forward,two steps back! Spridgets 6
healeyboz one step forward two steps back Spridgets 21
mrstinson One step forward, ten steps back - HELP! Spridgets 11
AngliaGT One Step Backwards....... Spridgets 8
Rob Glasgow Necessary step Austin Healey 5
Jim_Gruber Floorpan Replacement Step by Step Spridgets 4
B Another small step for the 100-6 Austin Healey 27
Healey Nut Another step closer . Austin Healey 8
BlueMax Next Big Step Spridgets 15
J Last Step, Rear end: What is this one? Austin Healey 8
luke44 TR2/3/3A TR3 Windshield Rebuild and Assembly - Step by Step Triumph 20
Tr3aguy TR2/3/3A Next step to try to start TR3 Triumph 3
M TR2/3/3A Step-by-Step TR3 tuneup Triumph 8
drooartz One step closer on the leak Spridgets 5
G On to the next step! MG 3
R TR6 TR6 Interior Seam Sealer Issue, Restorers! Step In Triumph 4
steved033 One step closer.... Austin Healey 2
R 1275 vinyl top replace, step-by-step instruction? Spridgets 5
JPSmit next step electrical Spridgets 4
T Crypt Car diagnostics-step 3 Triumph 42
T Crypty diagnostics- step two Triumph 34
2wrench Pics of engine. Help with next step -- valve adju Triumph 22
drooartz One step closer to engine out Spridgets 12
zimmy THE 7 STEP TOTAL PAINT PLAN Spridgets 18
1976Midget is there a 12 step program?? Spridgets 12
H Next step suspension rebuild, anyone done one? Spridgets 15
drooartz One step closer British Motorbikes 0
drooartz First step towards Triumphhood British Motorbikes 6
T How to dye your hands orange in one easy step... Triumph 9
drooartz Next step in my dash project Spridgets 16
B One more step completed Jack! Spridgets 8
drooartz Going one step further, to modify or switch? Spridgets 50
77_MG_Midget One Step Closer........ Spridgets 4
MattP A step in the right direction. Other Cars 26
S Forward opening hood / bonnet Spridgets 10
P Brakes lock up when rolling forward Austin Healey 4
simon1966 Happy New Year. 463 BEV has a lot to look forward to. Austin Healey 5
M TR2/3/3A Forward Carb Jet Lever Bent Triumph 12
Jim_Gruber Bugsy -Moving forward - RF Suspension is out Spridgets 3
F Seal between transmission tunnel and the forward bulkhead Austin Healey 7
N BJ8 Noise when going from reverse to forward Austin Healey 2
D Paying it forward sharing the passion Austin Healey 10

Similar threads

Top