• The Roadster Factory Recovery Fund - Friends, as you may have heard, The Roadster Factory, a respected British Car Parts business in PA, suffered a total loss in a fire on Christmas Day. Read about it, discuss or ask questions >> HERE. The Triumph Register of America is sponsoring a fund raiser to help TRF get back on their feet. If you can help, vist >> their GoFundMe page.
  • Hey there Guest!
    If you enjoy BCF and find our forum a useful resource, if you appreciate not having ads pop up all over the place and you want to ensure we can stay online - Please consider supporting with an "optional" low-cost annual subscription.
    **Upgrade Now**
    (PS: Subscribers don't see this UGLY banner)
Tips
Tips

Need instructions: Remove engine from MK3 Sprite

TraceZ

Senior Member
Offline
Does anyone have a link they can shoot me or instructions on the best way to remove the engine from a 1964 MK3 sprite?

There is nothing wrong with the clutch or transmission, so do they stay in the car, or is it faster / easier to pull them as 1 piece?

We've decided to do a factory rebuild on the 1275 engine in our Sprite. I'll be posting lots of progress pictures as work proceeds. I'll be doing most of the work myself. First step is to get the engine out of the car, disassemble it, do a basic inspection and send the major parts off for cleaning.

What are the tricks?
 

JPSmit

Moderator
Staff member
Silver
Country flag
Online
No real tricks. Engine and tranny come easier together. Not a lot of disconnection, rad Comes out. Don't forget the ground strap.
 

RyanBez

Jedi Hopeful
Offline
Your best bet is to spend the $20-30 on the repair manual for the car. I have the Haynes one and it tells you everything you need to know.

Not sure about the MK3 for sure, but my MK2 only has two engine mounts and then uses the tranny to stabilize the rest (no bolts, just rubber brackets to absorb the vibrations on mine). Make sure all electronics are disconnected from the engine (sensors, ground cable, starter cable/wire, etc.). take out the shifter on the tranny, take out the radiator, and disconnect the cables for the carbs (choke and accel.). I think that is it, then just hook your hoist up to the engine and carefully pull it out!
 

DrEntropy

Great Pumpkin
Platinum
Country flag
Offline
A Hayne's or Chilton's would really help.

The best method is to checklist the job by systems: fuel, hydraulic, electrical, mechanical. Un-do each in turn... then go back and check 'em again (JP's "Don't forget the ground strap." comment is telling. :wink: ).

Done it both ways, the engine/trans as a unit is the more 'relaxed' method. Mainly due to the "fussing" needed to put it BACK together if the tranny is left in the chassis. Much screaming and cursing has resulted from <span style="font-style: italic">that</span> exercise. Tons easier to split/mate the units while on the floor. :wink:

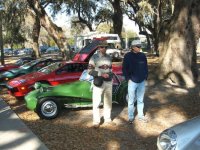
Once (in our youth, 1972 IIRC) pulled just the engine from a Mk-II on the curb by the owner's townhouse with a piece of angle iron, a chain and two of us lifting it out as the owner guided the process... we weren't big guys, either. Lean and mean tho. The rebuild was done in the livingroom of that townhouse.

And of course the reassembly was "reverse of the above." :laugh:

Biggest thing is that you take your time and BE SAFE.

These two are the "hoist" 36 years later, still car nuts :crazyeyes: :
 

Attachments

  • 25888.jpg
    25888.jpg
    93.7 KB · Views: 370

JPSmit

Moderator
Staff member
Silver
Country flag
Online
And still lean and mean....
 

PeterC

Jedi Warrior
Offline
Tracy, Just back from the 50th. (you should have come)
from above
Battery disconnected, Transmission shift cover (shifter boot, etc.) Peel back carper to access 1 bolt each side of tunnel to trans mount.(your hands are still clean) Hood off Radiator out. Disconnect heater hoses, starter cable (at either end) Coil wires Alt or Gen wires Oil pressure hose Water sender tube Fuel line to carb Accelerator cable Choke cable Or just undo the nifold nuts leave cable connected and tie the intake near the master cylinders out of the way. If you do that then undo exhaust clamp to headpipe and remove manifold.

From below right side
Slave cylinder hose or pipe. Ground cable Drain transmission while you're there
From Below Left side
Exhaust pipe support from trans Speedo cable

From below
2 trans mount bolts going up

Engine mounts.
Steering column side. Leave the bracket, remove rubber mount nuts at front engine plate
On non-steering side remove engine mount bracket from body (3 bolt) leaving mount on engine

Now, step back, imagine that you can fit a bag over everything.

OK, I use tow straps under the front engine plate and another at the rear giving me ability to raise front or rear independently, but there are chain devices out there. Lift tilting front up first for pulley to clear crossmember and rack. The oilpan will just clear the hoodshut plate.

I'm usually working by myself. Takes about 2 hours first time because you're labeling, etc. I typically do it much,much faster.

PM me if you need help. Peter C
 

DrEntropy

Great Pumpkin
Platinum
Country flag
Offline
Typically takes me an hour, doing it methodically. On the early MGB it's a 45 minute exercise (knowing my own cars more intimately).

The two strap system helps a LOT. With a center-point chain rig it'd be best to have a second set of hands and eyes.

JP said:
And still lean and mean....

I think now it'd be just plain mean. :smirk:
 
OP
TraceZ

TraceZ

Senior Member
Offline
Thanks for all the replies.

I think I have it ready to pull. Everything is disconnected and the cherry picker and engine stand are ready to go. I just need a section of chain or strap to attach the cherry picker to the engine. I ran into a couple issues getting it ready to pull.

1) When attempting to remove the clutch slave from the transmission the top bolt is too long to remove with the transmission in the car. There is not enough room to thread the bolt out, it hits the inside if the tunnel. I ended up disconnecting the hydraulic line from it and leaving it in place. I'll replace it when the powertrain is removed just for piece of mind.

2) I don't think my car has 2 bolts on the tranny mount in the bottom. I looked around, there are 2 empty holes on the center of the floorpan under the mount, maybe the bolts are supposed to go in those holes but a prior owner left them out? I was able to locate and remove the 2 inside the cabin, one on each side of the tunnel.

3) My speedo cable is not connected to any bracket on the exhaust. No big deal IMO.

4) I did remove the shifter and cover the openning with tape, but I'm nervous about the tail extension that houses the shifter clearing the tunnel. It seems to stick up into the car a ways. I guess I'll find out when I hook up the cherry picker if it is a problem or not.
 

PeterC

Jedi Warrior
Offline
Tracy, most people leave the bottom bolts out as they are "difficult" to align. No surprise.

The should have been a comma between exhaust pipe support and speedo cable.

The extension housing will clear.

A recommendation on the slave upper bolt. Either shorten the length of the upper bolt so it catches on 3 threads, or, make it a headless "stud", or, slot the slave upper hole. Any of the above will save half an hour of frustration.

If you use a chain, you can safely attach to the rearmost manifold stud and to the generator/alternator mount/bolt. Done it many times.

Peter C
 
OP
TraceZ

TraceZ

Senior Member
Offline
I did manage to get the engine and transmission out of the car last night.

I used a jack between the legs of the engine lift to raise the car a few inches to give the lift the clearance it needed to fit under the car.

I used a heavy duty extension cord to connect the hook on the lift to the engine. I just wrapped the cord around the generator bracket and the rearmost exhaust manifold stud, then put the hook through it and pulled it out. I know, a little unconventional but it was how I avoided a trip to the hardware store for an alternative. And by the way - it didn't damage the extension cord.

I then began disassembling the engine externals. I removed the starter and seperated the transmission from the engine first. Great news, the clutch is brand new. I bet it doesnt have 1000 miles on it. I removed the clutch, flywheel and rear engine plate. Next I removed the generator, water pump, thermostat housing, distributor, oil filter adapter with pipe, heater valve riser, and valve cover.

Next was removing the cylinder head. Inspection of the cylinders shows some wear. I'm able to put my thumbs on a piston and rock it in its bore to the point it makes a "clack" noise. The valve springs and pushrods appear they could be new, but the combustion chambers and valves are covered in thick black carbon buildup. This engine appears to have been running very rich.

The previous owner told me this engine was a recent rebuild. Now I believe him based on the many new parts I've found. But I dont think it was a proper full rebuild, I think he replaced some stuff to get it running, but didnt do the complete job resulting in an engine that has poor (almost no) oil pressure when hot and burns a ton of oil.

I'll continue on with the job tonight. I need a big socket to get the crank bolt loose. It appears to be a 1 1/4" bolt and I currently do not own a socket that large. Once that is free, I'll remove the timing cover and front engine plate, then on to removing the oil pan to inspect the internals.
 

Billm

Yoda
Country flag
Offline
Tracy
That bolt is 1 5/16" and Harbor Freight has a big set (3/4" drive so get an adapter too) that is cheap but works very well.
Sounds like he must have put in standard size pistons in bored out cylinders, no wonder it smokes really badly!!.
BillM
 
OP
TraceZ

TraceZ

Senior Member
Offline
Another question:


the crank pulley on this 1275 engine is just a pulley - it doesnt appear to have a rubber ring in it to dampen any harmonics.

Is that a problem? Should I re-use it or do I need to spend money on an actual harmonic balancer?
 
OP
TraceZ

TraceZ

Senior Member
Offline
PeterC said:
ooooooh racecar!

What does that mean?


Last night I began taking more of the engine externals apart. Although I did not locate a 1 5/16 socket at HF as I had hoped I did find an adjustable wrench suitable for the job and was able to remove the crankshaft bolt. I've got the timing cover and oil pan removed. Also removed is the oil pump pickup, oil pump, upper half of the rear main seal and the distributor drive shaft/gear.

What have I found of interest so far?

Well, for starters I found out why the rear main leaked so bad. There is no seal in it. When I removed the upper rear main seal housing I found the groove the seal should go in is empty.

The distributor drive gear is so worn out that what's left of the teeth are razor sharp like shark teeth. My buddy actually cut his finger touching it. It had a ton of slop in it as a result, I can't imagine it was possible to get a good reading on this engine with a timing light.

The oil pan has what looks to be a secondary dipstick hole in it that has been brazed shut

The screen on the oil pump pickup has a 1/4" hole in it right in the middle. I don't think that is supposed to be there.

The timing chain has a little slack in it. Enough that if the slack is taken up one way, then the other you can see the timing gear move a little. So it is impacting the timing.

The timing gear has another of those 1 5/16 " nuts on it. Ugh. the adjustable wrench I used to remove the crank bolt won't work on it either, so now I'm really going to need to find an actual 1 5/16" socket.

There were no indications of bearing failure in the pan. It has a magnetic drain plug in it and the plug was free of anything other than some black mushy oil. Feeling it with my fingers it was smooth, I could not sense any particles in it.

The inside of the engine block appears to have been painted or coated. And the coating is actually in great shape, like it was just applied. Is that normal?

The cam looks good. All the lobes appear in good shape to my eye, and despite the badly worn distributor drive gear the gear teeth on the cam appear to be fine. I'll make sure to get a second opinion, but the cam appears to be reusable.

How do I remove the head studs? Do I just lock a couple nuts together on a stud and use them to remove the stud or is there a special way? Should I reuse the studs for my basic rebuild to save some money?

And that is where i'm at so far. looking for a 1 5/16" socket.

My plan is to get the timing set removed and then take the major components to Midwest Engine. I intend to have them clean everything up like new, then remove, inspect and rework the crankshaft, rods and cylinder bores. They will tell me what size parts to order. I'm sure it will need new pistons, rings, bearings, oil pump, timing set and gasket set.

I'm also going to have the head dissassembled by them and inspected / reworked.

Peter -
I'll be needing to purchase a bunch of things from you soon!
 
OP
TraceZ

TraceZ

Senior Member
Offline
Thanks for the conversation Peter. I called Brian but he says he doesn't do some of the machining work it sounds like I'll need and refered me to a shop in Middleton right near my office called Performance Engine. I talked to Keith there, and have everything loaded up to deliver to him tomorrow. He has experience rebuilding the 1275.

As for my engine... I completed the tear down and and initial inspection tonight.

The cam looks good to my eye, but I'll let an expert make that call. two of the lifters are trash. #7 was badly pitted and #8 had a couple small pits. Can I replace just 2 lifters? Is that something I can get from you?

The crank is salvagable. It will need to be ground for sure because there are journals I can catch my fingernail on. The bearings overall were shot. Copper showing through on nearly all of them with the worst by far being the #4 rod. Just like you said, the back of the block is oil starved. The bad rod was the furthest one back, and the bad lifters are the two in the back. Is there a fix for this known problem?

The pistons don't all match. The piston in the #3 cylinder has cut outs in the skirt below the oil rings that are not on the other 3. It also has a partially stuck wrist pin that resulted in abnormal wear on its skirt. To add to the excitement, the #2 piston is completely missing it's 3rd ring. It appears someone forgot to put it on, or broke one and got lazy just installing the piston without it.

The cylinders don't look bad at all, no scratches or abnormal scoring. I don't have a bore gauge, but I did use a cheap set of inside micrometers to check the bore top to bottom and there was not much deviation. I'm hoping the cylinders can get by with just a basic cleanup hone but will let the shop make that call.

Off to bed. Hope to see you tomorrow if your schedule allows. (there is ice cold Spotted Cow in my fridge) The engine block/head/internals won't be here, but there is plenty of other stuff you can school me on and I'm very eager to learn as much as I can.

Cheers, and off to bed.
 
OP
TraceZ

TraceZ

Senior Member
Offline
engine is at the shop now.

on the list of things to do so far:

cleanup / shotpeen block and head
Magnaflux block and head
blast all the tin
machine crank
bore block
Possibly deck block
completely rebuild head
hardened valve seats
bronze valve guides
SS exhaust valves

Also determined that the cam is shot, it has a flat lobe on it and that the head gasket was blown allowing passover between the #2 and #3 cylinders.


so here is the FAIL list..

1- Bearings all shot
2- 3rd compression ring missing on #2 piston
3- Mismatched #3 piston
4- Wrist pin on # 3 piston seized partially
5- Head gasket blown between #2 and #3 cylinders
6- flat lobe on cam
7- both lifters on cylinder #4 trashed
8- distributor drive shaft has it's teeth nearly worn off
9- hole in the screen on the oil pump pickup
 

Sarastro

Obi Wan
Silver
Country flag
Offline
You really need a shop manual for this. It will answer a lot of questions and prevent errors. Also, it's a good idea to do a search of the archives on some of these issues, since a lot has been discussed here already.

A couple notes, though. It's a good idea to replace all the lifters with ARP ones, as well as connecting rod bolts and head studs. The quality of the ordinary parts, especially lifters, is often poor. Also, you can't assess the cylinders without a bore gauge, but the guys who check out the block will be able to do that easily. The dark "coating" on the inside of the block is, I think, just stain from dirty oil. I don't think anything special was done to it--I can't see why anything would be done. As long as it's run regularly, it sure ain't gonna rust.
 
Similar threads
Thread starter Title Forum Replies Date
giwplay1 Everything you need to know before purchasing an Austin Healey Austin Healey 15
S Wanted Need an HVDA conversion kit for 73 TR6 Triumph Classifieds 3
K TR2/3/3A Does this fitting need a Whitworth wrench? Triumph 10
angelfj1 TR5/TR250 TR250 Need Help identifying wires (2 - black) feeding starting solenoid Triumph 6
Gliderman8 TR6 Now I really know why I need new shocks Triumph 11
Got_All_4 TR6 Need 1969 TR6 Expert Got Questions Triumph 17
W Need advice on installing new side curtain glass Spridgets 1
AngliaGT General TR You Might Need Snow Tires for This - Drive Your Triumph Day 2023 Triumph 5
M Wanted Need 59 Bugeye Dashboard. LHD. Spridgets Classified 1
Basil Admn Note Our neighbors need emergency help Triumph 0
Basil Our neighbors need emergency help Spridgets 0
Basil Admin Note Our neighbors need emergency help MG 0
K TR6 Need help with Mimosa Yellow Paint Triumph 1
T Storing nuts and bolts (so you can find what you need) Austin Healey 7
AngliaGT Need Ideas on Selling Our Midget Spridgets 10
tj_tr3_tr6 Wanted Wanted / Need / TR4 Engine Block for 62 Tim from So California Triumph Classifieds 3
drooartz MGB OD question - need to warm up? MG 8
H Wanted Need Spare tire rod BJ8 Austin Healey Classifieds 1
J TR2/3/3A Need help with a value for this TR3 please Triumph 6
M Need help removing the pinion assembly from a late 1275 steering rack Spridgets 7
shadowfever Wanted Need a Sprite Mk II bonnet Spridgets Classified 1
jackq Wanted Need a C Tach MG Classifieds 2
TheRealDestrux MGB 1977 MG MGB need help putting top down MG 1
apbos New/Old wheels for my Speedwell Sprite. Need Center Caps Spridgets 13
tr6web TR6 Quit running after a few minutes - need advice Triumph 15
AngliaGT I Need to Resist - 1980 Ford Fiesta Other Cars 9
vette Need BugEye Generator Austin Healey 7
vette Need BugEye Generator Spridgets 4
Got_All_4 TR6 Distributor Gear Mounting Question Need End Float Washer Triumph 4
J TR2/3/3A Need help with pivot and body bracket for hood Triumph 2
Madflyer For Sale Triumph GT 6 parting out need something Triumph Classifieds 10
KiwiStagguy Re building my power steering 71 Stag . Rust and pitting bad . Need a business name to fix it Triumph Classifieds 0
tinman58 TR2/3/3A Need super charger!! Triumph 7
B Wanted I need a small section of a bugeye bonnet Spridgets Classified 5
volunteer Wanted Need Door Seals, Vent Window Seals and Trunk Seal for Daimler ds420 Limo Jaguar Classifieds 23
Got_All_4 TR5/TR250 Need guidance for replacing steering column bushings Triumph 11
John Turney Need a Better Demister? Austin Healey 5
K TR2/3/3A Need advice on what my TR3A might be worth..... Triumph 10
69MGC MGC Need one MGB/C Splined Hub MG 1
69MGC Wanted Need one MGB/C Splined Hub MG Classifieds 4
Gliderman8 General TR Need clarification on Triumph Competition Preparation Manual TR250 TR5 TR6 Triumph 4
S TR6 Need wisdom on tr6 brake calipers Triumph 6
J MGB Need help identifying these parts MG 6
S TR2/3/3A Need New Battery for TR3A Triumph 9
B MGB-GT Need help with MGB GT rattle MG 0
AngliaGT MGB Need a GT [or Three]? MG 1
T Need an Anti-Tramp Bar? Austin Healey 6
K TR2/3/3A Help! No start! Need input from you guys. Triumph 9
T Wedge TR7 engine, need help identifying part. Triumph 5
A Spitfire Need help with 1980 Spitfire 1500 Triumph 5

Similar threads

Top