• The Roadster Factory Recovery Fund - Friends, as you may have heard, The Roadster Factory, a respected British Car Parts business in PA, suffered a total loss in a fire on Christmas Day. Read about it, discuss or ask questions >> HERE. The Triumph Register of America is sponsoring a fund raiser to help TRF get back on their feet. If you can help, vist >> their GoFundMe page.
  • Hey there Guest!
    If you enjoy BCF and find our forum a useful resource, if you appreciate not having ads pop up all over the place and you want to ensure we can stay online - Please consider supporting with an "optional" low-cost annual subscription.
    **Upgrade Now**
    (PS: Subscribers don't see this UGLY banner)
Tips
Tips

Filler question

TexasKnucklehead

Jedi Knight
Country flag
Offline
This may sound like a really dumb question, and it probably is, but...

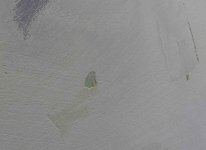
Assume I put some filler on, sanded it and realized I needed to apply a little more. Aside from blowing it with air, what else should I do to prepare for adding another layer of filler? Wipe it with something? I didn't wipe it down before the second application, and have a few spots where the new layer didn't stick to the old layer. Could it be because I started sanding before it was completely dry?

I guess the good news is I finally broke through the "can't get started" block.
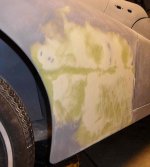
First_filler.jpgSecond_filler_void.jpg
 

LarryK

Yoda
Country flag
Offline
I usually wipe with thinner and resand before adding coats. Looks a little thick anyway. Need to shape metal better, filler should not be that thick.
 
OP
T

TexasKnucklehead

Jedi Knight
Country flag
Offline
Thanks Larry.
A little thick? Hopefully that's just the photo making it look that way. I applied it as thin as I could. I measured the thickness of that little void in the picture and it's about .008" or 1/128" thick. From what I've read it can be up to 1/8" thick in a single application, but several thin applications are preferred. I'm new at this. That is a seam weld for the fender patch, so the first picture shows where the filler is a little low (along the line of the weld), and the block didn't sand the low points. I worked the metal as flat as I could, but that's as good as I could get it with a hammer and dolly.
 

CJD

Yoda
Country flag
Online
Hey Jerry,

For that stage I'd recommend a very coarse sandpaper, like no more than 90 grit. If it is sanded and has not been "soiled" with any oil or other contaminant, it should adhere from coat to coat. All you need to do is dust it clean before applying more. Larry's recommendation for going over it with thinner can't hurt, but it's more than I do, and be sure it is dried before applying the new coat. Filler is actually porous, so anything you put on it soaks in and takes a while to evaporate back out.

Sanding too soon will gum up the sandpaper quickly, but should not affect the adhesion. In fact, if you add the second coat too soon, you will get a chemical bond between the coats, which is even stronger than the usual mechanical bond. I've never been able to work that fast, though. The thing is, if you wait to long to sand, the filler gets as hard as a rock, and makes the job very tough. I file with a chees grader as soon as it is firm enough, and then switch to the 60 grit when the filing gets hard.

The only time I've had problems with adhesion is if I missed sanding a spot. The resin will cure with a very thin wax coat over the surface (long story why, if you are ever interested). If that does not get sanded off, it will prevent adhesion for the following coat...or primer.

Glad you're back to work!
 

PatGalvin

Jedi Warrior
Country flag
Offline
Hi Jer
You can pile filler on filler in steps, but it needs to adhere well. You absolutely must sand the existing filler before you apply more. The surface of filler, after applied, has a sort of resin on it which prevents new filler from adhering properly). Where new filler needs to be applied on old, I scuff all the shiny surface off and then add some nice 80 grit (or 40 grit) scratches. Then, when you apply the new, push it hard into the scratches - it needs this mechanical bond to adhere well. Don't wipe with any thinner. Polyester fillers are porous and full of talc. Thinner or any fluid will be sucked up into the talc and take a long time to dry/evaporate. It is always a bad practice to use any wax and grease remover, thinner, etc. on filler. If you do, give it several hours to dry and let the solvents evolve from the filler. I hope this helps.

Your work looks fine, thus far. Remember, use sharp new sandpaper, change it often, and start with coarse grits (I would be using 40 or 80 on that work) to get the shape, without too much elbow grease and without having to push too hard on the metal (which will deform, with each sanding stroke, if you apply too much pressure). When panel shape is complete, you can use 120 or 180 - or you can use a thin glaze over the entire panel and sand with 180.

I shape with 40 ending with 80 grit and using glazing putty (2 part) on all the heavy scratches. I shoot with polyester primer (sprayable bondo, like Featherfill, slicksand, or a number of other products). This fills the big scratches well. I then block with 180 grit and guide coat to remove all scratches. Then, one to two coats of urethane (2K) primer. More guide coat and block with 400 grit. Then, I'm ready to paint. You will find small areas that need attention during each blocking step. Is a lot of work but the end product is well worth it.

Pat

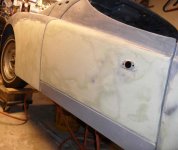
2012-06-10164807Large_zps7c938d01.jpg


001Large_zps8b01e2b6.jpg


007Large_zps08961913.jpg


011Large_zps387e58f8.jpg
 
OP
T

TexasKnucklehead

Jedi Knight
Country flag
Offline
The only time I've had problems with adhesion is if I missed sanding a spot. The resin will cure with a very thin wax coat over the surface (long story why, if you are ever interested). If that does not get sanded off, it will prevent adhesion for the following coat...

That's where I went wrong. I just assumed I could use the dark spots, where the block didn't sand, as a guide to where I needed more filler. I'll get out the DA and sand that down before applying a new coat.

Just because I couldn't get myself to apply filler, doesn't mean I haven't been working. I managed to find many things more important to do, rather than start filler and block sanding... but thanks, it feels good to finally dig in.

Thanks Pat and John.
 
Last edited:

PatGalvin

Jedi Warrior
Country flag
Offline
If you have high spots (and you have a couple in your photo), you may need to gently tap them down with a body hammer, off dolly. I use a lead shot bag as backing for that. Sometimes, if they are too high and I'm getting sanding burn throughs, I use a pointed body hammer and lightly dimple the high spot (all over, like a rash), which shrinks the metal and causes high spot to be lowered. Could shrink with heat, but not after applying bondo. I'm sure the pro metal men are cringing, but it works fine and my car isn't going to Harrah's Auto Museum for show - it's gonna be a driver and will look great when I'm done (and so will yours).
 

hondo402000

Darth Vader
Offline
once you get the low spots filled with filler, then you can spray a 2 part epoxy primer filler, a couple of coats, spray black flat paint very,very, very thin on the primer coat and block sand, you will be able to see the low spots, then you would use something like dolfin surfacer, a very thin type filler. Keep spraying the black mist coat and block sand till all the low spots are gone, then wet sand the primer with 400 paper to get ready for paint

good luck, its a lot of work
 

Bob Claffie

Jedi Knight
Country flag
Offline
Two things could be affecting your "lack of adhesion". I have found if the filler isn't mixed COMPLETELY, anywhere there is a trace of raw filler it will never set and new filler applied over that spot will never bond. The second possibility is starting to sand either too soon or with a too aggressive grit, that will "tear" the uncured filler where as a finer grit may not. There is a very fine line between too soft, too hard, and just right in timing as to when to work new filler. Bob
 
OP
T

TexasKnucklehead

Jedi Knight
Country flag
Offline
So my neighbor came over and insisted my 11" sanding block was too short. He loaned me his 16" and it does seem to work better. Probably the weight and subtle flexibility has something to do with it. He also loaned me his air powered tool but it takes 22" sand paper and I had to order some (should be in tomorrow). I seem to be wasting a lot of filler. I've applied and sanded it flat(ter) 7 times. When I'm sanding, it's obvious where the high and low spots are, but when I'm gooping it on, I can't tell how thick it is, just if it's going on smooth. So far I've used about 1/2 a gallon can on one door and fender. The vast majority of that has been blown away after it was sanded off. I know I've sanded too much when I hit primer, or metal. Is there some trick to this, or do I just keep trying until it's all flat?

I can no longer feel any high or low spots, not even with plastic gloves on and/or a rag under my hand laid flat. It's a flat as a premenstrual girl and smooth as a baby's bottom. -I always thought those similes were a little perverted, but you get my point.

7xFilled.jpg
 

PatGalvin

Jedi Warrior
Country flag
Offline
Hi Jer
I used about 3 gallons of filler for my complete car. I'm sure 90+ percent of this ended up on the floor. I think you will use less, as your experience increases. Suggest you use cheaper filler for the initial filling and then Rage for final smoothing. That's what I did and I saved some cash - cheaper filler can go for $20 to $30 per gallon - Rage is about $60 I think.
I would use very flat and very stiff blocks for your blocking work. You can work a slightly curved panel with a hard flat long block by sanding in an X pattern. I also use powdered guide coat during filler sanding so I can clearly see the high and low spots.
That seems like a lot of filler on that panel - I only see a couple primer spots showing. Make sure your sandpaper is new/sharp and change often. When you're shaping, you are cutting the filler (sort of like filing) - the paper does the work. I used 36 or 40 grit for shaping my filler. Saves calories too, as less aggressive grits take a lot of elbow grease and you tend to push too hard on these low crown panels. If you have high spots in metal, you can gently tap them down with body hammer, allowing removal of more filler around the high spot.
Pat
 
Last edited:

CJD

Yoda
Country flag
Online
At the filler stage it is alright if you go through to metal. You can tell more by running your hand along the sanded surface than with your eye. How much to put will get easier with experience...you'll get the hang of it.

The longer the block, the better. It fares the edges easier and takes out the ripples, while a short block will just follow the ripples and miss some of the high spots. To be practical, I usually use the blocks that will work with the readily available sheets of sandpaper long way. Longer is better, but only if you can get the paper reasonably.

Once it looks and feels just about perfect, then switch to a high solids primer...and repeat several times using that. Once you switch to primer, then you do not want to cut all the way to the metal. Use a base coat of one color, and folow all subsequent coats with another color primer. That gives you a tell when you are getting near metal.

It's slow, but all the time you spend in prep is really worth it!
 
OP
T

TexasKnucklehead

Jedi Knight
Country flag
Offline
Now that I'm mixing more thoroughly, and sanding at least the top off, I'm having no problem with adhesion. Thanks for all the input.

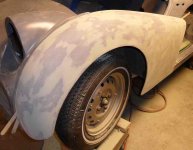
I agree the filler does seem too thick on the lower fender section as there are few primer or bare areas showing through. The problem is, both the door and fender are not very flat. They had much more filler on them when I stripped them. I'm thinking they were warped when they were bead blasted, or they were warped during one the earlier "restorations". I tried everything to get them flatter, but pushing one section down causes another to come up. I do know that it only takes a few swipes of the sanding block on any area to get through to metal, so I'm going to leave it as is. -It's really not very thick, but there is little metal showing through.

My high build primer is suggested to go over primer or filler (not bare metal), so that's another reason I'd rather have fewer spots of bare metal. I'm liking the way it's looking so far. I'm now using a sanding block (22") with 3 metal rods that insert lengthwise to make it stiffer or not. By the time I'm finished, I'll have a clue about what I should have been doing.takin_shape.jpg
 

CJD

Yoda
Country flag
Online
It's looking pretty good to me. Can't see the bottom right of the panel very well in the pick, but the rest looks even. When you run your hand over it you can feel a lot that can't be seen.

I'd recommend shooting a self-etching primer of an off color, then immediately (like 30 minutes or so later) shoot your high build primer. Do not sand or prep between the coats.

The bad news...then it all starts over with the sanding blocks. I start with 220 grit and sand with water to keep the paper from building up. Sand till there are no low spots (shiny when dry) or until the base primer starts to show through

Then repeat starting from the high-build spray...switching to 400 grit when it looks like you are getting close to the finish coat.
 
Similar threads
Thread starter Title Forum Replies Date
JPSmit Gas filler pipe question Spridgets 1
Todd78d Sprit MK1 gear box filler Spridgets 2
Celtic 77 MGB LeMans Gas filler MG 10
M Fuel Filler Caps Austin Healey 2
JFS Wedge Stripped gearbox filler hole thread Triumph 3
S TR2/3/3A TR3 gas filler cap Triumph 1
R TR6 Looking for Oil Filler Cap TR4/TR6 Triumph 7
ckeithjordan TR2/3/3A Gas Filler Cap Triumph 1
Chuck9482912 Rust in new fuel filler neck Austin Healey 4
BlueMax TR2/3/3A No Body Filler On This TR3 Triumph 7
Jim_Gruber What Now, new gas tank filler neck is about 1/2-3/4" too short Spridgets 19
maxwedge5281 gas filler opening replacement Austin Healey 4
C TR4/4A How to get the $&@%# filler bolt out of the side of the trans to top her off?!? Triumph 7
bugedd Aston filler cap Spridgets 8
TRMark Body Filler Mixing Board on the cheap Restoration & Tools 2
T BSW Filler Plug Armstrong Rear Shocks? Spridgets 2
maxwedge5281 gas filler and cap options Austin Healey 9
maxwedge5281 monza fuel filler door??? Austin Healey 6
S Embarrassed to ask: Transmission/Gearbox filler location on BJ8 Austin Healey 14
S TR2/3/3A fiberglass filler Triumph 4
Rut Body work and filler Spridgets 2
steveg Steering box filler Austin Healey 0
G Filler metal used for tig welding ah aluminum shrouds Austin Healey 2
andrea OIL sprayed on the under hood-TOP oil filler indaghed Austin Healey 26
D Body filler brand??? Spridgets 26
Lukens Is this my gearbox filler plug? Triumph 10
tahoe healey Gas filler tube gasket Austin Healey 11
jhorton3 Fuel Filler Hose Spridgets 0
BillD Gas Cap does fit on new tank's filler tube Spridgets 5
bighealeysource Looking for a 100-4 valve cover oil filler cap Austin Healey 0
Jeepster fuel tank filler pipe Austin Healey 8
Jim_Newman Fuel tank filler pipe Austin Healey 4
brgrmyster GT6 Original AC oil filler cap 67-68 GT6 [also TR4A]? Triumph 1
O TR2/3/3A TR3 Fuel Tank Filler Triumph 3
K oil filler cap Spridgets 0
J location of transmission oil filler on a BN-2 Austin Healey 5
E Bugeye Gas Tank Filler Tube Grommet Spridgets 13
DrEntropy Found confirmation of filler cap Lotus 14
A Gas filler cap Triumph 3
J What should I feel at oil filler pipe? Triumph 14
6 Fuel Filler Tube Color? Austin Healey 4
I What do I use to paint filler neck? Spridgets 10
Tabcon Okay...who poured green paint in my oil filler! Triumph 16
fad64b Help with "Filler Plates" Please MG 1
V TR2/3/3A TR-3B Oil Filler Cap Triumph 5
JPSmit What type of body filler do you use? Restoration & Tools 7
A TR2/3/3A TR-3A Gas filler cap Triumph 2
CharlieCarpenter Gasket for oil filler cap??? Austin Healey 1
ncbugeye What tool to remove final drive filler plug? Spridgets 12
G Oil Filler Cap-Retaining Wire Austin Healey 11

Similar threads

Top