• The Roadster Factory Recovery Fund - Friends, as you may have heard, The Roadster Factory, a respected British Car Parts business in PA, suffered a total loss in a fire on Christmas Day. Read about it, discuss or ask questions >> HERE. The Triumph Register of America is sponsoring a fund raiser to help TRF get back on their feet. If you can help, vist >> their GoFundMe page.
  • Hey there Guest!
    If you enjoy BCF and find our forum a useful resource, if you appreciate not having ads pop up all over the place and you want to ensure we can stay online - Please consider supporting with an "optional" low-cost annual subscription.
    **Upgrade Now**
    (PS: Subscribers don't see this UGLY banner)
Tips
Tips

TR4/4A TR4A Assembly by a rookie (me!)

Popeye

Darth Vader
Bronze
Country flag
Offline
Hello all,

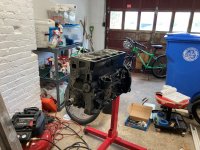
I am embarking on the final assembly of my TR4A engine. Short version of a long story: the engine languished for a few years at my mechanic. The block was rebuilt by an engine shop (liners, pistons, crank bearings, etc. Unfortunately the actual scope is unknown; I called the engine shop and they do not have records). The same shop rebuilt the head. I have full respect for my mechanic, he was open and honest and simply never got to finishing things. I've picked up the bits from him, and plan to complete the assembly on my own.

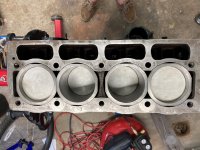
I've checked the cylinder liner protrusion. It seems OK, if on the high side: between 0.004" and 0.0055", measured with a straightedge and feeler gauge. Crank float is right at 0.005", measured with a feeler gauge, pushing the crank left or right with a wooden broom handle.

My general philosophy is an "expert" at an engine rebuild shop did the work so far. Where possible I prefer to leave their work alone. (Recognizing that experts make mistakes, and said experts may not have expertise in TR engines...)

A few questions, as I dig into what I have and what is needed:
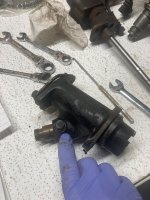
1.The rear oil seal appears stock. Is an upgrade to Viton important? (Does this require removing the crankshaft? Triumph engines leak oil... is a better seal like plugging a hole in a dike made of window-screen?)

2. Head gasket. I'm of the opinion that spending money for parts that are hard to access and can have a significant impact is worthwhile. I will shell out near $70 for a head gasket from Rimmer. They have two that seem quite similar: A "composite", > Head Gasket TR2-4A Composite - 89mm - 202775COMP | Rimmer Bros <, and a Payen branded version: > Copper Head Gasket - Payen Type - TR2-4A - 205481PT | Rimmer Bros <. Which is better? (Is this like asking if Mobile or Valvoline make better oil... :smile: ).

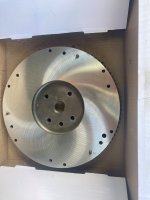
3. Machining the flywheel by a machine shop to ensure flatness and balance. Is this important? (I do not want to lighten, as my intent to keep things stock.) The flywheel has some surface corrosion, but looks good. I plan to use fine emery cloth and clean it up before giving it to a machine shop, to better see the condition.

Thanks, and I'll keep folks posted as I progress. Some good u-tube videos and web pages out there on rebuilds!
 

Attachments

  • Engine - 1.jpg
    Engine - 1.jpg
    2.2 MB · Views: 120
  • Engine - 2.jpg
    Engine - 2.jpg
    2 MB · Views: 120
Last edited:

DrEntropy

Great Pumpkin
Platinum
Country flag
Offline
Mike, I'm more in favor of the second gasket, the copper one. And coat it with the Permatex "Spray-a-Gasket" copper spray. Not a fan of the "new, improved" composite ones.

Something I notice in the pix, looks as if the block's mating surface to the head has some discoloration from having been covered with a plastic and possibly grease? Clean it with acetone or lacquer thinner on rags to remove ANY contaminants. Same with head's mating surface. Another thing is the front cover gasket areas; they look as if the block had not been well cleaned/prepped before the rest of the work was done. Can't be sure though, just from the images.

And "pin" the liners in place with suitable washers and bolts before moving the crank to TDC (or at all!).

Just a couple of my humble opinions from observation of what you've got there.
 
OP
Popeye

Popeye

Darth Vader
Bronze
Country flag
Offline
Thank you both.

I'll look into the oil seal. I will clean the surfaces with Acetone - it was covered with plastic for quite some time. Fortunately there does not seem to be corrosion on critical surfaces. The surfaces "feel" OK (gently running a fingernail does not reveal any bumps), but I agree, they look terrible.

Thanks for the tip on the pinning - I have bolts and large washers in place now. I took the photo right after I test-fitted the head / studs in place. Turns out the ARP kit has two incorrect studs: Should be 5-5/8, but the kit provides two 5-1/2 instead.
 

Sarastro

Obi Wan
Silver
Country flag
Offline
Just a couple comments:

1. Your cylinder protrusions look good to me. You can't measure to half a mil with a feeler gauge anyway, and, frankly, I don't think you can measure better than a mil or two with a feeler gauge and straightedge. I always used a depth micrometer.

2. I have the "Mad Marx" seal and it seems to do the job. I'm glad I installed it.

3. Shaving the flywheel is cheap and is good insurance for a smooth clutch. I had mine balanced, along with the rest of the moving parts, and I think it was good to do. The engine runs remarkably smoothly.

4. I know, the ARP set of studs is a little different from the stock dimensions, but it will be OK. The stock lengths are a little silly; you don't need the fine length differences that they used.

5. You might want to invest in some measuring equipment, especially an inexpensive dial gauge. You'll need it for setting up the timing gears.
 

charleyf

Luke Skywalker
Country flag
Offline
Hopefully your mechanic had the crankshaft and engine parts balanced. Look for marks on the flywheel and rear of the crankshaft to match those marks up when assembling. Also check the flywheel for those marks to be sure they don't get removed when having additional work done on it.
Charley
 

sp53

Yoda
Country flag
Offline
At this stage I would leave the rear seal in place. I have heard of people replacing the rear seal with a Mad Max seal with the crank in place, but I have not done it that way because it looks too difficult and very messy, and perhaps not doable that way. I put a Mad Max seal in last time but had the crank out at the time. I have a car with the stock seal and one with a Mad Max seal both cars leave a mess in the drive way from the breather pipe, but they do not leak at the seal. The crank on these cars are scrolled and that twisting of the scroll when running throws the oil to the front away from the rear seal and works well.

I would look at how they trimmed the felt seal when they put the rear main cap in place. Basically they build a dam with the felt and some kind of liquid gasket sealer down the side of rear bearing cap on both sides and then trim the felt flush with the bottom and use a mandrel to center the crank.

I also use the copper head gasket and spray copper sealer.

Find a good shop for the flywheel and let them do their best. Machine shops are harder to find these days. I have had good luck with larger Truck Clutch shops that sell clutches and reface flywheels.


Steve
 

DrEntropy

Great Pumpkin
Platinum
Country flag
Offline
Find a good shop for the flywheel and let them do their best. Machine shops are harder to find these days. I have had good luck with larger Truck Clutch shops that sell clutches and reface flywheels.
Good plan. Seems most of the good machinists left are working for trucking shops. They still repair and rebuild things as opposed to replacing them. The shop we've had do our work for years is a diesel truck shop in Sarasota, a fifty mile trip each way but they've done everything from cutting flywheels to replacing valve seats in V-12 Ferrari heads. Unfortunately they've become so busy it's a long wait, and now there's talk they will shortly close up shop. No real idea where to go next.
 
OP
Popeye

Popeye

Darth Vader
Bronze
Country flag
Offline
At this stage I would leave the rear seal in place.
Sounds like a plan - thanks for the input!
Find a good shop for the flywheel and let them do their best. Machine shops are harder to find these days. I have had good luck with larger Truck Clutch shops that sell clutches and reface flywheels.
I spoke with a few folks today, and have two machine shops that might be able to help with the flywheel (both in New Hampshire... MA is too expensive!)
 

bobhustead

Senior Member
Gold
Country flag
Offline
I think that you will still find a full service automotive machines shop reasonably near many towns that have amateur stock car race tracks. If you can find such a racer, he or she can likely direct you.

Bob
 
OP
Popeye

Popeye

Darth Vader
Bronze
Country flag
Offline
I love shiny parts! Got the flywheel surfaced over lunch today.

Also: On the distributor pedestal, is it worth replacing the shaft oil seal? How hard is it to remove the shaft itself? Remove the setscrew and pull hard enough (gently), or is heat required? (I assume the setscrew is there to keep the shaft in place. Making it loose / tight does not change the slight play in the tachometer drive shaft.)

Payen gasket ordered from Rimmer. A big-ish order is about to be placed with TRF. Carburetors have been sent to Joe Curto (might have them back by September :smile:). Next up is sending the distributor to Advance (promise 2-3 weeks turnaround). Hoping to be assembling parts end of next week...??
 

Attachments

  • Distributor pedestal.jpg
    Distributor pedestal.jpg
    2.4 MB · Views: 101
  • Flywheel.jpg
    Flywheel.jpg
    1.9 MB · Views: 90
Last edited:

Stevenry

Senior Member
Country flag
Offline
If you remove the distributor shaft, keep a lookout for the little woodruff key hiding down there in the dark. If it falls out and doesn’t make it into the sump, it could prevent the distributor (or shaft - I’ve blocked that day of frustration from my memory) from seating all the way. If you do knock one or few off and into the sump putting it back together, the autozone assortment pack has the correct size, so you can continue your enjoyment unabated.

Steve
 

DrEntropy

Great Pumpkin
Platinum
Country flag
Offline
I love shiny parts! Got the flywheel surfaced over lunch today.

Also: On the distributor pedestal, is it worth replacing the shaft oil seal? How hard is it to remove the shaft itself? Remove the setscrew and pull hard enough (gently), or is heat required? (I assume the setscrew is there to keep the shaft in place. Making it loose / tight does not change the slight play in the tachometer drive shaft.)

Payen gasket ordered from Rimmer. A big-ish order is about to be placed with TRF. Carburetors have been sent to Joe Curto (might have them back by September :smile:). Next up is sending the distributor to Advance (promise 2-3 weeks turnaround). Hoping to be assembling parts end of next week...??

Super progress, Mike! Flywheel looks a beauty.
 
OP
Popeye

Popeye

Darth Vader
Bronze
Country flag
Offline
Question: pushrod sealing tubes. Mine are missing - presumably they "melted" when the head was cleaned. Triumph p/n 100792, Moss 838-500.

I ordered a new set of 8 from Rimmer, but the tube OD is larger than the hole in the head. I believe the holes are 0.6875, and the tubes 0.71875 (assuming they are nominally English - although coming from the UK the tubes could be 18mm. I need a better set of calipers!)

How difficult is it to enlarge the pushrod holes in the head - and what is the best way to do this?

I can buy a drill bit or a hand reamer for about $40 - but want to make sure it will work before spending the money... Am I better off just going to a machine shop for this? I've heard "horror stories" about drilling cast iron... but then you can't believe everything you read on the internet :smile:
 

DrEntropy

Great Pumpkin
Platinum
Country flag
Offline
You'd have to cut out just 0.03125" for a proper fit, methinks. Best left to a machinist to bore the head and press/swedge in the tubes if possible, unless you've got a really good drill press!

Another thought is: wait to measure the tubes and get solid info using known calibrated mic's. Until they're in-hand it's a guessing game.
 

DrEntropy

Great Pumpkin
Platinum
Country flag
Offline
You need to find a machinist, Mike. Otherwise you'll need a ream that'll likely chatter when cutting the cast iron and a steel dreidel to swedge those tubes... and then maybe a file to cut the head side of the tubes down even with the head surface to seal against the gasket. :hammer2:

Waaay to many variables IMHO!

A competent machinist will understand the issues, don't let anyone blow smoke up yer dress.

HTH!
 

glemon

Yoda
Country flag
Offline
I will mention the one that I haven't seen here, and I didn't see it mentioned in the books when I did my 4A motor many years ago. The connecting rods are oriented or offset to one side. When I put my motor back together best guess/memory was wrong on which way. It became very obvious when the spin the engine by hand (rods hit the block if oriented wrong way).

Looks like you may be past that point, but this is a much better thing to figure out sooner rather than later.
 
Similar threads
Thread starter Title Forum Replies Date
KVH General Tech Assembly Lube and Zinc and New Cam--TR4A Triumph 7
J TR4/4A TR4A solid axle assembly Triumph 15
Scotsman TR4/4A Moss seat covers for TR4A missing spring tensioner pocket Triumph 0
trbby2 TR4/4A TR4A Intermittent rear wheel locking? Triumph 19
G Wanted Tr4a boot lid Triumph Classifieds 2
J TR4/4A TR4A automatic transmission conversion Triumph 6
D TR4/4A TR4a Fuel Pump Triumph 10
KVH TR4/4A Routing of TR4A Fuel Line Triumph 7
glemon TR5/TR250 Answering My Own Question Rear Tube Shock Conversion Numbers TR4a-TR6 Triumph 0
M Wanted Dampener Tr4a crank pulley Triumph Classifieds 9
T Wanted TR4A hardtop Triumph Classifieds 2
KVH General Tech Improvement to TR4A Muffler Triumph 1
KVH General Tech TR4A Brake Bleeding Triumph 5
KVH General Tech Reinstalling TR4A Interior Triumph 13
KVH General Tech Yes, the Horns Again--Electrical TR4A Triumph 8
Popeye For Sale Original TR4A windshield - with crack Triumph Classifieds 1
KVH General Tech New Clutch Installation--TR4A Triumph 5
RJS TR4/4A TR4A Temp Gauge Scale Triumph 6
Popeye Wanted WTB: two speed wiper motor TR4A / 75568 - Found Triumph Classifieds 2
2 Wanted Wanted - TR4A parts engine Triumph Classifieds 2
Popeye TR4/4A Latest thoughts on TR4A front springs? Triumph 8
DocDup1 TR4/4A TR4A Wiper Moror Rebuild Service Triumph 5
Ericstammer TR4/4A TR4A body on TR4 frame Triumph 0
Popeye TR4/4A TR4A rear tub repairs (likely accident damage in front of rear wheels) Triumph 6
Sarastro TR4/4A Another 50K TR4A Triumph 5
DocDup1 Wanted TR4A Accelerator Linkage Lever Triumph Classifieds 0
J TR4/4A TR4A seat retaining clip Triumph 5
Carlos Trade Free for the cost of shipping TR4A radiator Triumph Classifieds 2
C TR4/4A Advice for grafting TR6 frame front to TR4A frame rear Triumph 15
fpstude TR4/4A Replacing Rear Flexible Brake Hoses on TR4A w/ IRS Triumph 11
RJS TR4/4A TR4A Seat Upholstery - Piping Question Triumph 7
H TR4/4A 67 tr4a runs rough and losses power when hot but not over normal temp Triumph 14
RJS General TR TR4A Seat Rebuild Triumph 12
B 1966 TR4A two speed wiper motor Triumph Classifieds 1
T TR4/4A Recommendation on top for a late TR4A Triumph 8
S TR4/4A Build Date Triumph TR4A IRS Triumph 3
R For Sale Tr4a parts Triumph Classifieds 2
Sarastro TR4/4A TR4A top's rear attachment Triumph 2
H Wanted Looking for TR4A intake # 307455 Triumph Classifieds 3
fpstude TR4/4A Steering U-Joint Question for TR4A Triumph 5
S For Sale Triumph TR4 and TR4A Factory Workshop Manual on CD/ROM - 1962 - 1968 Models Triumph Classifieds 0
G TR4/4A Vin # for TR4A Triumph 3
M TR4/4A Seats for TR4A Triumph 3
B TR4/4A TR3 valve cover on TR4A Triumph 4
T For Sale TR4A Grille Triumph Classifieds 0
K For Sale TR4A Intake Manifold..Put one on your TR3...improves air intake....cheap like borsht. Triumph Classifieds 2
K For Sale TR4A Grille with Embedded Fog Lights Triumph Classifieds 0
K TR2/3/3A TR4A 16P Girling Calipers Adapted to TR3. Hose/tubing routing? Triumph 15
D Wanted TR4A Live axle frame Triumph Classifieds 0
D TR4/4A Tackling the biggest problem with my TR4A.... Frame Damage :[ Triumph 70

Similar threads

Top