• The Roadster Factory Recovery Fund - Friends, as you may have heard, The Roadster Factory, a respected British Car Parts business in PA, suffered a total loss in a fire on Christmas Day. Read about it, discuss or ask questions >> HERE. The Triumph Register of America is sponsoring a fund raiser to help TRF get back on their feet. If you can help, vist >> their GoFundMe page.
  • Hey there Guest!
    If you enjoy BCF and find our forum a useful resource, if you appreciate not having ads pop up all over the place and you want to ensure we can stay online - Please consider supporting with an "optional" low-cost annual subscription.
    **Upgrade Now**
    (PS: Subscribers don't see this UGLY banner)
Tips
Tips

DIY rear tube shock ideas [finished w/ pics]

RobSelina

Jedi Warrior
Offline
I want to go tube shocks in the rear. I like the change it made up front.

I'm looking at using the existing mounting hole on the chassis where the rubber retaining strap is attached. At the axle, I'm thinking I'll use the stock shock mounting point on the spring backing plate.

At rest, there's roughly 11" between these two points. A quick look at the Monroe website makes me think the Monroe Sensatrac model #5893 may work out. It's got 1/2" and 5/8" eyes (top and bottom respectively), compressed length of 9.375" and extended length 14.250" Total travel of 4.875"....

The top mount hole I'm considering is only a 3/8" diameter hole, so I'd have to run a sleeve, but does this look feasible? How have others done this? Is that top mounting hole I'm considering strong enough?

It looks like I'll have to get my exhaust rebent to clear the shock, but is there anything else I've forgotten?


BTW - I suspect this mounting system is what moss uses on their low-end tube shock conversion kit:
https://www.mossmotors.com/Shop/ViewProducts.aspx?PlateIndexID=52209


Thanks! /ubbthreads/images/graemlins/cheers.gif
 
OP
RobSelina

RobSelina

Jedi Warrior
Offline
Re: DIY rear tube shock ideas

Oh, one more thing. The only other shock that Monroe sells (I just picked them since they're the local NAPA brand) that may work is a 5752. It has 5/8" mounts top and bottom, compressed length 8.625, extended 12.750", total travel 4.125.

Between the 5893 and 5752, the main difference to me is more up-travel vs more down-travel. I can't decide which way to go on this.

The NS 5893 retails for $31.99 at NAPAonline.com....
The NS 5752 retails for $22.99 at NAPAonline.com....
 

aeronca65t

Great Pumpkin
Offline
Re: DIY rear tube shock ideas

Rob:

As you may have guessed, I used the same shocks at rear as up front. I used the limit-strap mount hole as the upper shock mount hole, This required using a spacer of about 1" (I think) to move the shock "inboard". And a long bolt.
For the lower mount, I used the lower clamping plate of the leaf springs (the plate with 4 holes that the big U-bolts go through). I flipped this plate upsided down to drop the lower mounting hole a bit. I don't re-call the hole sizes, but I think I turned plastic spacers to replace the rubber shock-end bushings (I'm not home right now or I'd look).
I drilled a nearby hole for the limit-strap (inboard a bit more).
This places the shock in a more verical angle than the kits you can buy, so I guess it is more effective. The shock ends up being about 3/4" in front of the axle but there is no clearance problem that I have noticed.
I think the whole thing cost me about $40 and was one of the most effective mods I have ever done on the car. Even after 2 hours of hard running, I have no shock fade.
 

aeronca65t

Great Pumpkin
Offline
Re: DIY rear tube shock ideas

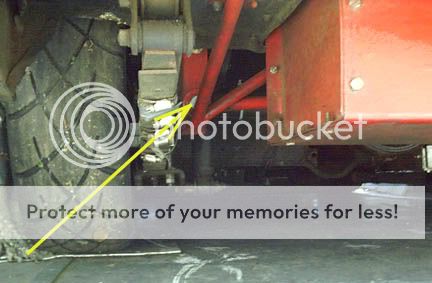
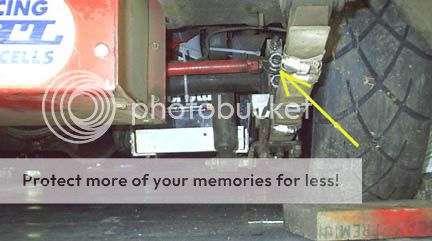
Not the greatest picture, but here's the shocks as mounted. You can see my battery in the right-side picture as well as the panhard rod in both. The yellow arrows are pointing at the panhard rod ends.

panhard2.jpg


panhard1.jpg


Since you are talking about suspensions, here is a little trick I added to the front. I added a "trailing arm" to stiffen the upper lever arm so that it would deflect less. Just 4 rod-ends from Summit racing, a short length of steel tube and 1/8"X1" steel straps at each end. When trail-braking into a hard turn in the upper gears, the car "self-steers" much less with this addition. The mounting area sheet metal is only there on newer, rubber-bumper Spridgets. On older cars, I suppose you could put something like this behind the arm. My front shocks are SPAX adjustables (they were in a parts car that I bought). This picture was used to point out where you need reinforcment for the upper mount (I used 1/8" steel plate). I had no problems on decent tracks, but this happened after running at Lime Rock, which is a crappy, bumpy track.
sprite-shock.jpg
 

Morris

Yoda
Offline
Re: DIY rear tube shock ideas

I have no personal experience with this, but I have heard/read, that mounting the rear shocks at an angle helps to keep the rear end centered. Just throwin that out there.

Also, if you used the rebound strap hole, would your tube shocks in effect work as your rebound strap. Or would you need to relocate the strap. Nial, I read above that you relocated your strap, but I am wondering if anyone else has an opinion.
 

mgblue79

Member
Offline
Re: DIY rear tube shock ideas

DIY can be alot of fun or frustration, that all depends on the person doing it. For my time and money, were I to do this conversion, I would just get the Frontline kit and be done with it. Frontline Spridget

John
 
OP
RobSelina

RobSelina

Jedi Warrior
Offline
Re: DIY rear tube shock ideas

Thanks for the info Nial!

I never even thought about flipping the spring backing plate. DOH! I'll compare the measurements with the plate inverted and see if the dodge colt shocks I'm using (and you were previously) will fit in the rear with my lowered suspension. I like the idea of matching shock valving front and rear.

As for the front tube shocks, if you recall, I had the same failure point you did and I've added a nice piece of steel plate to the frame on both sides of the upper front shock mount. It's funny you mention your trailing arms since I've also been wanting to make something along those lines. I was planning on doing them to the rear though, mounting to the new plate I welded in for the upper shock mount. I may have to reconsider that though and look at that mounting point you're using since it doesn't involve welding to the lever arm. I like it!

John - I'm one of those types that will play in the garage for 20 hrs to save $20 /ubbthreads/images/graemlins/wink.gif Just my nature I guess!

Morris - angling one shock forward and one backward can sometimes help with axle wrap, but it's not a huge concern in my 60-70hp car /ubbthreads/images/graemlins/wink.gif
 
OP
RobSelina

RobSelina

Jedi Warrior
Offline
Re: DIY rear tube shock ideas

Okay, the part number up front for the monroes (courtesy of Nial's tube shock how-to article) is 5877. They have a compressed length of 10.375", extended length 15.875", total 5.5" travel.

After flipping the backing plate, I should still have about 2" of up travel....looks like this might work after all!
 

Matthew E. Herd

Jedi Warrior
Offline
Re: DIY rear tube shock ideas

I have no trouble with axle wrap, even with the 1500's excellent torque and a hot cam, high compression, etc. As to those units with LSD's, there may be a problem, but on the open diff, I can hear the tires squeal under full throttle in 3rd over some of the bumps around here!
 
OP
RobSelina

RobSelina

Jedi Warrior
Offline
Re: DIY rear tube shock ideas

Well, put a pair of Monroe 5877s on order today. They're going to have to come out of Colorado so they won't be here until next Tuesday. Almost made myself wait a month since I had to blow $320 on a new fuel pump assembly on the wife's jeep /ubbthreads/images/graemlins/cryin.gif but decided I wanted instant gratification /ubbthreads/images/graemlins/thumbsup.gif Besides, if I waited for a month where I didn't have to spend money on that stupid jeep I'd be in my grave before I had tube shocks!

Rough budget for those thinking about this:
Shocks - $25 ea
Longer upper bolts, nuts, washers and sleeve ~$5
Lower mount bolt, nuts, washers & spacer ~$5
Exhaust relocation - ~$5-$20
TOTAL - $65-80

The exhaust relocation may not be required for some people. I have the exhaust pipe running in the stock location under the drivers side but I've tucked it up about 0.5" Under extension, the shock may contact the exhaust. I'm going to see if it really is a problem before I do anything about it.
 

Morris

Yoda
Offline
Re: DIY rear tube shock ideas

This exhaust relocation technique may make you a bit squemish, but it worked for me when I discovered that my DPO's custom exhaust was contacting the shock link (tsk, tsk!).

Anyway, put on a thick soled pair of work boots and with the engine warm, grab hold of the fender underside and give the pipe a firm push with your boot. Cheap and easy exhaust relocation.

Please send us pics when you have it all set up. I am finishing up on my front shock conversion this week. I may post pictures if I can get over my ugly weld shame.
 
OP
RobSelina

RobSelina

Jedi Warrior
Offline
Re: DIY rear tube shock ideas

thanks for the tip, but I think I have the exhaust figured out. I've got the pipe bender in the garage and three little bends is all it'll take /ubbthreads/images/graemlins/laugh.gif

As for photos, after I get done I'll take some shots of both the front and rear tube shock conversions.
 
OP
RobSelina

RobSelina

Jedi Warrior
Offline
Re: DIY rear tube shock ideas

Finished.

mgrearshock.jpg


Pretty easy really. Removing the original lever arm dampers was the hardest part.

Basically did the same thing Nial did. Here are a few details.
- The 5877s have 12mm mounts top and bottom. I added a sleeve on the top mount to neck it down from 12mm to 3/8. Just used 3/8" to 1/2" steel sleeves with a little metal removed. Got a nice tight fit. This allowed me to use 3/8"x5" bolts up top, which fit perfectly in the limiting strap bolt position.
- on the bottom mount, i decided just to redrill the spring backing plate for a 12mmx80mm bolt. I'm using about 9 washers as a spacer right now, since you need about 3/4" between the plate and the shock. I'll replace these with an aluminum spacer when I get the time.
- I rerouted my exhaust to cross the axle a little lower and also towards the pumpkin a little to clear the shock. Basically a bad idea since I hit it very easily now. I'm planning on taking it to the exhaust shop tomorrow to have them do a more permanent fix.
- I'm not going to bother running limiting straps.

As for handling - my lever arms weren't in bad shape, but these monroe's really tightened up the car. They're as significant, or almost as significant, as the improvement I gained from the front tube shock conversion. I really wasn't expecting this much of an improvement, but body roll out back and just general response and stabilty are all much improved. Well worth the money!

/ubbthreads/images/graemlins/cheers.gif
 
G

Guest

Guest
Guest
Offline
Re: DIY rear tube shock ideas

I looked into this before I joined the forum - and I was dissapointed.

I noticed that on my 79 Midget 1500, I was coming up with 15" unloaded and thirteen inches with the weight of the car on the springs. That's with the rubber bumber on the car and thats without flipping the spring plates. The Moss kit comes with some nice gas shocks, but the maximum extension is 14 and 3/4's. Good engineering would tell tell me that I would like to have a shock that has just a slight bit more travel than with the suspension unloaded.


Looking at the Moss instructions, it also appeared that on the later models, you would have to move the shocks more inboard, which would require a spacer on the spring perch so that the shock lines up correctly. So basically, for a 175 bucks you get some bolts and a set of nice gas shockswith a kit you can rocket science yourself a lot cheaper, with hardware store parts and a better quality of fit and parts.

As a sidenote, I looked up this info from Monroe. This is a Hyundai Excel shock that you are using. It looks to me like I need a longer shock. As for the Moss shock, I feel more travel is necessary for me- perhaps a range of 11-17". I'm figuring I should add two inches pus or minus to my loaded/unloade values (and it looks like I could add 2 inches on top of that if I flip the perches).I'm researching a high quality gas shock in this range. Any help would be desired.
 

JerryB

Jedi Warrior
Offline
Re: DIY rear tube shock ideas

"""""I'm researching a high quality gas shock in this range""""

Use the Koni from BMC early Mini front. Ring top and botom.
Reinforce the lower mounting plate. You can also move the lower bolt positioning around at the same time.


"""""""""""""Also, if you used the rebound strap hole, would your tube shocks in effect work as your rebound strap. Or would you need to relocate the strap"""""""""

The tube shock will do the work of the rebound strap. just get the open length correct to use as a stop when the rear housing is at full droop. Give the strap the floatation test.
 
G

Guest

Guest
Guest
Offline
Re: DIY rear tube shock ideas

I can't find any specs on the Koni's, however I noticed some VW Dune Buggy shocks that have about 11-18" of travel.

I still have the Moss kit as I never sent it back. I'm going to go ahead and use the shocks in the kit as they are pretty nice and I can't find anything similar to them.

I was concerned with the downward travel as these shocks are already maxed out at the point where they meet the mounting holes with the springs unloaded. Should I be concerned? I really want to deep six those straps, too.

Looks like compressed they are about 9.75" (just sighting it, as I don't have me ruler handy). I could possibly build a C shaped bracket out of bar stock and weld it below the frame as I'm not to thrilled about offsetting the shock inboard at the spring perch (looks like an inch inboard). When I get the car out on the road, I'll wipe some grease on the stems and see what kind of travel I'm getting on the shocks and go from there.

The shocks part number is 738125 and it's made in the US. However I have no idea of who made it. Takes 1/2" bolts top and bottom.
 

jlaird

Great Pumpkin
Country flag
Offline
Re: DIY rear tube shock ideas

I would bet that if you called Monroe or someone like that, customer service and gave them the info they could help.
 

theleisure

Jedi Trainee
Bronze
Country flag
Offline
Re: DIY rear tube shock ideas

This is an old thread that I like to read every now and then...

FYI, Advance Auto parts has a sale on all Monroe Gas-matic products right now. That means you can swap to tube shocks for about $30 + $5 for hardware right now. Here's a question for you though, they carry a gas-matic shock and a sensa-trac shock-- what's the difference (other than 10 bucks)?

thanks,
sean
 
Similar threads
Thread starter Title Forum Replies Date
Joel Lester TR2/3/3A DIY paint job? vs leave it to the professionals? Triumph 27
Hamish Racing TR2/3/3A Sway bar rose joints and diy brackets Triumph 4
PC DIY tips from Bo his self Other Cars 0
tahoe healey DIY Extension for Clutch Bleeding Austin Healey 23
K TR2/3/3A Sloppy SU linkage and DIY bellcrank repair? Triumph 6
K TR2/3/3A DIY Alternator heat shield>>> Triumph 2
K TR2/3/3A DIY TR3A Rack and Pinion Steering Conversion Triumph 0
S TR2/3/3A DIY radiator rebuild and rod out Triumph 26
maxwedge5281 diy side curtain polishing Austin Healey 8
Joe Reed MGB DIY splash shield for 77-80 MGBs... MG 0
Joe Reed MGB DIY Late MGB Mud Shield MG 0
oud272 New Paint - DIY Spridgets 17
jaegzie Looking for a write up on diy carpet mentioned in other posts Spridgets 9
K TR2/3/3A Can porting a TR3 Cylinder head be a DIY job? Triumph 6
T TR2/3/3A Upholstery Shop or DIY Triumph 16
Schroeders T-Series TF Tach Calibration - DIY? MG 3
D DIY - Front tube shock conversion Spridgets 33
M Ultimate DIY Triumph 2
D DIY-Roller-Throw-Out-Bearing Spridgets 2
RAC68 DIY Roller Throw Out Bearing Austin Healey 14
Morris DIY Dash Spridgets 20
K TR2/3/3A TR3 water pumps again...DIY? Triumph 0
boxfullofyertoys Thoughts on DIY welding/bodywork Spridgets 27
K TR2/3/3A Rebuilding a TR3 Lever Shock DIY? Triumph 8
B TR6 DIY TR-6 frame repair feasibility- Triumph 15
HealeyRick DIY Carb Cleaning Soda Blaster Austin Healey 2
T perils of DIY paint jobs Triumph 14
K DIY Gas Tank Flush Triumph 5
Atrus DIY Temp gauge repair - Solder issues Spridgets 40
RickB First DIY front alignment. Spridgets 5
tosoutherncars Front shock R&R instructions / pix / DIY? Spridgets 10
DrEntropy Anyone interested in DIY front-end alignment? Restoration & Tools 14
T Raise Seat Height - DIY Triumph 1
CraigLandrum TR2/3/3A DIY TR3A Seat Covers Triumph 13
T Install Lower A-arms-DIY Triumph 0
beaulieu DIY powder coating , how good does it work ? Restoration & Tools 10
RobT DIY Michelin Red Line - 205/70R15 Triumph 21
JPSmit DIY Carpet Question Spridgets 12
eschneider diy ultrasonic cleaner Restoration & Tools 5
Randy Harris Ran across cool car-guy show on DIY channel Austin Healey 5
RobSelina need some help with DIY spring arching/de-arching Spridgets 9
john_j DIY Rag Top? Other British Cars 1
R Transmission Rebuild DIY? MG 5
Rick O. DIY Pressure Bleeder Restoration & Tools 5
petnatcar Rear View Mirror Relocation Austin Healey 0
Carlbanan56 MGB Rear axel torque? MG 4
petnatcar Rear View Mirror Relocation Austin Healey 0
trbby2 TR4/4A TR4A Intermittent rear wheel locking? Triumph 19
Carlbanan56 MGB Rear wheelbearing clicking MG 8
Carlbanan56 MGB MGB rear break rebuild MG 6

Similar threads

Top