Didn't do my BJ7, but did my Bugeye which is more or less the same dash. Tools you'll need: Sharp pair of scissors, single edge razor blades, a wallpaper trim snap off razor blade knife that you can break off the end to expose a new sharp edge whenever the edge gets dull, one of those small wallpaper seam rollers, a Sharpie that contrasts with the back of the vinyl, a hair dryer, small brush for glue and a sewing needle. Work in the sun or on a warm day. You want the vinyl to be warm enough that it will stretch easily. Start with a perfectly clean dash with all prior glue removed and any imperfections on the dash face smoothed out. Although you might think the vinyl will cover any bumps or unevenness in the dash, it won't. They'll show through. You'll also need to clean the reverse of the dash a good two inches around the edges so the glue will have a good clean surface to stick to. Lay your vinyl out on your work surface face down, and place the dashboard face down on top of it so you'll have room to cut the vinyl with a couple of inches to spare all around the dashboard. Draw the outline of the dashboard with the two inch border on the vinyl with the Sharpie, then cut out the vinyl with the scissors. Don't cut any holes for the instruments at this time. (I'm assuming you don't have an original dashboard vinyl to use as a pattern. If you do, carefully peel off the old dashboard vinyl (the hairdryer may help) and cut your new vinyl to match including all the slits, holes, etc)
Apply contact cement to the entire surface of the vinyl backing, the front of the dashboard and the border area on the back of the dashboard. Glue choices are Moss upholstery adhesive: #221-560,
[FONT=ARIAL, HELVETICA]DAP[SUP]®[/SUP] Landau Top & Trim High Heat Resistant Contact Cement[/FONT], or 3M Super 90 spray adhesive. Best choice is probably the DAP or Moss stuff as it's the strongest. They don't come in aerosols and ideally you'd be able to spray it on. You can probably brush it on, but you want to ensure it goes on in an even thin coat that won't produce any bumps. The 3M spray will probably hold ok as well as it's not a high stress application. Where the vinyl tends to come unglued, though, is at the edges and around the back so if I went the 3M route, I'd still brush on some of the other stuff around the edges to make sure it stayed stuck. Follow the glue manufacturer's instructions regarding number of coats and let the glue dry according to the instructions as well. Don't get eager. Since it's a contact cement you want it to be tacky, not wet.
Put the dash on the work surface face up. Fold the vinyl in half vertically with the non-glued surface facing inwards and place the center of the vinyl in the midpoint of the dash. Lightly press down about an inch of the vinyl along the center onto the dash surface. What you want to do from here is work your way out from the center line, stretching the vinyl vertically and horizontally so you get a nice smooth tight surface as you go. Push down on the vinyl as you go to anchor it. It comes pretty naturally, it's harder to describe than do. The seam roller can come in handy as you go, just make sure not to press down so hard that the raised center of the roller leaves an impression in the vinyl. Cover the entire face of the dashboard, leaving about an inch border around the front that hasn't been stuck down tight. You shouldn't have any bubbles in the vinyl, but if you do, you can puncture it with a small needle to let the air out and smooth it working from the outside of the bubble inwards.
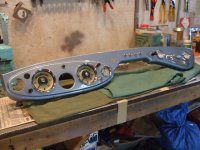
Flip the dash over, face down. Fasten the excess vinyl to the back by stretching it tightly while holding down the vinyl on the front side. Use the single edge razor to make slits and pie cuts of the vinyl up to the edge of the dashboard (don't continue the cuts to the front of the dashboard) so that the vinyl will lay flat on the frint without bunching in the rear. This is what a factory (Bugeye) dash looks like in the back

On tight curves, like where the heater controls mount, the hair dryer can help to make the vinyl more pliable. Don't set the controls too high or leave the dryer in one place, or you'll melt the vinyl. Clamping the edges with some spring style clothespins can't hurt, but probably won't be necessary. Once everything has dried, start cutting out the holes for the instruments/switches. Use the wallpaper trim knife to cut an "X" into the vinyl covering the hole from the rear of the dash. On some of the holes, you'll need to trim the vinyl even with the edge of the hole as there isn't enough clearance for the gauges to fit through the hole if there is any overlapping vinyl. On the switches, you might get away with just pushing the switch through the flap made by the X. Again, use the wallpaper trim knife to cut the vinyl away from the gauge holes, being careful to hold the knife straight up and down so you don't undercut the vinyl on the face of the dashboard that wouldn't be covered when the gauge was reinstalled.
Test fit all the switches and gauges before refitting the dash. I don't know what kind of gauges you're fitting, but if you can install them permanently before installing the dash so much the better.
While searching for a bugeye rear dash picture I found "forum member "Drooartz" did a similar write up which you may also find helpful:
https://www.drooartz.com/index.php?page=43 Hey there Guest!
 Hey - did you know if you click on the title of a thread it will take you to the first unread post since you last visited that thread?
 but were afraid to ask:
  STOP!! Never post your email address in open forums. Bots can "harvest" your email! If you must share your email use a Private Message or use the
  smilie in place of the real @
 Pretty Please - add it to our Events forum(s) and add to the calendar! >>


 Didn't Shelby build them.

 A friendly reminder - be careful what links you click on here. If a link is posted by someone you don't know, or the URL looks fishy, DON'T CLICK. Spammers sometimes post links that lead to sites that can infect your computer, so be mindful what you click.