• The Roadster Factory Recovery Fund - Friends, as you may have heard, The Roadster Factory, a respected British Car Parts business in PA, suffered a total loss in a fire on Christmas Day. Read about it, discuss or ask questions >> HERE. The Triumph Register of America is sponsoring a fund raiser to help TRF get back on their feet. If you can help, vist >> their GoFundMe page.
  • Hey there Guest!
    If you enjoy BCF and find our forum a useful resource, if you appreciate not having ads pop up all over the place and you want to ensure we can stay online - Please consider supporting with an "optional" low-cost annual subscription.
    **Upgrade Now**
    (PS: Subscribers don't see this UGLY banner)
Tips
Tips

TR2/3/3A Clamp plate on Rear Fender TR3A

mcguijo

Jedi Hopeful
Offline
Did every TR3A have a clamp plate (Roadster Factory Part # 602167) on their rear fenders? The clamp plate is defined with a "captive nut, fixing top of rear fender at rear."

I really don't remember pulling any off when I took off rear fenders (and I'm pretty comfortable that I was the first to take off these fenders..

Would an elongated captive nut cage have been used in its stead?

If every car should have had them, how where they rigged up?

Thanks
 

TR3driver

Great Pumpkin - R.I.P
Offline
I believe they all had them originally. Much stouter than an ordinary captive nut cage, but otherwise I guess you could apply that description.

The plate goes in the very top edge of the fender, with the rearmost bolt through the nut on the front of the plate, and the rear of the plate clamping the top rear corner of the fender to the body just above the tail light pocket.

The attached photo isn't the best, but perhaps you can make it out.
 

Don Elliott

Obi Wan
Offline
Mine were rusted away when I dismantled my 1958 TR3A for restoration in 1987. So I just did that last screw like all the others. I finished the restoration of another in 2006 and used new items referenced above.

Randall - How did you get under there to take such a fabulous photo, considering the confining space, your physique and the poor lighting ?
 
OP
mcguijo

mcguijo

Jedi Hopeful
Offline
Great picture! Thank you for going through all the trouble.

Is this clamp tacked on (spot welded)? The other alternative of holding in place while bolting on sounds like it would take really long arms to pull off.
 

Don Elliott

Obi Wan
Offline
It's not welded to anything. Maybe you need a willing friend to hold it in place while you tighten the screw. The "L" end is intended to close any gap near the red lans tail light and its chrome base by the short end applying pressure to the flange on the top end of the fender when the last truss head screw is tightened to the captive nut. Once the screw is really tight the long part of the "L" acts as a bow or a flat arch to apply the pressure at the short "L" end to close the gap. But this is covered by the stainless steel trim beading strip and no one would see any gap anyway.
 

TR3driver

Great Pumpkin - R.I.P
Offline
Don Elliott said:
Randall - How did you get under there to take such a fabulous photo, considering the confining space, your physique and the poor lighting ?
Waddya mean, my physique !?! Just cuz I weigh twice what you do ...
grin.gif

(Actually, I have managed to lose just a little weight since you met me, Don.)

But the credit really goes to my digital camera, which works amazingly well in such awkward situations. Especially if I remember to turn on "Macro" mode, which allows it to auto-focus to only a few inches. The car is in the garage with the rear up on jack stands (working on the rear brakes), so I just crawled under and started shooting. Couldn't really see what I was shooting, so took shots from several angles and picked the best one. Then cropped and scaled it, and added the circles and arrows and a paragraph on the back of each one, explaining what each one was to be used as evidence ...
 

TR3driver

Great Pumpkin - R.I.P
Offline
mcguijo said:
The other alternative of holding in place while bolting on sounds like it would take really long arms to pull off.
Not as bad as you might think. Remember, the fender is only about 13" high at that point. Just squatting by the car on jack stands, I had no trouble putting one hand on the clamp from underneath and the other on the screw head inside the drip rail.
 

luke44

Jedi Warrior
Silver
Country flag
Offline
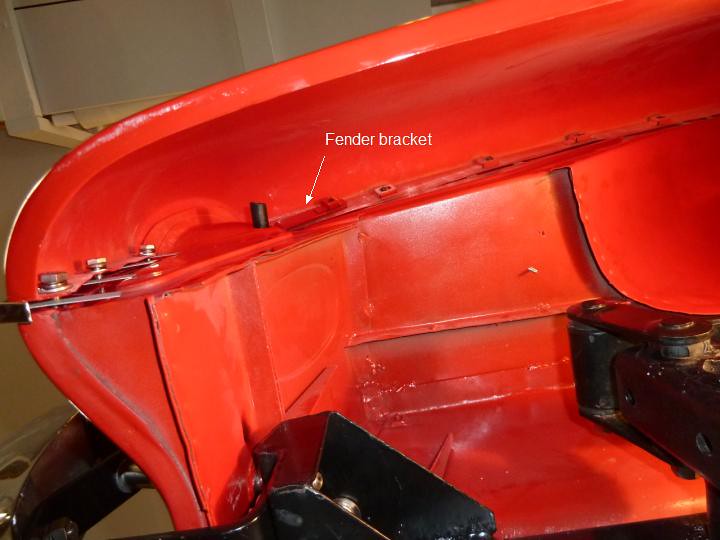
Thought someone coming later may appreciate this picture. Took me a while to figure it out...

8793216620_2dd8582206_b.jpg
 

luke44

Jedi Warrior
Silver
Country flag
Offline
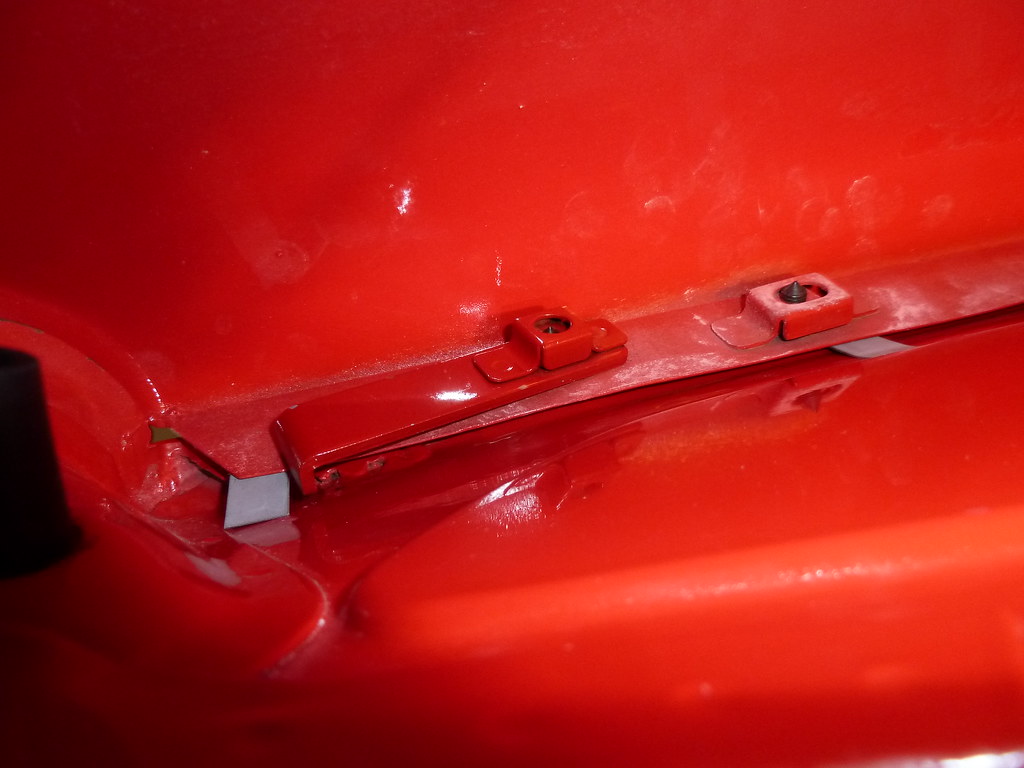
The photo is looking up into the inside of the rear fender from beneath the car. The bolt is the last slotted truss head machine screw that goes into the plate from inside the trunk railing. Maybe this helps? You can just see the tip of the bolt end.


91785a542-b01-p2l.png


8794836148_318252e320_b.jpg
 

M_Pied_Lourd

Darth Vader
Country flag
Offline
I cant see Randalls photo but Lukes are great! Thanks.
 

MDCanaday

Jedi Knight
Offline
Dang I love the way the cage nuts are reflecting on your trunk side panel,Hope you did NOT actually
polish this hidden bit too long.
MD(mad dog)
 

TexasKnucklehead

Jedi Knight
Country flag
Offline
I can only hope the outside of my fender looks as good as his inside. I don't see Randalls picture/attachment either. -Maybe it's just another typical case of American blind justice, and we're not going to look at the 27 8x10 color glossy photographs with the pictures and arrows and a paragraph on the back...
 

RC64

Jedi Hopeful
Country flag
Offline
Bruce...

Seeing your post tonight along with that photo of the fender bracket brought an answer to a long standing question for me. I have two of those in the misc parts box from the guy who originally disassembled my car and I have never been able to figure out where they were supposed to go. Now I know.

I also need to thank you again for the photos you sent me and the ones you've posted. They have been a tremendous help. Lately they have been the first place I go when I have a question about how something goes together. Since I've taken over the restoration now that the painting is complete I seem to be rustling around in those photos almost daily.

Rick...
 

TR3driver

Great Pumpkin - R.I.P
Offline
Sorry bout the disappearing photos. I had uploaded them directly to the old BCF, and the new forum-ware wouldn't let me upload anything new until I deleted some old uploads.

Besides, Luke's photos are MUCH better than mine!

CLAMPEXPLAINED.jpg


Glad to hear Arlo's still out and about. I got to hear him a couple years ago at UCLA and it was by far the most enjoyable concert I've been to in a long time. Been hoping he'll come back again.
 
Similar threads
Thread starter Title Forum Replies Date
S TR2/3/3A tr2 muffler clamp Triumph 10
steveg TR6 Steering boot clamp wire - why? Triumph 2
D TR2/3/3A Exhaust system routing and middle clamp Triumph 8
jfarris TR2/3/3A Small Manifold Clamp Locations? Triumph 5
P TR6 Air vent hose clamp Triumph 0
Jim_Stevens TR2/3/3A Distributor clamp with a Mallory? Triumph 5
J Need pic of BN4 Convertible Top Clamp Austin Healey 4
PAUL161 MGB Hose clamp question MG 2
Tinkerman TR2/3/3A Rear wing fixing clamp Stan Part # 602167 Triumph 5
weewillie can't tighten dizzy clamp Spridgets 3
T TR2/3/3A TR3 muffler clamp Triumph 20
S Manifold-tailpipe v clamp Spridgets 8
Tinkerman TR2/3/3A TR3A Dash Clamp Attaching Point Triumph 10
R Top clamp needed Spridgets 3
R Top clamp Spridgets 5
Tinkerman TR2/3/3A TR3A Steering Column Clamp Triumph 7
Tinkerman TR2/3/3A TR3A Rear Wing Clamp Installation Triumph 14
D Distributor clamp upgrade? 907 engine. Lotus 5
Tinkerman TR2/3/3A TR3 Crank Dog Bolt & Double Wire Clamp Question Triumph 5
Tinkerman TR2/3/3A TR3 Exhaust Manifold Clamp Question. Triumph 1
DNK R. Goode's steering clamp Triumph 3
eejay56 84 Ford ranger Dizzy clamp bolt Other Cars 7
tomshobby exhaust clamp Triumph 12
Brosky Distributor clamp bolts Triumph 14
jerrybny Exhaust Band Clamp question Triumph 3
PeterK How do I clamp new exhaust and so it won't leak? Triumph 7
saabmp3 Rear overload spring clamp broken Spridgets 7
AUSMHLY Fresh air hose clamp, heater blower ground Austin Healey 5
B Clamp ammeters for auto testing Restoration & Tools 4
AngliaGT 1997 Miata - Anyone Have a Picture on How to Mount the Front License Plate Bracket? Other Cars 12
B For Sale GT6/Spitfire License Plate Light Assembly Triumph Classifieds 0
Joel Lester TR2/3/3A Advice on how to get VIN number stamped into new plate Triumph 10
timsgolf Center Dash Switch Plate Painting Austin Healey 5
S TR2/3/3A Distributor vacuum advance hook up to the inner plate Triumph 9
Rod-H TR4/4A TR4 Body Number Plate Supplier Triumph 6
PAUL161 T-Series MGA pressure plate verses MGTF pressure plate? MG 6
AUSMHLY BJ8 Clutch Pressure Plate, Old vs New Austin Healey 4
B TR4/4A License Plate Protection Triumph 12
Prof. T Wanted 1974 - TR 6 Front Chrome License Plate Holder Triumph Classifieds 1
AUSMHLY BJ8 Clutch Pressure Plate Brand Preferences Austin Healey 3
K TR2/3/3A Brake caliper brake pad retaining plate bolt hole? Triumph 16
Rob Glasgow Finally Found It (Original License Plate Number) Austin Healey 3
K TR2/3/3A TR6 Gearbox in a TR3.....Use a TR6 clutch disc and pressure plate or Triumph 7
J TR2/3/3A Dirty clutch driven plate Triumph 5
J TR2/3/3A clutch driven plate Triumph 1
R Engine Number Plate Austin Healey 2
chicken BJ7 Rear Number Plate Mounting Austin Healey 3
G 1962 TR3A inner plate # Triumph 8
RJS General TR Commission Number Plate Triumph 13
H Rocker Cover Data Plate Austin Healey 15

Similar threads

Top