• The Roadster Factory Recovery Fund - Friends, as you may have heard, The Roadster Factory, a respected British Car Parts business in PA, suffered a total loss in a fire on Christmas Day. Read about it, discuss or ask questions >> HERE. The Triumph Register of America is sponsoring a fund raiser to help TRF get back on their feet. If you can help, vist >> their GoFundMe page.
  • Hey there Guest!
    If you enjoy BCF and find our forum a useful resource, if you appreciate not having ads pop up all over the place and you want to ensure we can stay online - Please consider supporting with an "optional" low-cost annual subscription.
    **Upgrade Now**
    (PS: Subscribers don't see this UGLY banner)
Tips
Tips

BN1 5 stud conversion

OZ_BN1

Member
Country flag
Offline
Hi

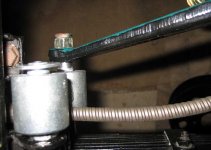
I have fitted a 5 stud differential to my BN1, using the original springs and shocks. However when installing the new shock link it ends up being distorted once it has been tightened up. Its as if the shock arm needs to be bent slightly to line up properley.

Any ideas?

Cheers Graham
 
Country flag
Offline
Picture?

Something clear and concise, that will give us something to think about.

There's a wealth of information here, but we need a little more to go on :wink:
 
OP
OZ_BN1

OZ_BN1

Member
Country flag
Offline
Hi

For some reason I can only add one picture, I am sorry it was not clear but it was to me.

It's difficult to see in the photo but the shock link is no longer sitting as it should be. Once the shock arm is tightened up on the link it distorts it. Due to the rubber bush in the link the top section of the link is at adifferent angle than the bottom and the top link shaft has shifted out about 5mm.

Cheers Graham
 

Attachments

  • 18014.jpg
    18014.jpg
    40.4 KB · Views: 271

zblu

Jedi Knight
Country flag
Offline
Those look like the spring hangers at each end of the rear springs you are attached to, there should be an attachement point on the diff axle housing where it crosses the springs, and there should be a small "arm" off that that the lever bolts to
 

vette

Darth Vader
Country flag
Offline
I don't know how Bn-1s are built, but this is what the rear shock set up looked like on my BJ7 before I took it apart.
I hope the attachment took.
 
Country flag
Offline
There's supposed to be a short tubular spacer on the shank that bolts to the axle bracket. Find and install that, and you should not have the alignment weighted, as it is in your picture.

While small, vette's picture shows the spacer.
 
OP
OZ_BN1

OZ_BN1

Member
Country flag
Offline
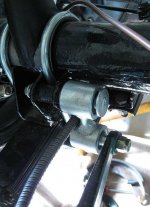
I have taken a better photo. I have the small tubular spacer, it's installed on the bracket on the axle. The top link shaft goes through the bracket and the spacer, once tight it's position is set. However when mounting the shock it distorts the link. Im thinking now that that maybe the angle of the shaft on the link is not correct.If I could get the shock arm to go on further it would reduce the tension. I talked to Moss but they have not had anyone else with this issue.

Cheers Graham
 

Attachments

  • 18038.jpg
    18038.jpg
    83.5 KB · Views: 238
Country flag
Offline
Was your car "at ride height" when the picture was taken; i., e,. weight on the wheels.

I could see the if the distortion was at full droop or compression, and being centered when loaded.
 

vette

Darth Vader
Country flag
Offline
I believe maybe your alignment issue is minor. As Randy said, with weight on wheels maybe it is ok. But too, check to make sure the bracket welded to the axle is not bent.
 

zblu

Jedi Knight
Country flag
Offline
I think the problem is the bent face the top connection is attached to, the faces should be parallel, if you bash that face out to match the other side I believe all will be ok
 

zblu

Jedi Knight
Country flag
Offline
I must check to make sure, but it would make more sense for the distance piece to be between the parallel faces to get ensure a better transfer of load
 

vette

Darth Vader
Country flag
Offline
GregW said:
An optical illusion of an asymmetrical bracket. Say that fast three times.

I did, and it looks better already.
 

vette

Darth Vader
Country flag
Offline
GregW said:
An optical illusion of an asymmetrical bracket. Say that fast three times.

I did, and it looks better already.
 

Michael Oritt

Yoda
Gold
Country flag
Offline
Something does not make sense--if it was bent before the conversion then the same condition would have been there prior to doing it. Oz, do you remember how it was aligned when you disassembled things?

Also, is the misalignment only on one side or both? Did you change the panhard bar setting while doing the R and R and if so is it possible the axle housing is offcenter?
 
OP
OZ_BN1

OZ_BN1

Member
Country flag
Offline
Hi

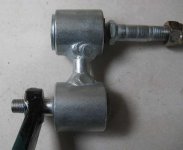
The problem is the same on both sides. The bracket is not bent probably the angle that the photo was taken. The chassis is sitting up on stands. Have added another photo showing the link prior to being fitted, you can then see in the other photos how the top link shaft has repositioned itself.
The panhard bar was extremely difficult to install, never thought to measure anything to see if axle is sitting central. I will go take some measurements.

Thanks for the help

Graham
 

Attachments

  • 18059.jpg
    18059.jpg
    31.2 KB · Views: 178

pan

Jedi Warrior
Country flag
Offline
Just a small note: When swapping to the hypoid "5 stud" axle on a BN1, shouldn't one also change the front brake cylinders? When the new axle was introduced during production the front wheel brake cylinder bore was reduced from 1" to 7/8" .
I understand this was to balance the brakes as the front brake drums were still 1.75" wide but the rear drums on the new axle were 2.25". How critical is this in practice?
 
OP
OZ_BN1

OZ_BN1

Member
Country flag
Offline
Hi

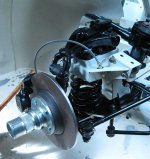
Just an update, I have taken the measurements and all apears to be correct. So I plan to leave it as it is and see what it looks like once it's off the stands.

The front brakes have been converted to disks using the Welch conversion kit.

Cheers Graham
 

Attachments

  • 18098.jpg
    18098.jpg
    58.4 KB · Views: 145
Similar threads
Thread starter Title Forum Replies Date
Z BN1 4 stud PCD Austin Healey 0
S Wanted Windscreen Wiper Arm for BN1 wanted Austin Healey Classifieds 2
J For Sale BN1 project car (price reduction) Austin Healey Classifieds 0
W BN1 Steering Box Removal Austin Healey 11
W BN1 Steering Box Austin Healey 3
I Wanted BN1 with H6 carbs : bodies of TR3 Austin Healey Classifieds 1
S BN1 Wheel-Tyre Combination Austin Healey 10
AUSMHLY Laygear End Float BN1-BJ8 Austin Healey 2
W Healey BN1 Ignition Light Austin Healey 8
T Wanted: Early BN1 Sidescreens Austin Healey 2
Guido36 BN1 with Triumph TR 4 engine Austin Healey 1
B Austin-Healey 100 BN1 Electrical Diagram Austin Healey 0
W BN1 Gearbox First Motion Shaft Austin Healey 0
I Austin-Healey BN1 Parts List Austin Healey 4
BoyRacer BN4 Front Wings on a BN1 Austin Healey 9
BoyRacer Engine Swap: 3000 Engine Into a BN1 Austin Healey 25
BoyRacer Replace BN1 steering box with later version? Austin Healey 0
red57 Interesting BN1 for sale in Bellingham, WA Austin Healey 4
D BN1 Parts to Trade Austin Healey Classifieds 0
S WANTED: Healey BN1 "Smiths" Fuel Gauge (Dead or Alive) Austin Healey Classifieds 3
A BN1 Mechanical Brake Switch Austin Healey 23
P Wanted BN1 can shaft Austin Healey Classifieds 0
C BN1 Clutch Pedal Rattle Austin Healey 2
CharlesBN1 Uprated or 'umbrella' valve stem oil seals for BN1 Austin Healey 2
Guido36 BN1/BN2 Sidescreens Austin Healey 0
M BN1 Loss of Power Austin Healey 21
L Seat position for a BN1 Austin Healey 0
CharlesBN1 Wanted WTB Shelley Jack [6 INCH DL] for Early BN1 Austin Healey Classifieds 0
M BN1 with H6 carbs : what setting ? Austin Healey 56
I Ball Bearing cup for old style BN1 steering box Austin Healey 0
M Heat-related carb issue on BN1 Austin Healey 7
RCarr 1954 BN1 Wiper Wheelbox and Rack Austin Healey 3
CharlesBN1 Wanted wanted to buy - sidescreen trim/strips for early BN1 Austin Healey Classifieds 5
CharlesBN1 BN1 Soft Top installation - need advice! Austin Healey 3
Michael Oritt Optimal lighting for a BN1 Austin Healey 5
D Wanted BN1 LH Seat Cushion [Bottom] Austin Healey Classifieds 0
J 100 bn1/bn2 id Austin Healey 26
HealeyRick Wilwood Discs on a BN1 Austin Healey 1
CharlesBN1 need some advice fitting the bonnet on a 54 BN1 Austin Healey 4
Z For Sale 1954 Austin Healey 100-4 BN1 Beautiful Restoration Austin Healey Classifieds 0
Z For Sale 1955 Autsin Healey 100-4 BN1 and 1956 100-4 Race car Austin Healey Classifieds 0
D Wanted BN1 or BN2 Donor/Parts Car Austin Healey Classifieds 1
GeorgeC Rear spring disassembly - BN1 Austin Healey 1
Jake BN1 Front Shroud Badge - What is original? Austin Healey 4
Jake For Sale FS: BN1/BN2 Kilmartin Chassis Repair Parts, New Austin Healey Classifieds 2
55modified Need photoshop help for side vent options on my BN1 Austin Healey 6
55modified Nardi hub for a BN1? Austin Healey 10
L BN1 Transmission rebuild Austin Healey 1
simon1966 Replacing the witches nose in-situ. BN1 Austin Healey 14
P BN1 Rear Chassis-to-Shroud Extensions Austin Healey 1

Similar threads

Top