• The Roadster Factory Recovery Fund - Friends, as you may have heard, The Roadster Factory, a respected British Car Parts business in PA, suffered a total loss in a fire on Christmas Day. Read about it, discuss or ask questions >> HERE. The Triumph Register of America is sponsoring a fund raiser to help TRF get back on their feet. If you can help, vist >> their GoFundMe page.
  • Hey there Guest!
    If you enjoy BCF and find our forum a useful resource, if you appreciate not having ads pop up all over the place and you want to ensure we can stay online - Please consider supporting with an "optional" low-cost annual subscription.
    **Upgrade Now**
    (PS: Subscribers don't see this UGLY banner)
Tips
Tips

TR6 '74 Clutch & various broken bits

TomChar

Senior Member
Country flag
Offline
So the clutch started making a few noises, and then quit altogether. From reading the forums, I thought it might be the release fork pin. I've only had this car for two years now, so before I dug into it, I ordered a new clutch kit, throw-out bearing, and replacement pins for the release fork. After getting all the parts, I started into it, and found a few more things. First there was a little hole in the passenger side of the bell housing, clearly from something coming out. But it was an old hole, so I won't worry about that.

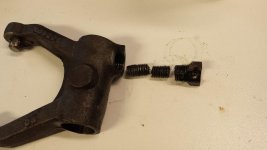
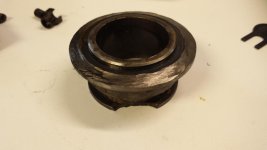
Then once the transmission was out, I found the issues as shown in the photos. The release fork pin was sheared, but also the throw-out bearing was shot, badly enough that it was rotating on the sleeve. The sleeve had a chunk missing - no idea where that went. Just trying to remove the release fork from the shaft was problematic, as the pin was in three pieces and required much beating and heating to remove. As I had never of read of such failures here in the forum, I thought I share them with you. So now I'm awaiting a new release fork and the phosphor bronze sleeve from Moss Motors.

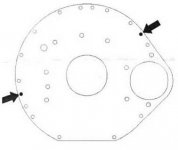
As this is the first LBC transmission I've removed (and will eventually install) I noticed that there aren't any locating dowel pins on the engine block. When I took it apart, I noticed that the bottom edge of the engine plate lined up nicely with the bell housing. I was thinking that a block of wood placed there to slide it on might do the trick. Any other advice for getting this thing back together by myself?

Thanks,
Tom
 

Attachments

  • 2014-08-19 14.34.22.jpg
    2014-08-19 14.34.22.jpg
    182.2 KB · Views: 132
  • 2014-08-19 14.34.57.jpg
    2014-08-19 14.34.57.jpg
    180.8 KB · Views: 126

TR3driver

Great Pumpkin - R.I.P
Offline
There are supposed to be "dowel bolts" that locate the transmission to the rear plate (and in turn, dowels that locate the plate to the block). But they are frequently missing, or substituted with common bolts.

The remains of your taper pin look suspicious to me; not like a factory pin. I think someone has tried some sort of substitute.

Got to say, that's the worst TOB I've ever seen.

You might want to consider reinforcing the taper pin. I used a 1/4" bolt as shown at https://www.buckeyetriumphs.org/technical/clutch/ClutchShaft/ClutchShaft.htm
Don't forget to trim the bolt to length.
 
Country flag
Offline
A little noise? Bet it sounded like meat grinder. One tip to help reinstall the trans is to remove the top two 1" studs on the engine plate and put two 4" long studs in. Hang the trans on them, it will help you slide the trans in place. Of course, remove them later and put the 1" stud back in.

Marv
 
OP
TomChar

TomChar

Senior Member
Country flag
Offline
There weren't any dowel bolts, all of my bolts looked like decent grade 8 through bolt replacements (except for the three that go into the block at the top) with nylock nuts. My pressure plate & friction plate are "stuck" together. Haven't tried to separate them, no need really.

Does anyone know the actual diameter of the dowel bolts, and in what holes they were used? Others have mentioned them, but no specs. I'm thinking to ensure correct alignment, I will use dowel pins in those holes, and then once all is tight, remove them and install bolts. Someone mentioned 3/8", but I'd like to be sure.

Thanks again,
Tom
 
OP
TomChar

TomChar

Senior Member
Country flag
Offline
To Randall,

The taper pin is definitely not the same as the one sent to me from Moss Motors. The old one is obviously threaded the entire length (which actually makes it weaker), but the exposed end, what's left of it, looks just like the replacement. Neither the shaft or fork were tapped for those threads either. The new pin is a tight enough fit in the shaft, and I'm replacing the fork.

I read through the links you provided, about drilling for a second dowel pin. Easiest for me is drilling it for a 1/4" bolt. But I'm wondering how necessary it might be, have others done this? My concern is how difficult it might be to drive in the bolt with the holes slightly undersized, since you're essentially using the aluminum bellhousing as a vise.

Thoughts, anyone?

Cheers,
Tom
 
OP
TomChar

TomChar

Senior Member
Country flag
Offline
As I like pictures (good for those of us out there who still don't know why the Brits drink warm beer...), here are some.

The inside of the bell housing looks like it's seen grenades... Note the little hole above the starter area. It's an old one, and that's a casting mark running to the center, not a crack!
2014-08-21 16.38.07.jpg

After removing the flywheel I found a very clean looking business end of a crankshaft. Whether that's good news or not I'm not really sure.
2014-08-21 16.50.59.jpg
Regarding the mounting of the engine plate, clearly it's been removed and re-installed using aftermarket bolts. I can see only 2 dowel pins locating it, one at top right next to that scribe mark, and the other lower left between two mounting bolts.

If anyone could identify the locations for the dowel bolts, that would be great. I've looked online for literature, but nothing as yet.

Cheers,
Tom
 
Last edited:

TR3driver

Great Pumpkin - R.I.P
Offline
I read through the links you provided, about drilling for a second dowel pin. Easiest for me is drilling it for a 1/4" bolt. But I'm wondering how necessary it might be, have others done this? My concern is how difficult it might be to drive in the bolt with the holes slightly undersized, since you're essentially using the aluminum bellhousing as a vise.
Well, lots of people (including myself) have done it. Perhaps it is not necessary now, after all it took the factory pin some 40 years to break in my previous TR3A. If the new "heavy duty" replacements are finally as good as the factory pin, then maybe they will last another 40 years. By then, I'm not likely to be around to care!

But it's such a royal PITA to pull the gearbox just because that pin sheared that I saw no reason not to add suspenders to the belt, as it were. And for awhile, the replacement taper pins were clearly much poorer quality than the originals (where have I heard that before ??) and were breaking after just a few years (or even a few months) of service. No doubt the wrong pressure plates being supplied had something to do with that, but still ...

In my case, I just drilled the hole with a letter drill (sorry, I forget which one offhand, probably the same one Nelson mentioned in the article) so it was a snug fit for my bolt. It only took some gentle taps with a BFH to drive it in the hole, so I had no concern over damage to the housing (which after all has to take a lot of force all the time in regular service).

But I'm not trying to say that the reinforcement is required. It's up to you.

Oh, BTW, when drilling the hole, make sure you have the fork turned the right way around :smile:

PS, when I got the TR6 gearbox that is now in my TR3, someone had welded the fork to the shaft! Obviously they were frustrated by a broken pin too!
 

TR3driver

Great Pumpkin - R.I.P
Offline
Does anyone know the actual diameter of the dowel bolts, and in what holes they were used?
0.375"
I don't have a drawing or photo handy, but if you look at the gearbox, it is easy to see. All of the other attachment bolts (except the one for the starter) are 5/16, so their holes are slightly smaller. No way to fit a 3/8" dowel into them. The starter bolts are 3/8", but those holes are obviously for the starter and are somewhat larger than 3/8" (so the dowels go through easily). The two for the "dowel bolts" are the ones where a 3/8" dowel will only go in with some encouragement.

FWIW, I made my own dowel bolts for the Stag. Just cut a length of 3/8" drill rod and threaded both ends for nuts. You could put some Loctite on the "head" end if you want, but it doesn't really matter. Since the shank is such a snug fit in the hole, the end you turn is the end that comes apart.

It's been said that there are AN "ground shank" bolts that will fit, but I never could find anyone selling a reasonable quantity at a reasonable price. You could try asking at Aircraft Spruce, though.
 
OP
TomChar

TomChar

Senior Member
Country flag
Offline
For replacing the dowel bolts, I'm looking at trying these from McMaster-Carr, shoulder screws. The shoulder is 3/8", and you can select various shoulder lengths. They have 5/16" threads on the ends, and are Grade 8. The link is for a 1/2" shoulder length, but I need to go measure the actual thickness of the engine plate / bellhousing to get the right size. The shoulder lengths come in 1/8" increments for the alloy steel screws. At $1.50 each, it's not too expensive to try.
 

trrdster2000

Luke Skywalker
Country flag
Offline
TomChar, I hope you plan on replacing the rear seal while you are almost there.

Wayne
 

titanic

Jedi Warrior
Country flag
Offline
Also check the crankshaft end play. It is much easier with the trans., clutch, and flywheel removed. Hopefully, you have a dial indicator with a magnetic base.
You might measure the dia. of 1/4" and drill the hole about .001" smaller for the backup pin in the clutch fork. I think I used a C or D drill bit.
The front&rear seals on the trans. might be good candidates for replacement, also check the u joints on the drive shaft.
The fun never stops.
Berry
 

Tybalt

Jedi Warrior
Country flag
Offline
For replacing the dowel bolts, I'm looking at trying these from McMaster-Carr, shoulder screws. The shoulder is 3/8", and you can select various shoulder lengths. They have 5/16" threads on the ends, and are Grade 8. The link is for a 1/2" shoulder length, but I need to go measure the actual thickness of the engine plate / bellhousing to get the right size. The shoulder lengths come in 1/8" increments for the alloy steel screws. At $1.50 each, it's not too expensive to try.

Here is an illustration from the Gunst throwout bearing instructions showing dowel locations. It's the only place that I recall ever seeing them shown. While I think the shoulder bolts listed are worth considering, the one thing that jumps out at me as a caution is that you will be mixing a coarse thread fastener in with all of those other fine thread fasteners that are on the car.

As for the AN fasteners mentioned by TR3driver, Aircraft Spruce is a good source and they do sell them on an individual fastener basis. I have found that I can buy AN fasteners from Aircraft Spruce for less than what I can buy generic SAE stuff for from a local fastener supply house. The thing that I really like about the AN/MS/NAS fasteners is that I can get very precise on the grip length to ensure that I either have that I have no threads in shear and can usually minimize overall fastener length. If I buy them from the local supply place or hardware store they jump in 1/4" grip increments while with the AN/MS/NAS stuff I go in 1/16" grip increments. Looking at Triumph's parts catalogs, they used 1/8" increments for their fasteners. If you are looking for onesie/twosie type quantities, you might also check in with your local genral aviation field and see what the aircraft maintenance folks have to sell. Because I typically buy fasteners in sort of bulk quantities (25, 50, 100) depending on size and usage, it's worth it to me to get them from Spruce, Pegasus Racing in Wisconsin or Coast Fab out in Hunting Beach CA.
 

Attachments

  • Dowel Locations.jpg
    Dowel Locations.jpg
    9 KB · Views: 83
OP
TomChar

TomChar

Senior Member
Country flag
Offline
Wayne, Berry,

I see exactly what you two are talking about. I'm also a clean freak (at least my car thinks so, the wife, not so much), so I keep pulling more and more things apart to inspect and clean. A few of the observations about this car as I pulled it apart for the first time, is that all of the trans and engine plate bolts are replacements, and since the end of the crank appears very clean and there's no sign of oil leaking there, my assumption is that the engine had been worked on (hopefully a good job) and all that stuff is not 40 years old and won't need to be touched. But since my replacement clutch fork is on backorder...

As for the tranny seals, the end with the overdrive is wet, so I'm looking into what's involved in fixing that.

And finally to Tybalt. Thank you for that drawing! As all of those holes had 5/16"-18 through bolts in them, gunk and crud had filled in the holes and my measurements all around varied quite a bit, but none reached 3/8". Now I know where to look and I can be a bit more aggressive in my cleaning. I was worried about holes having become oversized due to the lack of dowels. You should see what's left of the pilot bushing, it's waaaay oversized now. As far as getting bolts through McMaster-Carr, I use them a lot for work, and delivery is always within a day or two. I'm not worried about mixing the threads, as long as this is my car, no one else will ever touch those bolts. Never thought about using a shoulder screw for the fork shaft, that's a brilliant idea. Once I get my new fork I determine exactly what size would work.

Thanks everyone,
Tom
 

Tybalt

Jedi Warrior
Country flag
Offline
Tom, something I didn't think about until this morning on the dowels. It's been a while since I did the install, but if I'm recalling correctly, the dowels get installed to the transmission at those corresponding locations and not to the engine mount plate. Since I'm going off long memory, check both and go with which ever is the slight interference fit.
 

poolboy

Yoda
Country flag
Offline
There's a stop in the plate that keeps the dowels from setting in too deep..I never tried putting them in the bell housing first, though.
 

titanic

Jedi Warrior
Country flag
Offline
Tom-If you decide to replace the rear crank seal, make sure there is a copper crush washer on the top most bolt of the oil seal housing. I tend to replace the rear crank seal& trans seals just because they are easily accessible&cheap and might delay or prevent having to remove the trans. again.
After seeing the bodge the PO did with the clutch fork pin, I wouldn't have much faith in his work.
Berry
 
OP
TomChar

TomChar

Senior Member
Country flag
Offline
Well, a little more info..

Regarding the dowel pins in the engine plate for the transmission. The illustration from Gunst is right on, my holes are about 3/8", never had a consistent reading across them, likely due to having 5/16" bolts in them, but I think the 3/8" shoulder bolts I ordered from McMaster-Carr will do fine. The stack height of the bell housing and engine plate is about 0.85", so the shoulders are 1" long, with 3/8" of 5/16"-18 threads. The shoulder bolts are socket cap heads, 9/16" head diameter, so I'll use 3/8" ID / 13/16" OD washers on both ends for spacing.

To Berry and Tybalt, I don't see any evidence of a "stop" for the dowels, and my measurements are not consistent enough to determine whether one side is tighter than the other. So far I intend to mount the shoulder bolts from the engine side, but I'll find out soon enough.

Berry, my oil seal retainer bolts only had split washers on them. I guess you're recommending the copper crush washer for top hole as it's a through hole into the block? Do you really think it could leak?

For the clutch fork, the Wedge Shop in MA had them in stock, so I'm getting one from them. Thanks for the offer Marv, I'll let you save your stock for when someone needs one and they're no longer available. I'm going to drill the center with a D drill bit, right on that little boss and use a 1/4" shoulder bolt, this time no washers will be needed. The shoulder is 1" long, my old fork is 1.07" thick at that point. I've ordered a nylock flange nut to hold it. Should be perfect.

For those who recommended changing the oil seal, I couldn't argue with that advice. I could have though, as I also decided to drop the pan and have a look inside. The PO had this motor rebuilt. I've had the car two years now, put maybe 4k on it last year, and everything is shiny and new inside. There is no sludge anywhere, I can see shiny pistons, camshaft, fresh balancing marks on the crankshaft. I'm a happy camper! I don't think he had the shop completely reassemble it though, as all the external stuff is clearly used, and not well cleaned/painted. The block was certainly tanked, as the inside is spotless. The front end has oil leaks, so I think he just had the block and head done, then reassembled the rest himself. The car always ran good, but now I've got some piece of mind and won't give a second thought about those long trips anymore.

Cheers all,
Tom
 

titanic

Jedi Warrior
Country flag
Offline
Tom-As noticed the top bolt hole in the oil seal housing goes into the block. The "standard" advice is to use a crush washer in that location. I am not sure if the factory used one. Crankcase pressure could cause a leak, but I would think that gasket sealer around the bolt would do.
Just a slight interference fit on the clutch fork bolt is all that is necessary. You might find the Buckeye article on the clutch fork pin interesting. It seems that that the pin is not supported on the "far" side of the fork. Maybe that is the reason why the pin breaks.
Berry
 
OP
TomChar

TomChar

Senior Member
Country flag
Offline
Berry,

I did read the Buckeye article about the clutch fork pin fixes. Very interesting and if the hole in the shaft and fork are not tapered, then it only gets supported on one side. I have a new pin from Moss Motors and it is tapered (as mentioned previously). Whether the holes in the fork and shaft are tapered I cannot tell, as the edges are rounded from when the pin was breaking, but the new pin will only fit into the old shaft from the correct side, so either my shaft hole was tapered, or it's worn to appear that way.

I thought about getting a drill and over sizing the holes just enough to fit the next size dowel pin (.3125") and then using a set screw in the fork threaded hole to keep it from dropping down, and loctite on the dowel to keep it from dropping "up". But as others have mentioned, the original has lasted for a very long time (where everything else is well maintained), so I figure a new shaft / fork / pin assembly with the 1/4" shoulder bolt through the middle is plenty for me.

Tom
 
Similar threads
Thread starter Title Forum Replies Date
71TR6 TR2/3/3A Aftermarket brake and clutch master cylinders - black extension? Triumph 6
tr6nitjulius For Sale TR6 Clutch Master Cylinder $40 Triumph Classifieds 0
Turbozinke TR2/3/3A Varying clutch engagement Triumph 6
K TR2/3/3A Pushing down the clutch pedal when starting the car? Triumph 13
DutchConnection Clutch finger problems on Powetune aftermarket clutch cover Spridgets 0
3 100 Clutch Freeplay Austin Healey 7
K New Clutch Master/Slave Cylinder Austin Healey 1
wkilleffer MGB MGB clutch slave bleed driving me nuts MG 38
Govtslug TR6 Clutch Problem Triumph 21
wkilleffer MGB 1974 MGB clutch master cylinder questions MG 1
AUSMHLY Clutch Pedal Freeplay Austin Healey 18
T General Tech Clutch trouble Triumph 12
K TR2/3/3A Gearbox clutch adjustment. Triumph 1
AUSMHLY Clutch Stalls Engine Austin Healey 16
D Wanted WTB - clutch fork and shifter from Datsun 5 speed #60 Spridgets Classified 0
G MGB Sorry from the Newbie...Clutch gone on 78 MGB MG 17
P TR2/3/3A TR3 Clutch Bleeding Problem Triumph 10
T Spitfire Clutch fork and hydraulic cylinders Triumph 3
Got_All_4 TR6 Which Clutch Master Cylinder Fork is for TR6 Triumph 4
AUSMHLY BJ8 Clutch Pressure Plate, Old vs New Austin Healey 4
Lin Brake/Clutch Fluid Austin Healey 11
R TR2/3/3A Clutch Petal Adjustment Triumph 2
AUSMHLY BJ8 Clutch Fork Bush Replacement Austin Healey 5
KVH General Tech New Clutch Installation--TR4A Triumph 5
T Spitfire Spitfire MK2 Clutch Hydraulics Triumph 2
D Clutch Fork Pin Removal Austin Healey 4
AUSMHLY BJ8 Clutch Pressure Plate Brand Preferences Austin Healey 3
Michael Oritt Clutch Linkage Austin Healey 19
M 1275 Race Clutch Racing 5
G MGB 1978 MGB clutch is out..! MG 39
M TR2/3/3A HVDA Replacement Clutch Disc Available from Moss Triumph 10
B Spridget with a Tilton Race Clutch Racing 1
AUSMHLY Clutch Pilot Bush: NOS vs Aftermarket Austin Healey 8
T Clutch Pedal Engagement Point Austin Healey 1
TR6Canuck For Sale 72 TR6 clutch and transmission Triumph Classifieds 4
K TR2/3/3A Clutch slave "return spring"? Triumph 3
vintagemechanic Recommended clutch kits Jaguar 3
K TR2/3/3A Mystery Clutch MC? Spitfire....TR4....69-70 TR6??? Triumph 2
K TR2/3/3A Clutch Master Cylinders? Triumph 1
R TR2/3/3A Clutch Engagement Triumph 31
S TR2/3/3A Clutch pushes hard when engine is hot Triumph 4
T TR2/3/3A TR3A clutch problem Triumph 15
S MGB 1978, replacing the clutch. MG 3
S MGB clutch replacement MG 7
K TR2/3/3A Clutch "Long Throw" Slave Cylinder? Triumph 4
D BJ7 Clutch Austin Healey 6
K TR2/3/3A An Unusual Brake and Clutch MC Set Up? Triumph 2
K TR2/3/3A Clutch and Brake Master Cylinder push rod stop bolts? Triumph 15
K TR2/3/3A Clutch Slave Cylinder location when TR3 has a TR6 Gearbox? Triumph 16
E TR2/3/3A Tr3 a clutch hydraulics problem, again. Triumph 16

Similar threads

Top