• The Roadster Factory Recovery Fund - Friends, as you may have heard, The Roadster Factory, a respected British Car Parts business in PA, suffered a total loss in a fire on Christmas Day. Read about it, discuss or ask questions >> HERE. The Triumph Register of America is sponsoring a fund raiser to help TRF get back on their feet. If you can help, vist >> their GoFundMe page.
  • Hey there Guest!
    If you enjoy BCF and find our forum a useful resource, if you appreciate not having ads pop up all over the place and you want to ensure we can stay online - Please consider supporting with an "optional" low-cost annual subscription.
    **Upgrade Now**
    (PS: Subscribers don't see this UGLY banner)
Tips
Tips

My Prefect in her B-Day Suit and playing with rust-Flash!

algot1901

Senior Member
Bronze
Country flag
Offline
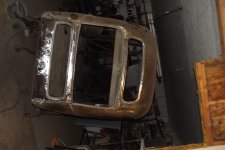
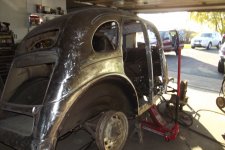
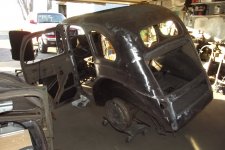
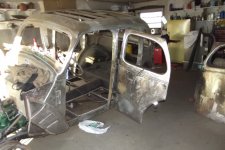
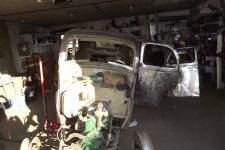
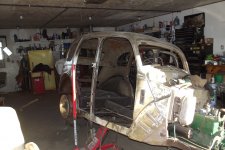
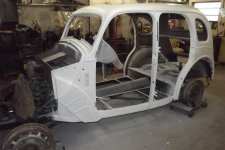
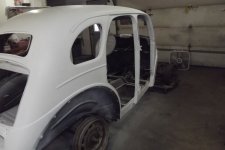
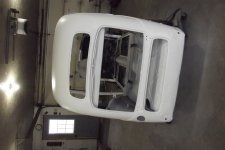
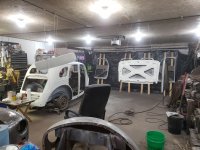
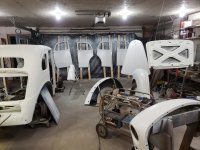
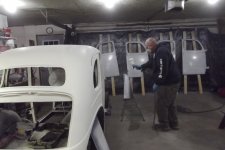
Today is paint day (I hope) she is down to bare metal her factory suit was some kind of horrid beige or tan then someone decided to paint her dark green then a light green and finally a dark green on everything above the body line and light green below, that is a lot of paint. Next, we get to the doors and the fronts came off without too much trouble there is a drain tube on each lower corner of the windshield opening which was purposely put there to make life miserable and the slotted screws that bolt the hinges to the body on the rear doors will not come loose I have tried the air chisel to vibrate the rust loose which did nothing so we had to drill out the pins as they were fused into the hinge. The first coat will be an epoxy followed by a high build primer, once done I can push the car over to the other stall and get to work on the doors and fenders oh and hood, I have been lucky so far and the flash rust has not found me.


DSCF0483.JPG
 

Attachments

  • DSCF0480.JPG
    DSCF0480.JPG
    1.5 MB · Views: 74
  • DSCF0482.JPG
    DSCF0482.JPG
    1.6 MB · Views: 62
  • DSCF0483.JPG
    DSCF0483.JPG
    1.6 MB · Views: 77
  • DSCF0484.JPG
    DSCF0484.JPG
    1.8 MB · Views: 65
  • DSCF0485.JPG
    DSCF0485.JPG
    1.6 MB · Views: 67
  • DSCF0486.JPG
    DSCF0486.JPG
    1.7 MB · Views: 72

Bayless

Yoda
Silver
Country flag
Offline
You have made some serious progress. How did you strip the old paint?
 
OP
algot1901

algot1901

Senior Member
Bronze
Country flag
Offline
With a 4 1/2 inch angle grinder, DeWalt Orbital Sander a mouse, and angle air tools no chemicals.
 

Bayless

Yoda
Silver
Country flag
Offline
That's how I plan to strip mine too.
 
OP
algot1901

algot1901

Senior Member
Bronze
Country flag
Offline

empireabrasives.com you want the surface conditioning Disk 4 1/2" X7/8" about $35.00 for 5 disks and it will take at least 10 disks, for the drip molding I used my sandblaster to get in deep also if you have a soft top it will be needed for the deep recess of the flange. I used my DeWalt 5" DA Sander with 80g for the cleanup and a lot of 3m discs for the 3" angle air tool. If you have to remove the doors which is a pain as they welded the door hinge the front are bolted top and bottom but the back doors are another story as I could not get them to turn so I had to use a pin removal tool I bought from Bob Drake as it works quite well unless the rust monster welded the pin then it is drill time.

If you want to save time and stress take it to a media blaster, no dust no chemicals you might save a buck if you pull the fenders and front clip.
Have Fun, oh and I do hope you are independently wealthy I spent over $600.00 in exchange rate to small Ford Spares KIP Motors is too expensive and I also used DHL Worl Wide Express and received my items in less than a week
 

Bayless

Yoda
Silver
Country flag
Offline
Thanks for the info. I'll look into empire abrasives but my plan has been the D/A and a little air grinder where necessary. That is the method I used on the Sprite and it worked pretty well. Much of mine is already done and over the years I have everything I need to complete the car except carpet. The interior is stripped and painted, including the door jambs. It already has a new soft top. Firewall and forward is finished. Frame and under body are stripped and painted except for the boot area where I recently did a lot of welding.

I would like to get the doors off for final painting but have not been able to do so. My hinges are not welded but I can't get the screws out without destroying them and not sure they can be replaced. I also have not been able to remove the pins. Who or what is this Bod Drake and the tool you mentioned? Sounds like something I could use.

I agree Small Ford Spares and DHL are great. The whole history of the Prefect is on my web site > Bayless' Personal Page <.
 

Bayless

Yoda
Silver
Country flag
Offline
I found Bob Drake easy enough and ordered the tool. Now hope it works for me. Thanks.
 
OP
algot1901

algot1901

Senior Member
Bronze
Country flag
Offline
Good luck, here is the epoxy primer on the body, there are a few small dents and one large one that I will have to use the stud gun to pull the dent out. It will get bodywork done now and then I can spray the high build primer. Still have to strip the doors, trunk, and hood.
Time for a nap.
 

Attachments

  • DSCF0487.JPG
    DSCF0487.JPG
    1.6 MB · Views: 61
  • DSCF0489.JPG
    DSCF0489.JPG
    1.5 MB · Views: 68
  • DSCF0490.JPG
    DSCF0490.JPG
    1.7 MB · Views: 60
  • DSCF0488.JPG
    DSCF0488.JPG
    1.5 MB · Views: 61
OP
algot1901

algot1901

Senior Member
Bronze
Country flag
Offline
Basil from visiting you in the small hours and putting a bat up your nightdress! EXCUSE ME!
I will be doing high build DTM primer today
 

Attachments

  • 20211128_165028.jpg
    20211128_165028.jpg
    3.8 MB · Views: 55
  • 20211128_180546.jpg
    20211128_180546.jpg
    3.6 MB · Views: 52
  • DSCF0496.JPG
    DSCF0496.JPG
    1.6 MB · Views: 56

Bayless

Yoda
Silver
Country flag
Offline
Looking good algot. What is your plan for the running board? Do you have new rubbers? You are certainly making progress much faster than I am or likely ever will. Finally got to work on mine a little today though. Looking into what it will take to repair previous repairs to the bonnet by the DPO. ARRRGGGHH! Oh, BTW, I got 7 of the 8 hinge pins out with the Bob Drake tool and lots of PB Blaster. Thanks for the lead.
 
OP
algot1901

algot1901

Senior Member
Bronze
Country flag
Offline
Running boards are like new just need to paint the bottom outside edge black and the bottoms all done, I really hate the hinge pins the driver door top popped right out and the bottom was another killer, broke the second shortest pin off in the screw bolt and then broke the drill bit trying to get it out but-but I happened to have an old tool so I was able to salvage the screw bolt and the bottom hinge we had to hacksaw the pin top and bottom. The middle fell right out and it had kroil on it but I had to use the flame wrench almost to melting what a job. I got the rear door hinges of the B pillar by heating the screw head cherry red and using one of those slammer tools that twist the screws came out. Was going to put the sanding primer on today but I had a Vet appointment for Oliver (dog) and Luna (cat) the latter is getting her front nails removed she is a rescue cat that has been adapted several times and returned several times due to ripping furniture and ripping screens. Will put the high build on tomorrow and spend the rest of the winter block sanding and color going on in the Spring.
 
OP
algot1901

algot1901

Senior Member
Bronze
Country flag
Offline
Now have the sanding primer on and will wait for a day to start block sanding, I do believe that we are going to paint the color panel by panel as the color is not metallic just your basic single-stage urethane if it were metallic we would have to assemble the car, I would have liked to do a base clear but the funds are not there.
20211130_154649.jpg
20211130_154338.jpg
 

Bayless

Yoda
Silver
Country flag
Offline
Looks great so far. You are really moving fast on this. Which high build are you using. I have been using Slick Sand and have come to really like it.

Now I have a serious question. Do you have any problem with your hinges trying to lower/close the bonnet? DPO did some serious damage to mine that I am just now trying to repair. With the bonnet off, it is impossible to push my hinges down by hand without first spreading the legs a bit with a screwdriver. I thought the hinges were worn or distorted or something but they look exactly like yours in the photo above.
 
OP
algot1901

algot1901

Senior Member
Bronze
Country flag
Offline

I am using Gray DTM High Build 2K Primer Surfacer (Direct to Metal) 2.1 VOC, 1-1/4 Gallon Kit - Fast Dry High-Performance Primer -

I had a problem with my hood binding on the right side, it took two persons to work it down and I thought for sure the hinge was bent what it was is the tin that was welded to the hood on that side had broken spot welds and after re-welding works fine. A word of caution when you go to taking off the hood latch soak the nut with Kroil several days ahead of removing, use an impact gun on low air, and if all else fails use the fire wrench. The bolt will snap off and if it does you might play heck finding another hood latch and ornament as it is all one piece. I was lucky and found one in NZ and the shipping and price were OUCH
"what one doesn't have in their head, one has in their legs"


Bayless

Yoda
Silver
Country flag
Offline
Nut came right off, also the screws holding the nose badge. I've had this car since 1962 so know most of its quirks. Both sides of the hood were pretty damaged when I got the car. Used it without hinge springs and a prop rod for years. Drilled the spot welds and removed both mount pads today. Found several tears and poorly done attempts at welding it. Mount pads pretty distorted which explains some alignment problems. Think I can correct all of it with some time and effort. Still concerned about those hinges though. Like I said, I always suspected they were worn and opening too far. Seeing you photo though, they are identical. Well, that's for after I repair all that old damage to the skin and the mount pads.
 
OP
algot1901

algot1901

Senior Member
Bronze
Country flag
Offline
I will get you a close-up photo and measurement I do know that you cannot swap them left or right do to the shape of the hood. I would put a call out for a hood must be something around.
 

Bayless

Yoda
Silver
Country flag
Offline
I'm well into the repair now and shipping on a replacement would be pretty steep. Besides, as you had similar problems and from what I see of the design, it looks like a builtin problem and may be hard to get one that doesn't need work.
 

Bayless

Yoda
Silver
Country flag
Offline
If you could get a close photo of the panels where the hinges attach to the hood that shows the proper curves and locations, that would really be helpful. Mine are both bend roughly the same and I think I know what they should be but a good photo would help.
 
Similar threads
Thread starter Title Forum Replies Date
Bayless The Prefect Grille Other British Cars 0
Bayless More Prefect Progress Other British Cars 2
algot1901 50 Prefect wood roof support / bow Other British Cars 8
algot1901 1950 Prefect E93A-946480 - door bottom rubber Other British Cars 14
algot1901 1950 Prefect starter Other British Cars 1
algot1901 1950 Ford Prefect Brake Lining Other British Cars 1
algot1901 How did people in the 1950's manage to fit in the Prefect???? Other British Cars 16
algot1901 1950 Prefect Ign Switch Other British Cars 1
algot1901 Window Channel Ford Prefect Other British Cars 5
algot1901 1950 Prefect Speedo Cable Other British Cars 8
algot1901 Brakes for Anglia / Prefect Other British Cars 2
Bayless My Prefect update Other British Cars 5
algot1901 Carburator 50 Prefect 1172cc engine 10hp Other British Cars 4
algot1901 1950 Prefect Starter Other British Cars 10
algot1901 1950 Ford Prefect Paint Other British Cars 5
algot1901 Electronic Ignition for 1950 Prefect 1172cc Eng Other British Cars 10
algot1901 1950 Prefect Headliner Other British Cars 17
algot1901 1950 Prefect/Anglia Trsnmission Main Bearing Retainer Other British Cars 2
algot1901 Rear Seat Bottom/Frame for 1950 Ford Prefect Other British Cars 12
TRMark Ford Anglia/Prefect USA parts supplier Other British Cars 7
Bayless Even more progress - the Prefect Other British Cars 5
L !953 Ford 4 door Prefect Other British Cars 3
A Body Paint Codes for 1950 Prefect E493A Other British Cars 1
A Rubber parts for 1950 Prefect E493A Other British Cars 6
A 1950 Ford Prefect Windows Other British Cars 4
A 1950 Prefect Vacuum Tank Other British Cars 22
A 1950 Ford Prefect Floor Covering Other British Cars 2
KLUTZ Wow.. A Perfect Prefect ....... Other British Cars 2
A 1949 - 1952 Ford Prefect Other British Cars 9
Simmo TR2/3/3A Tyres to suit Dayton wheels Triumph 10
Frankenhealey The fat guy in the red suit was early this year! Austin Healey 20
lbc_newbie eBay Motors Class Action Law Suit Spridgets 4
2wrench What tools best suit interior door skin replace? Triumph 8
Z Different diffs to suit BN1 Austin Healey 8
B Engine playing up Austin Healey 6
W It's like playing the stock market Spridgets 5
Brosky Playing with powder coating [not me...] Triumph 15
PATR8 Off playing Army Triumph 11

Similar threads

Top