• The Roadster Factory Recovery Fund - Friends, as you may have heard, The Roadster Factory, a respected British Car Parts business in PA, suffered a total loss in a fire on Christmas Day. Read about it, discuss or ask questions >> HERE. The Triumph Register of America is sponsoring a fund raiser to help TRF get back on their feet. If you can help, vist >> their GoFundMe page.
  • Hey there Guest!
    If you enjoy BCF and find our forum a useful resource, if you appreciate not having ads pop up all over the place and you want to ensure we can stay online - Please consider supporting with an "optional" low-cost annual subscription.
    **Upgrade Now**
    (PS: Subscribers don't see this UGLY banner)
Tips
Tips

General TR Block Crack Repair

CJD

Yoda
Country flag
Offline
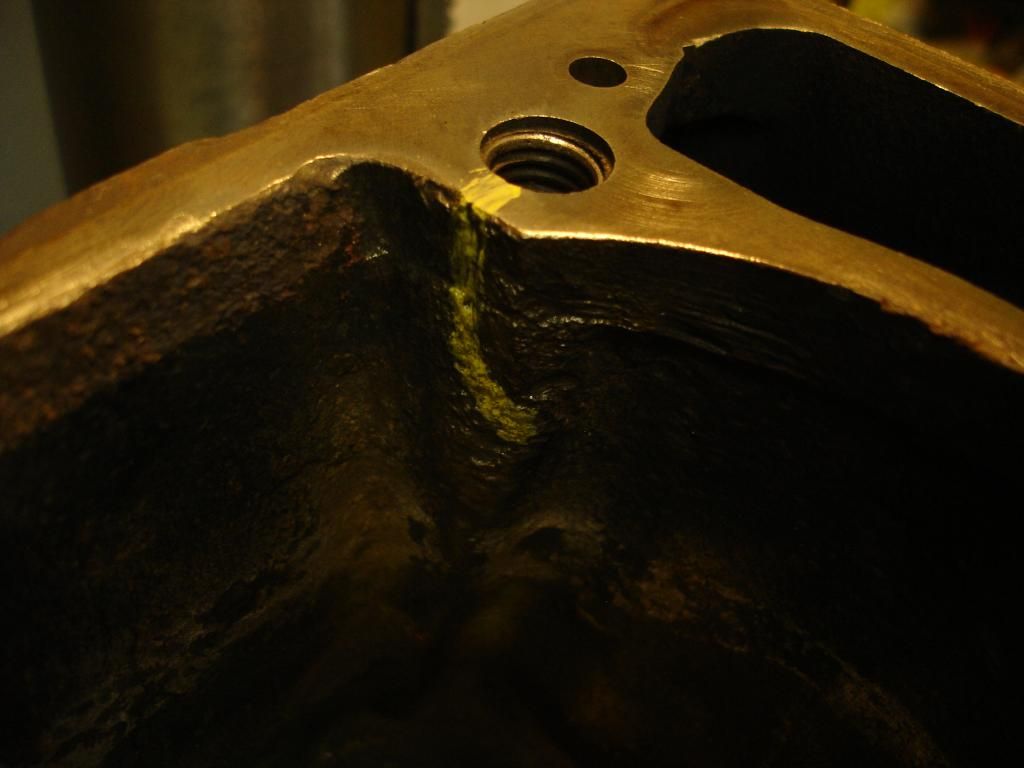
I finally got back after a bit of a family break and am back to work. I promised I'd follow through with a thread about how to repair the crack in the stud hole in the back of my block. Here is what I started with, in the second pic I highlighted the extent of the crack following the boss well down and around:


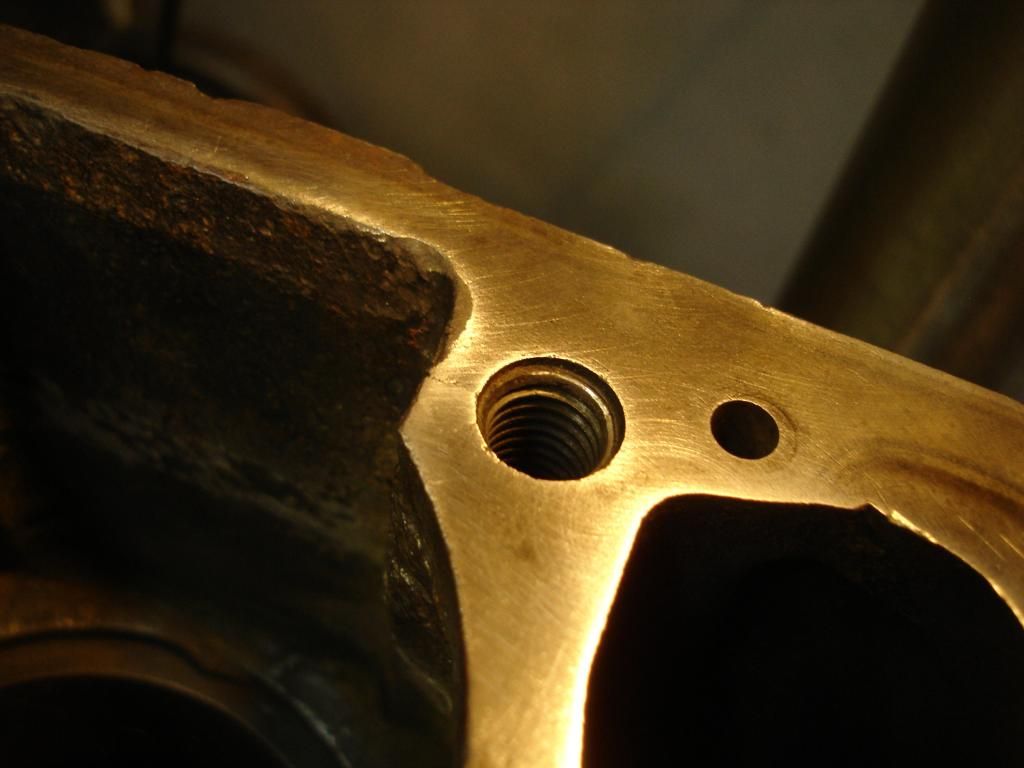
I know from the PO that the engine was rebuilt, and I have little doubt that a crack like this is the result of lifting the block using the studs without the head to align them. I may be wrong, but that seems the only explanation. The symptom for this crack was anti-freeze around the stud nut in the valve cover. Normally these studs are kept dry by the head gasket, but with a crack, the coolant can seep into the stud hole and right up the stud into the the valve rocker area...or outside, depending on which stud hole is cracked.


After months of research, I found a company called Lock N' Stitch, that deals with issues like this. Normal thread repair will simply not work with this crack. A standard helicoil will continue to allow coolant to leak into the threads and up the stud. There are solid helicoil style inserts, but they have a major drawback. To install them, you have to drill the hole larger and re-tap for the insert. If the boss is already cracked...then drilling a larger hole is just going to worsen the problem. In addition to the boss being cracked and thinner, the threads on the typical insert are a 60 degree pattern. So, as you tighten the insert in, the threads are wedging the hole outward. Not good.

I ordered a Lock N Stitch kit, designed for just this problem.


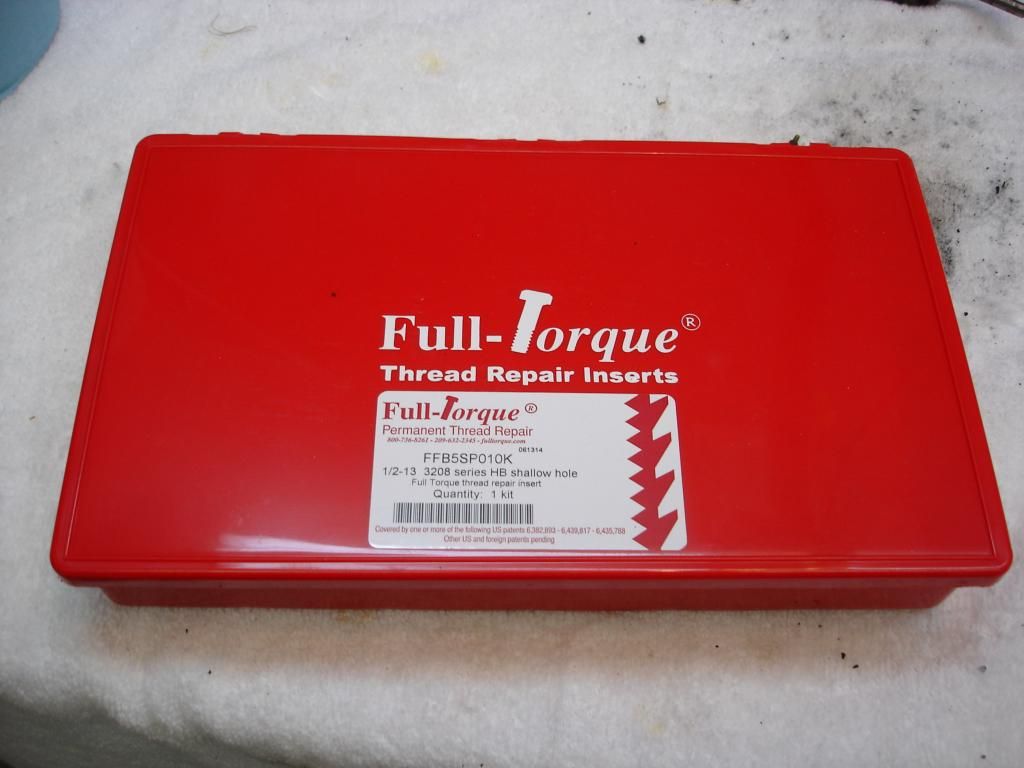
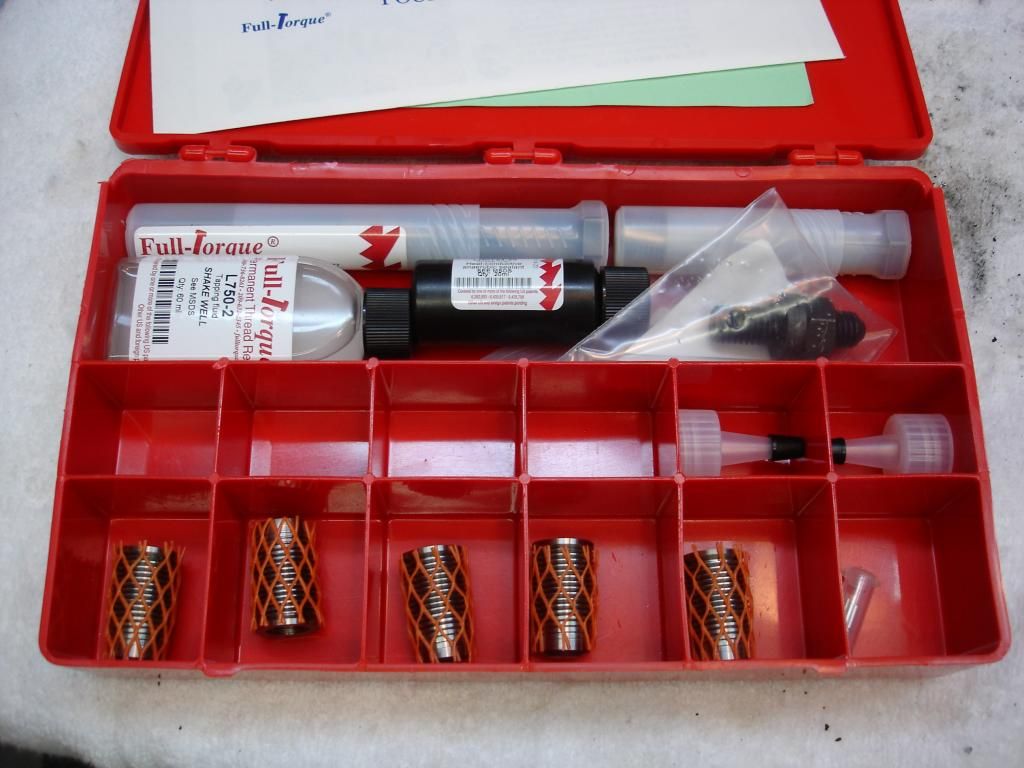
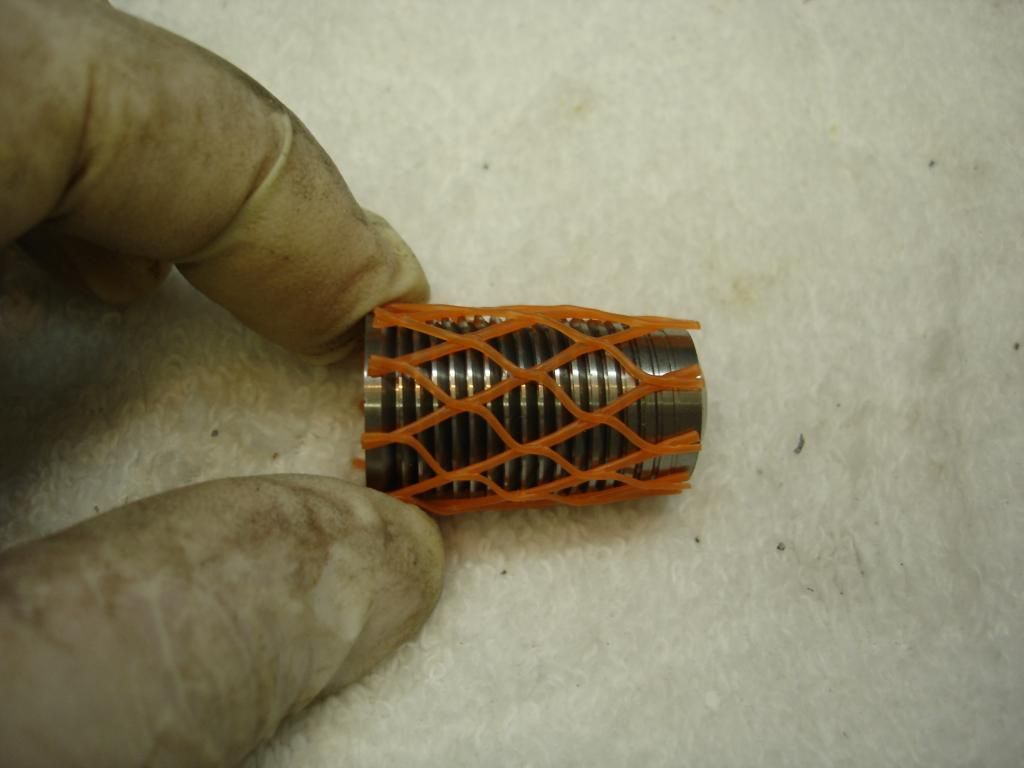
These guys are used to saving casings that are damaged from large earth-moving equipment, that can cost 10's or 100's of thousands of $. The inserts are reasonable, like $25 each. The rub is the cost of the installation kit. Here is the quick and dirty. The key is the specially cut insert. If you look very closely at the pics, you will see that the thread pattern is actually inverted on the top. Instead of wedging the iron outward as the insert is installed, these threads grab the iron and pull it inward. They claim that the insert will remain set even if 1/4 of the boss has broken off, exposing the side of the insert!


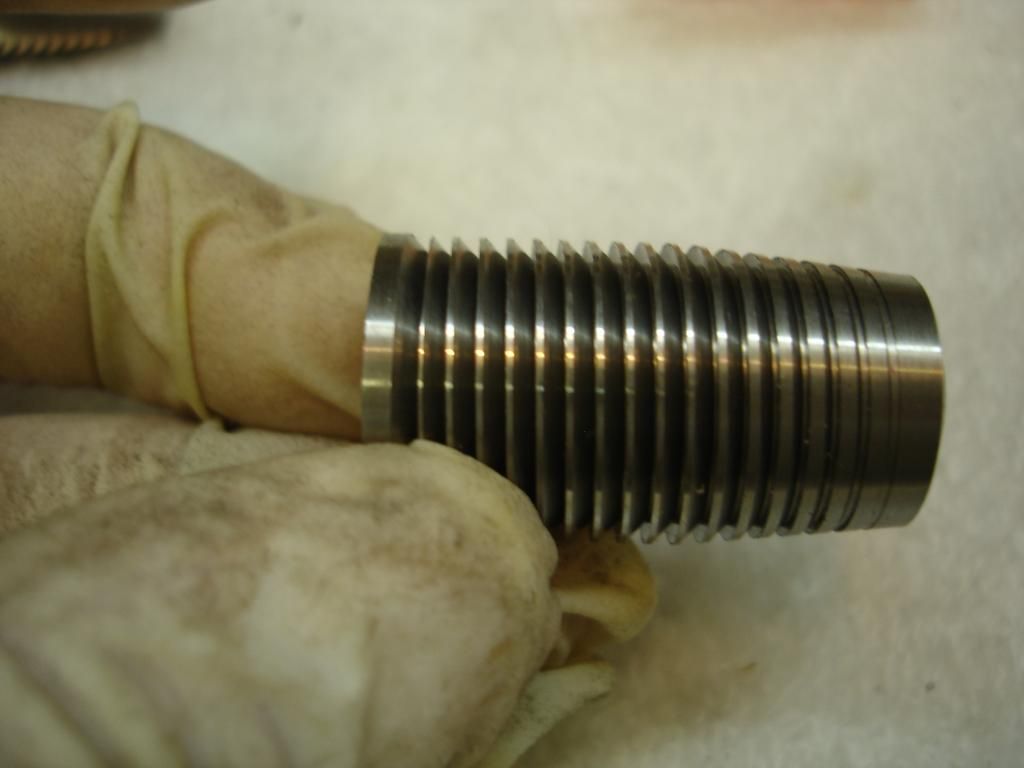
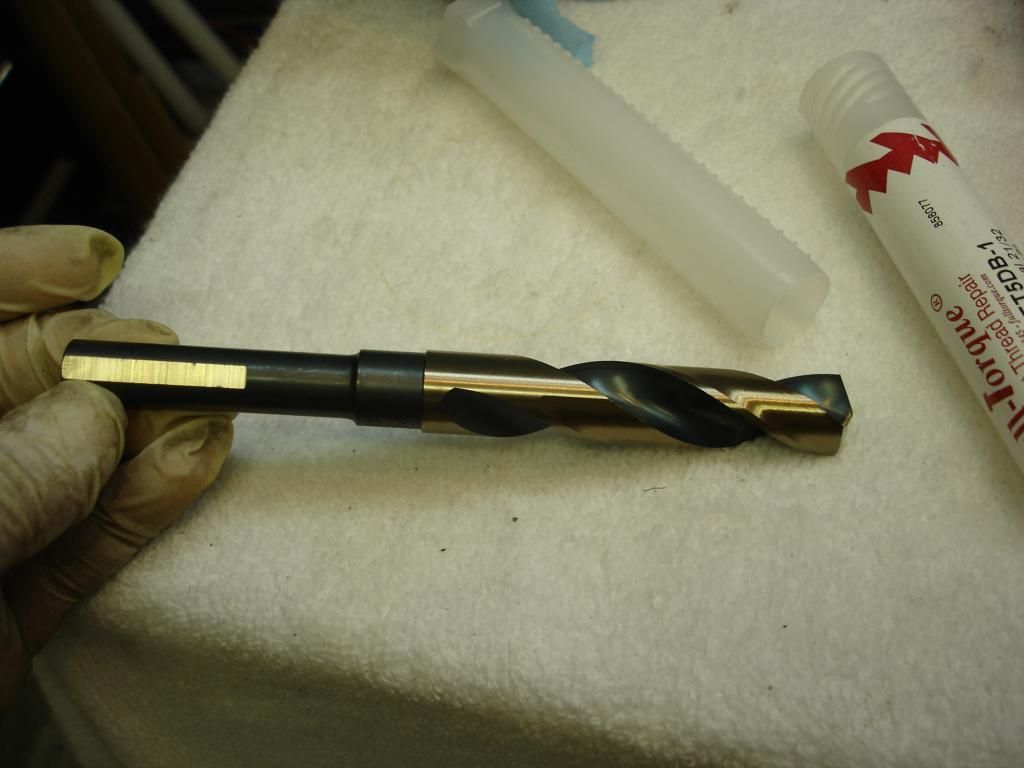
You may be able to see this inverted angle better with this pic of the tap. I believe the tap is the main cost of the kit, as I know from experience that this item has got to be a buggar to make.


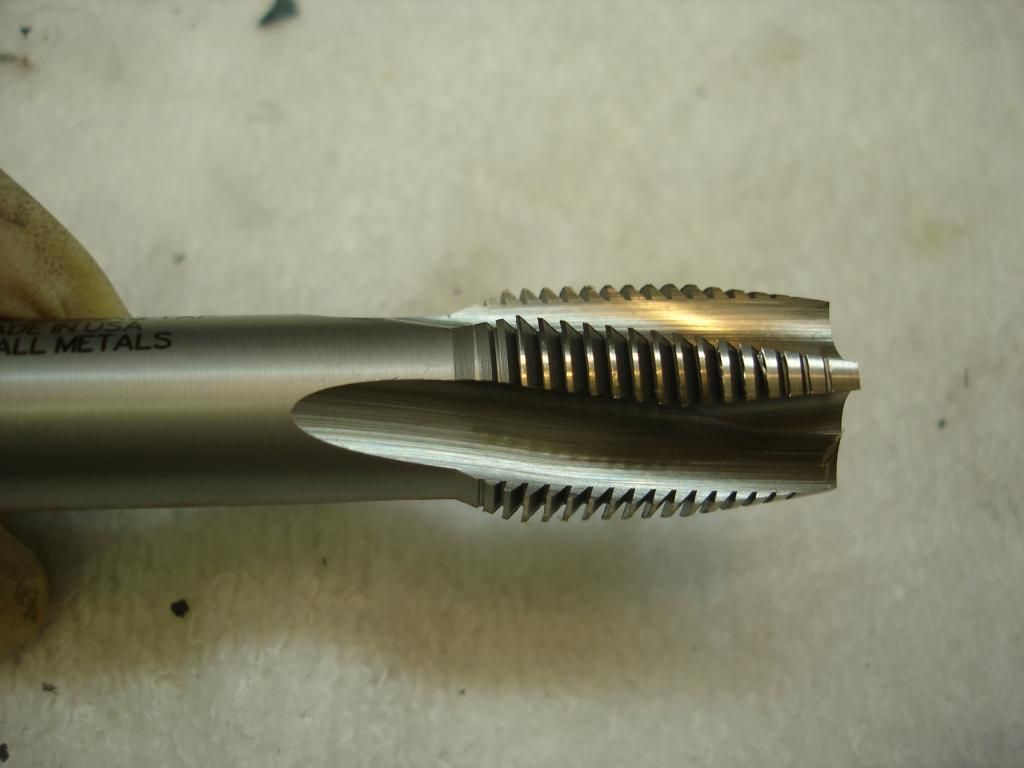
Of course you get the appropriate drill bit to use for the tap.

 
OP
CJD

CJD

Yoda
Country flag
Offline
Now, on to the fix. You will need a drill press of some kind to insure you drill the hole perfectly aligned. The block goes on top, and I used a "sticky" tape to keep it from shifting once it was aligned.


Here, I measured the insert to know how deep to drill the hole. They recommend the hole being 1/16" deeper than the length of the insert>


You must make absolutely certain you are square and centered. I spent almost an hour just on that operation.. Then away you go with the hole:


And here is the finished and cleaned hole


If you use a drill press to make a hole, it is only logical to use the same press to start the tap. It is the best way to make sure the alignment is perfect. They provide tapping fluid that really works well, and I finished by hand.


This is the installation tool for the insert. You screw the bolt part into the insert, followed by a washer that is made to contact the top of the block to set the depth, and a nut to hold it all together. You will be using a sealant/locktight type fluid, so you must coat the bolt with anti seize compound (not included in the kit) to prevent the installation tool from becoming permanently part of the block. An allen wrench fits in the tool to screw the insert into the block.


mallard

Luke Skywalker
Country flag
Offline
John thank you for posting this, my block was cracked in the same place. I'm very interested in how it comes out, please update the post as you go along. Looks like I just missed the update, thanks again. 2nd edit- Does the manufacture have a maximum allowable torque for the insert when you install the head stud?
 
OP
CJD

CJD

Yoda
Country flag
Offline
The insert has a rim at the top, so as you tighten it into the hole the inverted threads are loaded...which in turn pulls the surrounding iron towards the insert. The very top edge of the insert has to be filed smooth to the surface of the block.


Now, the insert is permanent, but they go one step further to ensure it will never come out. The fat washer you saw in the previous pics has a tiny hole, and they give you a drill bit with a spacer sleeve. You use the washer hole to locate a tiny hole that cuts half into the insert and half into the block. Then you tap a small pin into the hole. The insert can never spin out...like...ever.


Here is how you set the drill bit in the drill chuck just far enough to hold the pin in the resulting hole.


And that's all it took! They claim the resulting hole is so much stonger than even a new cast iron bolt hole that many companies, like Case and Cat are actually using inserts on brand new castings. The steel lasts longer than cast iron can.
 

HerronScott

Darth Vader
Offline
I hope I never have to do this but boy is it neat watching you do it. :smile:

Thanks for posting all that you do here that's far above what I would probably ever attempt (but at least I have clear and concise instructions if I do).

Scott
 
OP
CJD

CJD

Yoda
Country flag
Offline
Keith, I know I read the detailed torque figures when I was researching how to repair this crack. I think they were buried in the Lock N Stitch website somewhere. I do remember that the allowable torque is higher than the original cast iron threads, making this now the strongest hole in my block. Here is their website:

https://www.locknstitch.com/

While I love this product, the downside is that they are the only ones who have it. They gouge you severely for the priveledge of using it. The patent is only 3-4 years old, so maybe in another few years, when the patent runs out they will get competition and reduce the prices. You gotta hand it to them for the idea, and it's a very recent development. If I had found this crack just 5 years ago, my block would have been delegated to scrap.

By the way, I have 4 more inserts that came with the kit, and I have no immediate use for them. I can likely figure out a way to spread the costs of the kit between myself and 4 other guys...anybody interested PM me and we can work something out that will be mutually beneficial for all of us...
 

dklawson

Yoda
Offline
Fantastic stuff!

John, is the insert closed at the bottom so there is no chance of coolant finding its way out or is the thread locker supposed to prevent weepage through what's left of the crack?
 
OP
CJD

CJD

Yoda
Country flag
Offline
Good question, Doug...I forgot a pic of the ends of the insert! It is enclosed at the bottom. The thread locker does also act as a sealant, but the head gasket should prevent the coolant from getting around the insert and to the stud:


WiscTR

Senior Member
Silver
Country flag
Offline
A very interesting and informative post even if you don't need the block repair -- haven't gotten to mine yet :smile:
Thank you.
 

charleyf

Luke Skywalker
Country flag
Offline
John,
thanks for the very complete process.
I would add that having cracked a block myself, I know that another way to crack the block is to over tighten the stud. I still have the block, so now it is not just an anchor. It may live again someday.
charley
 

TR3driver

Great Pumpkin - R.I.P
Offline
I couldn't find prices on-line; do you mind sharing the cost of the kit?

To expand on Doug's question, the inserts are available in several different configurations (so they can be used in other cases, like spark plug holes).

Since I couldn't even give away a perfectly good TR block a few years back, I suspect that a different block would probably be a cheaper route. But I really appreciate the article & photos!
 

TR4nut

Yoda
Country flag
Offline
John -

Really slick writeup, thanks!
 
OP
CJD

CJD

Yoda
Country flag
Offline
I couldn't find prices on-line; do you mind sharing the cost of the kit?

To expand on Doug's question, the inserts are available in several different configurations (so they can be used in other cases, like spark plug holes).

Since I couldn't even give away a perfectly good TR block a few years back, I suspect that a different block would probably be a cheaper route. But I really appreciate the article & photos!

It hurts to write it...the kit was $319 with shipping. To break that down, it comes to $63 per insert. The cheapest block I have seen on Ebay was $100, with $100 packaging and $200 shipping. So, assuming I loose the kit after this job and never use it again...it basically comes to a wash compared to replacing the block.

But, those are not TR2 blocks on Ebay, which do have several subtle differences. I saved the original block for the restoration, which means a lot to me. And, I got to learn something new.
 

Geo Hahn

Yoda
Country flag
Offline
...I saved the original block for the restoration, which means a lot to me...

And preserved the 'matching numbers' (matching the Heritage cert). Not a big deal to me personally but looking at the direction some other marques (e.g. Jaguar) seem to be taking it could be a value factor down the road.
 

TR3driver

Great Pumpkin - R.I.P
Offline
But, those are not TR2 blocks on Ebay, which do have several subtle differences.
I know about the cam bearings and locating bolts (which are visible from outside), plus the oil baffle (which AFAIK is not visible); are there others?
I saved the original block for the restoration, which means a lot to me.
Excellent point, and a worthy goal.

And, I got to learn something new.
And that's the fun part!
 
OP
CJD

CJD

Yoda
Country flag
Offline
Now, I know this is getting anul...but it's a carry over from my Vette resto days...

The casting number on the later blocks is different. Also, the TR3 and later blocks have a casting date added, which is not on the TR2 block. The internal baffling on the vent was different on the earliest TR2's...although I don't think mine was one of those. Again, all very subtle...only a handful of Trumph guys in the country would know, and I'll forget before I finish this thing.

Along another line...there are some videos on the Lock n Stitch sight showing how extensive damage can be and still repair it. The general term for their repairs is "stitching". You drill holes along a crack and add the pattented bolts with the reverse thread. The bolts overlap, and the reverse threads pull the repair together, rather than pushing it apart. It is totally amazing how well these reverse threads work. In one video they cut a 12 inch by 6inch section out of the side of a big Cummins block. They then stitch in a steel plate to cover the hole...and do it all with the engine still in the chasis.

I have always been a welder...but I think I will try the stitching next time. My cracked head may be a contender down the road.
 

Tompol

Freshman Member
Offline
Hi,
My name is Tom, I bought my TR3B couple months ago, recently the engine started to overheat so i took the head off hoping for bad gasket and discovered crack identical to the one you fixed with Full Torque insert.
Do you still have some of the inserts, I'll be interested to buy the kit or rent a kit and buy one insert.
I love my TR3b but unfortunately it's a bitter start for British car novice?


Regards
Tom
 

mallard

Luke Skywalker
Country flag
Offline
Welcome to the forum Tom. John did a fantastic job with this topic I'm sure he will get back to you.
 
Similar threads
Thread starter Title Forum Replies Date
AEW TR2/3/3A TR3a block with crack Triumph 5
sim A-series Engine Block Search Spridgets 2
1 TR2/3/3A TR2/3 Oil Leak Where Oil Sending Pipe Connects to the Block Triumph 4
B TR6 TR6 block decking Triumph 2
B TR6 71 block & crank Triumph 1
T Block Heaters Austin Healey 3
tinman58 TR2/3/3A Por-15 in engine block? Triumph 12
F Wanted BJ8 Engine Block Austin Healey Classifieds 1
R For Sale 100 engine block w/head Austin Healey Classifieds 3
Sopwith_Camel what is this on the block? Jaguar 13
BoyRacer Mystery 3000 Engine Block Austin Healey 2
jfarris TR2/3/3A Plug/cap sizes to block off heater Triumph 5
healeynut For Sale 100/4 block and head Austin Healey Classifieds 1
tj_tr3_tr6 Wanted Wanted / Need / TR4 Engine Block for 62 Tim from So California Triumph Classifieds 3
Chuck9482912 Letters Cast Inside Engine Block Austin Healey 0
A Land Rover V8 3.9L long block core for sale Rover / Land Rover 1
P TR2/3/3A Block treatment post cleaning Triumph 17
Bayless Ready for final block sanding Spridgets 5
Joel Lester TR2/3/3A "TR3" painted on the engine block Triumph 13
R Rust in Block? Help needed! Austin Healey 6
D TR6 Disconnecting pipe from engine block to oil pressure gauge Triumph 6
HealeyRick For Sale Bare 29F Block, Cylinder Head and Manifold Austin Healey Classifieds 2
T For Sale Triumph TR6 N.O.S engine block [late] Triumph Classifieds 2
nichola TR6 Classic Technologies front sealing block Triumph 7
nichola TR6 Aluminum block engine Triumph 8
M 948 Cylinder Block Studs - Sequence on Cylinder Block Spridgets 4
CinneaghTR TR4/4A Hole at Bottom of Threaded Stud Hole in Block Triumph 6
F TR2/3/3A SU 1 3/4 Carb to Manifold Insulating Block; '59 TR3A Triumph 6
Bremer TR2/3/3A Block deck height? Triumph 10
Bayless Memory block Spridgets 3
D TR2/3/3A Coolant tap on TR3 block Triumph 3
Got_All_4 TR6 Should I paint the inside of the block? Triumph 17
T Oil filter block plate - really? Austin Healey 13
6 1275 Head to block dowel pins Spridgets 10
D New Fuse Block Configuration Austin Healey 21
Sarastro TR4/4A Engine block deck flatness Triumph 9
KVH TR4/4A Block Water Outlet Valve Triumph 13
D 3000 engine block Austin Healey 0
H Machined Engine Block - Cleaning before assembly and paint. Not sure what to do? Spridgets 5
S BJ7 frozen temperature sensor to block Austin Healey 17
D mystery of the day... pedal block? Austin Healey 5
D TR2/3/3A Block coolant passages plugged - pull the head? Triumph 46
simon1966 Numbers stamped into a BN1 block? Austin Healey 5
M TR6 Front sealing block Triumph 11
H Post-War Other Herald rear suspension lower block installation Triumph 3
D Engine Block Austin Healey 14
jfarris TR2/3/3A Head stuck on block Triumph 8
T TR4/4A How to prep block to reinstall head for composite gasket Triumph 3
J Austin healey block Austin Healey 18
Zitch TR4/4A New fuel pump fitment to block Triumph 3

Similar threads

Top