• The Roadster Factory Recovery Fund - Friends, as you may have heard, The Roadster Factory, a respected British Car Parts business in PA, suffered a total loss in a fire on Christmas Day. Read about it, discuss or ask questions >> HERE. The Triumph Register of America is sponsoring a fund raiser to help TRF get back on their feet. If you can help, vist >> their GoFundMe page.
  • Hey there Guest!
    If you enjoy BCF and find our forum a useful resource, if you appreciate not having ads pop up all over the place and you want to ensure we can stay online - Please consider supporting with an "optional" low-cost annual subscription.
    **Upgrade Now**
    (PS: Subscribers don't see this UGLY banner)
Tips
Tips

The teardown begins, follow along at home!

drooartz

Moderator
Staff member
Gold
Country flag
Offline
The teardown of my Bugeye (tentatively named "Penny" after the town of Penryn in Cornwall where she was first sold) has begun. I'll be tearing her down to a rolling shell before taking her down to the body shop for some repairs and a full repaint in the original Old English White.

I'm keeping notes and photos on the disassembly here so I can remember how it all goes together:
Bugeye disassembly notes

I'm taking a methodical approach to the teardown, making sure I'm documenting any issues with the components and making notes on bodywork issues I run across while I'm in there. So far things look pretty good -- there have been some repairs (floors at least) but I think things are solid. Will be interesting to talk it over with the body guy once I've got the car down there to see if the repairs will need to be redone. I think they're fine, but I'm no body man that's for sure.

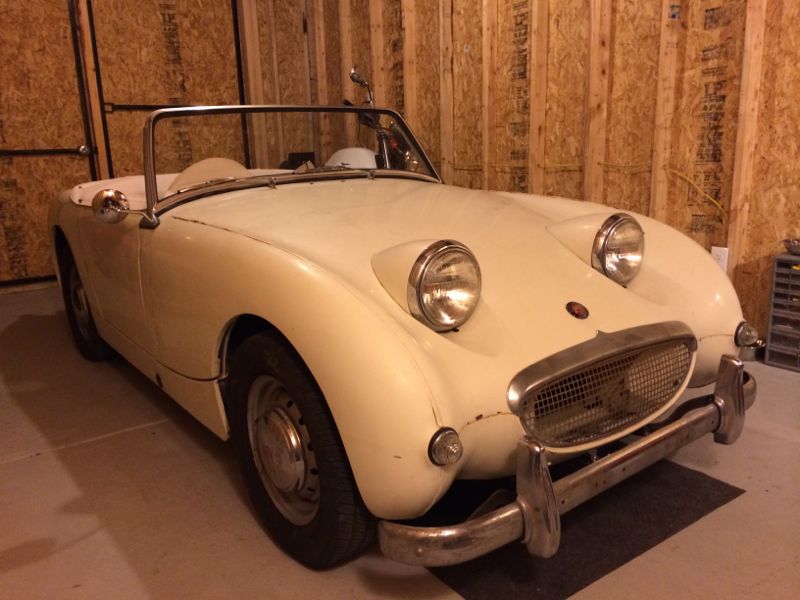
What I started with. Looks just fine in the picture but there are some things to be addressed.

IMG_1764.jpg


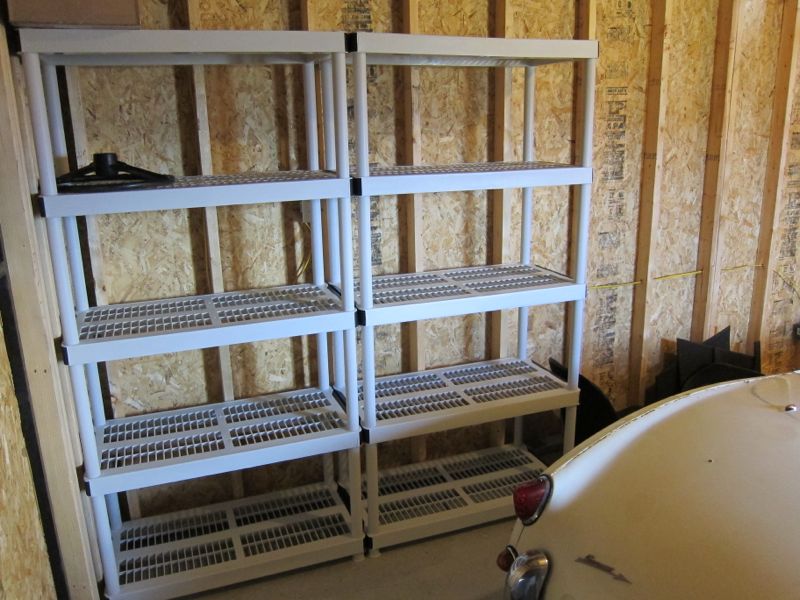
Picked up some cheap shelves and a bunch of boxes. Soon much of the car will be on these shelves...

IMG_0836.jpg


Front floors had this odd plastic-like coating. Came up easily enough with a scraper and few taps with the hammer

IMG_0819.jpg


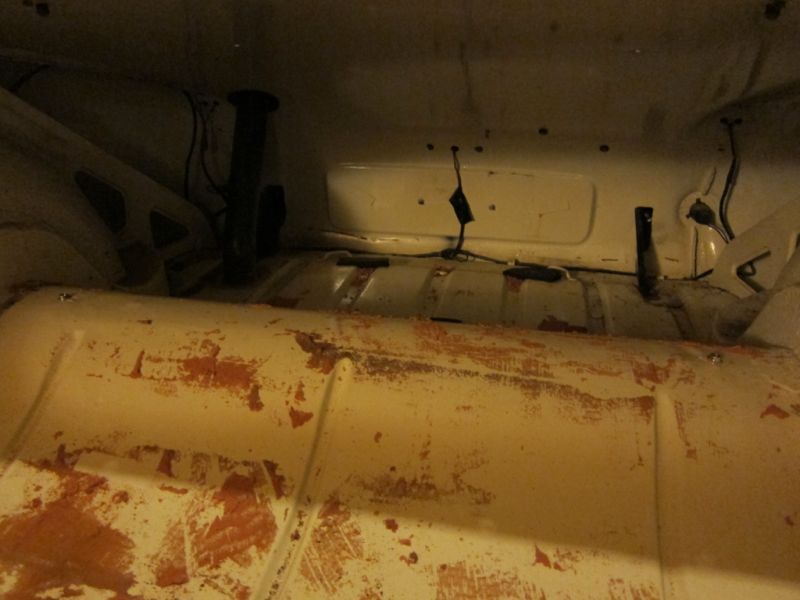
Boot area is solid. There are a few holes in the back rear deck to be filled, but for the most part things in here look solid. Got both of the bumper bracket reinforcements out of the boot today and one will need a bit of work (broke off one of the welded-in nuts) and both need paint before they go back in.

The old carpet had this thick backing/foam glued in everywhere (that's the red in the pics). Nasty stuff, all dried out and made little pellets everywhere. At least it came up easily enough.

IMG_0823.jpg


Floors are solid, but have seen some patches at least in places. I don't know enough about the structure to know how much has been patched in.

IMG_0830.jpg


Onward an upward. I've got some time over the coming Thanksgiving weekend so if the temps aren't too bad (my little shop isn't insulated and just has a small heater) I should be able to make some more progress soon.
 

Jim_Gruber

Yoda
Country flag
Offline
Drew looks good. Now I can see where the brackets to hold the top bows go. That's the picture I was looking for. You had and advantage over my restoration if Bugsy II in the Penny is all together. Bugsy II is totally apart and in boxes. I discover things I need or repairs that are needed as I go along. I did manage to score a NOS Dash Grab Handle this week with perfect chrome. It will all go back together in time. Good luck on weather this week. Going to try and get Bugsy III my parts car picked up next weekend.
 

Rut

Obi Wan
Country flag
Offline
Drew, looks like the bulkhead and floor stregntheners are new from the way they are welded in, but all looks good. I would suspect that the floors are new since they seem to rust out before the stregntheners do. All in all it looks done properly.
Rut
 
OP
drooartz

drooartz

Moderator
Staff member
Gold
Country flag
Offline
You had and advantage over my restoration if Bugsy II in the Penny is all together.

It's a huge help having the car together and running (sorta) at the start. I just have to keep being patient and not just tear everything out at once... do a section, document it, move on, otherwise I waste that advantage. Still, hoping to have some serious progress this week.

I can get a better picture of those top-bow brackets if you need, but do be warned that it's likely that the bulkhead panel was replaced in my car so I can't guarantee that they are completely in the stock locations.

Drew, looks like the bulkhead and floor stregntheners are new from the way they are welded in, but all looks good. I would suspect that the floors are new since they seem to rust out before the stregntheners do. All in all it looks done properly.

From notes I found with the car it was restored/refurbished/worked on before it was purchased by the American owner in 1981-ish. I'm guessing this bodywork dates to that time, but no real way to know. No nasty surprises at least (none were expected).

I do chuckle at just how easy it is to strip down a Bugeye -- there's just not that much to take off, really. :grin:
 
OP
drooartz

drooartz

Moderator
Staff member
Gold
Country flag
Offline
Drew, looks like a real solid car.

I'm really happy with it, Hap. Considering it was an unexpected car swap -- you know all about the last minute plan change -- I couldn't be happier. So no MGB engine build (sold that car to a friend) but I will have a 1275 to do again once the bodywork is sorted.
 

Gundy

Luke Skywalker
Offline
I like your attention to documentation . Failing to plan is planning to fail.
Great canvas for YOUR personal
version of a Frog.
 
OP
drooartz

drooartz

Moderator
Staff member
Gold
Country flag
Offline
I like your attention to documentation. Failing to plan is planning to fail.

Thanks -- mostly I know my weaknesses well. I have a running joke with a friend: "it's not that you fix your weaknesses, but that you learn how to work around them." :grin:

I'm really excited. It's a good indication that my car switch was the right one to have made for me (from MGB back to a Bugeye)... I never had the interest to go this deep with the MGB, but am really enjoying this process. Trying to apply everything I learned from the Tunebug as well, including some helpful comments that the new owner was kind enough to share with me.

I have a very particular end result in mind with this car and have made a conscious choice to stick to that, even if it means a longer time horizon to completion. Luckily I love my second job (as a musician) that pays for all of this. So y'all hope for lots of snow in Utah this winter -- more snow means more tourists means more gigs for me. :thumbsup:
 

JPSmit

Moderator
Staff member
Silver
Country flag
Offline
Looks great! The tupperware containers are also a great idea. In July's Classic Motorsports Magazine, there is an article on organizing a restoration. What they did was use tupperware, but, before they closed the container, the numbered it, took out the contents and took a picture of the contents. Then printed the pic and put in a book - so they have pictures of the contents of every box - made sense to me. (not that I have done it - doh!)
 
OP
drooartz

drooartz

Moderator
Staff member
Gold
Country flag
Offline
I'm using lots of ziploc baggies -- small bags for the individual parts, and multiple small related bags from a component go into a single larger gallon bag to keep them together. Bags then go into a bunch of banker boxes. Where possibly I'm reassembling the components before storage. Written on each box goes a list of the box contents. Trying where possible to keep like parts (such as all the lights) in the same box.

I'm using the Google doc as my documentation, linking pictures with the notes on each component. When I'm working on a section of the car I make notes on a little note pad and take the appropriate pictures, then write it all up later in the evening once the work is done. It's not too time consuming, and I should have a decent set of pictures and notes for the reassembly stage.

It really helps that a Bugeye is a *very* simple car. Just aren't that many components to take off the car in the first place.
 

Keith_M

Jedi Knight
Country flag
Offline
Luckily I love my second job (as a musician) that pays for all of this. So y'all hope for lots of snow in Utah this winter -- more snow means more tourists means more gigs for me. :thumbsup:

Amen to that! (no religious overtone intended:D). More snow in Utah means better skiing for me. If I can't drive my Healey, I might as well be skiing.

Drew, the car looks great. Are you going to have the body shop strip it to bare metal?
 

NutmegCT

Great Pumpkin
Gold
Offline
More snow in Utah means better skiing for me. If I can't drive my Healey, I might as well be skiing.

If that guy at the ski lift wants to buy your Healey again - tell him I'll double his offer. :jester:


nomad

Yoda
Offline
Drew I would recommend checking out the rust pocket that exists behind the rear wheel's. BMC wanted to spot weld everything and have no seam's on the finished surface so created a nasty little pocket there. I would recommend cleaning it out and putting some wax oil or equivalent in there while you are at it.

Kurt.
 

Keith_M

Jedi Knight
Country flag
Offline
More snow in Utah means better skiing for me. If I can't drive my Healey, I might as well be skiing.

If that guy at the ski lift wants to buy your Healey again - tell him I'll double his offer. :jester:


Tom, as recall the word 'buy' was never uttered. He was trying to trade for the golf car he was driving! :highly_amused:

I guess that means you've upped the bid to two golf carts?
 

Keith_M

Jedi Knight
Country flag
Offline
Drew I would recommend checking out the rust pocket that exists behind the rear wheel's. BMC wanted to spot weld everything and have no seam's on the finished surface so created a nasty little pocket there. I would recommend cleaning it out and putting some wax oil or equivalent in there while you are at it.

Kurt.

Kurt,
My bugeye is at the bodyshop now, so I'm interested in what rust pocket you're talking about. Are you talking about the cavity that the rear springs are mounted in? Or is there a more insidious, hidden cavity somewhere else?
Keith
 
OP
drooartz

drooartz

Moderator
Staff member
Gold
Country flag
Offline
Drew, the car looks great. Are you going to have the body shop strip it to bare metal?

Thanks. Not certain yet if we'll be going to bare metal, but I'm thinking so. The paint in the interior is flaking off pretty easily, so I'm not sure it's the best base for new paint. Likely we'll have to go that route -- rather not have to spend the budget there, but if we need to I'll make it work somehow. I can eat every other day.

Drew I would recommend checking out the rust pocket that exists behind the rear wheel's. BMC wanted to spot weld everything and have no seam's on the finished surface so created a nasty little pocket there. I would recommend cleaning it out and putting some wax oil or equivalent in there while you are at it.

I've got some rust in both 1/4 panels right behind the rear wheels, so we'll be giving that area a close inspection as we fix things. Not exactly sure what area you're describing, though.
 

nomad

Yoda
Offline
Kurt,
My bugeye is at the bodyshop now, so I'm interested in what rust pocket you're talking about. Are you talking about the cavity that the rear springs are mounted in? Or is there a more insidious, hidden cavity somewhere else?
Keith

Yes around the spring mounts is a problem area but I'm talking about the hole in the boot that gets filled up with dirt and bits that you thought you must have left somewhere else. Namely the pocket directly behind the rear wheel's where the outer fender is spot welded to a panel that drops down from the floor of the boot. To get at it you have to crawl in and reach over the bracing on each side. My car is a rust free California car but I got some scaley rust colored stuff out of those holes, along with pens,bolts and nuts. Vacuumed out and wax oiled.

Kurt.
 

Gerard

Luke Skywalker
Country flag
Offline
Yes around the spring mounts is a problem area but I'm talking about the hole in the boot that gets filled up with dirt and bits that you thought you must have left somewhere else. Namely the pocket directly behind the rear wheel's where the outer fender is spot welded to a panel that drops down from the floor of the boot. To get at it you have to crawl in and reach over the bracing on each side. My car is a rust free California car but I got some scaley rust colored stuff out of those holes, along with pens,bolts and nuts. Vacuumed out and wax oiled.

Kurt.

The pocket Kurt is referencing is formed by the shut panel between the boot floor and the outer fender. You can see it clearly in the attached photo. It was the only spot there was any rust on my current Bugeye project, so a new one was made and replaced. You won't be able to see much back inside the boot, so check it from the underside as well.

You'll see mine has been seam sealed and undercoated, so it should never be an issue in the future, even if I ever do get it on the road... :playful:


IMGP0103_4.jpg
 
Similar threads
Thread starter Title Forum Replies Date
KVH General Tech Engine Teardown on the Way Triumph 43
davester Help me make some engine teardown/evaluation/might-as-well decisions please. Spridgets 6
J TR6 73 TR6 teardown. Triumph 3
TR6BobNF TR6 TR6 Teardown - Winter 2011 Triumph 4
JodyFKerr Spifire 1500 Carb teardown question Triumph 10
swift6 TR6 Teardown of a 150k TR6 engine... Triumph 4
R BE Teardown In Process Spridgets 11
smaceng Ready for engine teardown? Spridgets 4
spit71 Finally doing teardown Triumph 5
drooartz 1275 teardown continues, a few questions Spridgets 9
drooartz Next steps in engine teardown? Spridgets 8
drooartz A bit more teardown Spridgets 32
JPSmit 2 questions, #1 teardown, #2 vinyl? Spridgets 4
DonPete3 Teardown almost complete. Spridgets 6
Baz 2012 Mini CEL - Now it begins........ British Motor Corp 0
longbridgehealey And so it begins....... Spridgets 6
Bayless Progress finally begins Spridgets 5
Westcoast M5 The Journey Begins - BJ8 restoration Austin Healey 74
Jim_Gruber Decopnstruction of Rear End over, Reconstruction Begins Spridgets 4
S And so it begins again Spridgets 48
R TR2/3/3A And so begins the body work... Triumph 10
Jim_Gruber And so it begins - Bugsy II - Floorpan Replacement Spridgets 1
drooartz Penny's bodywork begins Spridgets 131
bugedd The journey begins....maybe Spridgets 9
simon1966 The BN1 resurrection begins today. Austin Healey 7
Jeepster Now the fun begins! Austin Healey 30
60Bugeye Bodywork Odyssey Begins Spridgets 3
Basil The Tank Saga begins Jaguar 9
O And so it begins...again Triumph 16
PAUL161 Restoration Slowly Begins MG 16
MadRiver And so it begins MG 1
J And so it begins! Triumph 20
hondo402000 The Painting begins Triumph 44
G MGB 1971 MGB...The Project begins! MG 24
drooartz The week of Tunebuggery begins! Spridgets 3
B Voting begins for Midget 50th National Venue!! MG 1
B Voting begins for Midget 50th National Venue!! Spridgets 26
JPSmit Wiper Motor - the saga begins Spridgets 5
S My Jaguar Adventure Begins Jaguar 22
Monark192 MGA MGA Restoration Begins MG 3
Dadandson Now the Fun Begins Spridgets 16
T The Battle Begins Triumph 104
Brosky Powder coating begins next week Triumph 2
tosoutherncars Front-End Rebuild Begins!! ['78 1500] Spridgets 8
Brosky Bumper rechroming project begins... Triumph 23
B The rebuild begins! Austin Healey 6
sideache My Barn Find Resto begins Spridgets 27
A And so it begins!! Spridgets 3
B painting begins on the BE! Spridgets 11
Brosky New Overdrive adventure begins tomorrow Triumph 15

Similar threads

Top