• The Roadster Factory Recovery Fund - Friends, as you may have heard, The Roadster Factory, a respected British Car Parts business in PA, suffered a total loss in a fire on Christmas Day. Read about it, discuss or ask questions >> HERE. The Triumph Register of America is sponsoring a fund raiser to help TRF get back on their feet. If you can help, vist >> their GoFundMe page.
  • Hey there Guest!
    If you enjoy BCF and find our forum a useful resource, if you appreciate not having ads pop up all over the place and you want to ensure we can stay online - Please consider supporting with an "optional" low-cost annual subscription.
    **Upgrade Now**
    (PS: Subscribers don't see this UGLY banner)
Tips
Tips

Pics of how Rear End bolts into a BE

Jim_Gruber

Yoda
Country flag
Offline
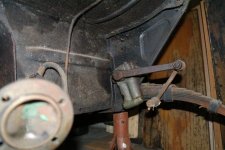
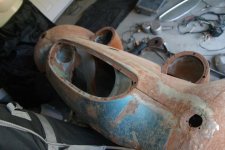
Anyone have a simple picture of how the rear end connects to quarter elliptic springs on a BE and how radius arms connect. BE i'm looking at has rear end out of the car. The Right Rear Spring is installed and the other is out of the car due to a bulkhead repair. Parts never got put back together after all of the metal work was completed.Trying to figure out how rear end attaches to the BE. Looking at my Bible i.e. Moss Catalog, it doesn't show clearly how things bolt back together. Is it simply what appear to be large bolts on the top ends of the differential that go through the bushings on the quarter elliptic springs. I'm trying to figure out a transport issue and whether or not I need to fabricate something to support the rear end for transport on a trailer(i.e. furniture dolly and some 2 x 4's, or do I need to try to find all of the parts and pieces in the P.O.'s garage and try reinstalling differential prior to transport.

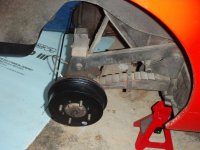
Engine, tranny, differential are all out of the car. Front suspension is still installed so transport weight will be light for the top. Biggest question, I think I could load & move with a furniture dolly supporting the rear end. But how to secure the back end of the BE to a trailer with nothing to tie it down with i.e. Rear end and only one quarter elliptic spring installed on the PS? Thoughts gentlemen?
 
OP
Jim_Gruber

Jim_Gruber

Yoda
Country flag
Offline
Right Rear Spring and Shock 2.jpgHere's all that is there to secure to. LR Spring not currently installed.
 

Attachments

  • Right Rear Spring and Shock 1.jpg
    Right Rear Spring and Shock 1.jpg
    95.6 KB · Views: 80

Rut

Obi Wan
Country flag
Offline
Jim,
Not a good picture, but I hope it helps.
Rut
 

Attachments

  • rear spring.jpg
    rear spring.jpg
    91.9 KB · Views: 94
OP
Jim_Gruber

Jim_Gruber

Yoda
Country flag
Offline
Rut, That really helps. So does the Spring then attach to what looks like a bolt that runs parallel to the differential. From the Moss Catalog it's not real clear how things connect and I had no clear how the Radius Arm attached. Now the question is how to transport with only a spring on one side. OK I now see what the radius arm attaches there is a mount on the outer side of the trunk bulkhead that I wasn't seeing on both sides. A very effective tie down point can be made there and rear end of the car could ride on a furniture dolly or something similiar. And it looks like radius arms are still attached the the rear end. I think the light bulb just came on.
 

apbos

Jedi Knight
Country flag
Offline
Jim
Two furniture dollies will make moving it easy. One guy with a good back can even load it on a trailer in the stripped down state your car is in. Just get all the parts shown in the Moss catalog. Especially the peculiar bolts unique to the B/E rear end. To secure the car, remove the dolly and stap the car down through the doors and secure the front suspension
Paul
 

Gerard

Luke Skywalker
Country flag
Offline
Jim,

Mine has been transported on a wooden dolly with the car lag bolted through the rear spring hangers in the back and frame horns in the front. Use bigger size wheel on the dolly, otherwise you'll have trouble with them digging in or getting stuck in small divots on whatever surface you are on. I used 2x6's for the two boards that span the width. I attached the wheel to the 2x6's. When on the trailer, I would secure the car with hold-down straps around the radiator uprights, in a "U", each metal end hooked to the trailer. At the rear, I bolted sturdy short chains to the brackets where the shocks are mounted, then attached hold down straps to the chains. If the heavy brackets where the radius arm attaches are still attached, you could secure there too. The thing never moved an inch.
 
OP
Jim_Gruber

Jim_Gruber

Yoda
Country flag
Offline
Thanks guys. This won't happen until Spring but trying to get cogitating on the issue of hauling it back 450 miles to Dayton. The brackets for the radius arms are there I just could not see them on hte right side until I got the picture from Rut. I could not pass this one up and SWMBO doesn't know I pulled the trigger on this one yet. I just could not let this one go. The car was taken apart in 1985 and put on a jig to have rear bulkhead on DS, floor, trunk floor, rockers, replaced. BE Bonnet had lower valence replaced and rear of car had some bodywork to corrrect some issues all done in lead not bondo. Then sprayed with aircraft presevation primer. Car has been apart since 85 and I'll get the opportunity to put it back together. All of the bits are there including a hardtop. My spare 1275 and ribcase will find a home and unfortunately Bugsy, my '68 Sprite with a Bugeye Bonnet will need to go up for sale to fund restoration of the BE. Anyone looking for a well sorted "Bugeye in disguise" please reach out to me via PM. Bugsy is a great car that I'd love to keep after retoring and owning for the past 12 years but with a 1 car garage Bugsy will have to go. Lot's of pics to follow as this new journney gets underway.

I weighed acquiring this BE that is apart but has all of the hard structural repairs completed vs. a 59 I can acquire for almost nothing that has typical rust that has been stored inside for the past 34 years since it was last on the road. I looked at restoration hours for "The Sitter" as Gerard nicknamed the car vs. one apart with all rust and structural issues fixed and it came down to time, and $. Restoration of "The Sitter" was going to take 4-500 hours more for fairly extensive metal work and and paint vs. reassembly of this car. I'm going to miss Bugsy and Bugsy II will take some time to get back together but it's going to be fun.
 

nomad

Yoda
Offline
Jim, if the spring perch on the other side is done it would only take minutes and some hardware sourced bolts to make it a roller. I think that is what I would try to do to transport it. Sounds like good project!

Kurt.
 

Gerard

Luke Skywalker
Country flag
Offline
Jim,

As you already know, these cars are quite simple. If all the body repairs have been made, you'll be well ahead on the project. Paint is always a time consuming obstacle for me, but the assembly is the fun part.
 
OP
Jim_Gruber

Jim_Gruber

Yoda
Country flag
Offline
Ray,

The after pics are pics are almost Spridget Porn. Your work is inspirational to all. I have your web site bookmarked for reference purposes. I now know how this goes back together. I think the tqack I am going to take is to show up with a couple of Harbour Freight dollies, a pice of 2 x 6, some bolts, piece of CHAINS, Screw together chain links and lots of hold down straps. Bonnet is off of the car, Front Latch and rods are not installed, and rear hinges are off as well. Thinking I can run a bolt through on each side or worst case a piece of rope and transport the bonnet attached to the car. I'm pretty sure long bolt passed through where locking rods attach will work to hold down the front end and gravity along with help from a hold down strap will secure the rear. Guessing Hardtop woud fit in rear of my Suburban along with a whole bunch of plastic tubs for all of the parts and pieces. Engine, place on a dolly and strap to front of trailer, tranny same thing as well. Rear end, strap down to back of trailer. It will all fit I'm sure. Grandson has a large two axle trailer I can borrow so lots of planning and hold down straps will get Bugsy II home.Cockpit and Steering wheel.jpg
 

Attachments

  • Bonnet - 5.jpg
    Bonnet - 5.jpg
    94.3 KB · Views: 63
OP
Jim_Gruber

Jim_Gruber

Yoda
Country flag
Offline
Nice Door gaps, repaired bulkhead, all bodywork repaired in lead and then sprayed with green aircraft preservation primer.Cowl and New A Post Rocker.jpgHardtop - 3.jpgRear of Tub.jpgDrivers Side - Interior Bulkhead Replacement.jpg
 

nomad

Yoda
Offline
Jim, think you have found a treasure. Looks like a pretty straight car.

Kurt.
 
OP
Jim_Gruber

Jim_Gruber

Yoda
Country flag
Offline
Kurt,

Door gaps are all good, well at least on the DS and I've been assured they are the same on the PS. Access to the PS is blocked by a wall in the garage. All of the important parts are there. Seat Bases are good, cockpit surround is there, new grille purchased 25 years ago, and most important structurally sound. Restoration will be mainly cleaning, grinding and filling, inventoring what is there and figuring out what parts are needed, prime and paint and reassembly. There is an uninstalled interior panel kit, 25 y.o. new top and lots of other stuff that will need to be blasted and POR-15'd on the underside. I can concentrate on reassembly rather than welding in new metal.

Right now I need to concentrate on a kitchen and bathroom remodel project that is in process. Once that is finished and new appliances in place I can talk with better half and let her know, "Hey Honey, BTW I bought another car." Plan is to pick up in March or so, all depending on weather conditions of course.
 

nomad

Yoda
Offline
Ah yes, as my wife reminds me "a happy wife is a happy life"!

Kurt.
 
OP
Jim_Gruber

Jim_Gruber

Yoda
Country flag
Offline
You got it Kurt. If Mama ain't happy, ain't nobody happy!
 

apbos

Jedi Knight
Country flag
Offline
Jim
What is the condition of the hard top? Will you be spraying or rolling? If you need some hardtop restoration. Tips let me know. It would be a nice project for your spare time this winter and SHMO would not have to know about the new car.
Paul
 
OP
Jim_Gruber

Jim_Gruber

Yoda
Country flag
Offline
Paul,

Hardtop looks to be excellent. Liner is still in there. And from what I can see from multiple pics it looks great. Likely will remain Red. And I already know where to get seals and necessary aattachment hardware if needed. No clue yet on painting. I did Bugsy with a roller and he still looks good 5 years later. It all depends on the budget. There is a guy at the end of our block that is into major muscle car restorations and he paints them all in his driveway. I may need ot get to know him better.
 

apbos

Jedi Knight
Country flag
Offline
I did my hardtop with the roller ( I can not seem to find my posts on the BCF when I did it in 2008). Interlux Brightside paint. I will have my car painted in the next 4 weeks, using the same paint. I have to have it done by Feb 15 as my uncle is coming over from Holland to help me assemble the car. I will post pictures when I am done. We need to warm up a little (it was 25F) last night.

Paul
 
Similar threads
Thread starter Title Forum Replies Date
vping Pics of my new rear MG 18
RobSelina DIY rear tube shock ideas [finished w/ pics] Spridgets 18
J Rear brake assembly pics needed!! Spridgets 2
S TR2/3/3A Tr3 pics. Triumph 8
Bob Claffie More Village pics Other British Cars 0
Bob Claffie More Village pics Other Cars 3
Bob Claffie General MG Falls Village pics MG 1
Bob Claffie Falls Village Pics Austin Healey 0
Bob Claffie Falls Village pics Jaguar 0
Bob Claffie General TR Falls Village pics Triumph 0
Bob Claffie Falls Village pics Lotus 0
Bob Claffie Falls village pics Spridgets 4
Bob Claffie General TR Random pics from Falls Village Festival Triumph 0
Bob Claffie MGA Falls Village MG pics MG 1
Bob Claffie More pics from Falls Village Festival Other British Cars 3
Bob Claffie Random pics from Falls Village Festival Spridgets 1
Bob Claffie Pics from Falls Village Festival Austin Healey 5
Bob Claffie Pics from Falls Village Festival Jaguar 2
Bob Claffie Pics from Falls Village Festival Lotus 6
C TR6 Latest TR6 updates and pics Triumph 10
JPSmit Trouble posting pics FORUM Navigation Questions 2
classicmechanic Amazon engine rebuild pics Other Cars 6
B Before and After Pics Longbridge 100-6 Austin Healey 5
K TR2/3/3A More pics of Kast Cam Triumph 4
K For Sale Further Pics of TR3 SU's Triumph Classifieds 0
K TR2/3/3A TR3A SU's More Pics Triumph 0
tr6nitjulius Great Race 2019 Official Start 6/22/19 pics Other Cars 2
A Spitfire I've been lax on posting - Summer Events Photo Albums - Lots of Pics Triumph 2
JPSmit Late night Benz [no pics] Other Cars 3
tr6nitjulius General TR Rites of Spring April 2018 video/pics Triumph 0
R Pics Spridgets 7
JPSmit Loading pics with iPhone FORUM Navigation Questions 6
tr6nitjulius Woodley Park All British Field Meet 4/22/2018 Video/Pics Rover / Land Rover 0
tr6nitjulius Woodley Park All British 4/22/18 Video/Pics British Motor Corp 0
tr6nitjulius Woodley Park All British Meet 4/22/18 Video/Pics Lotus 0
tr6nitjulius Woodley Park All Brits Meet 4/22/18 Video & Pics Sunbeam (Rootes) 0
tr6nitjulius General MG Woodley Park All British Meet 4/22/18 Video/Pics MG 0
tr6nitjulius Woodley Park All Brits Meet 4/22/18 Video/Pics Spridgets 3
tr6nitjulius General TR Woodley Park All British Meet 4/22/2018 Video & Pics Triumph 6
Got_All_4 TR2/3/3A Looking to get new wheels any Pics? Triumph 27
tr6nitjulius General TR TCSC New Year's Day Tour 1/1/2018 video/pics Triumph 2
A General Tech Here's Our BMCNE Newsletter - links to Collings Tour & Beatles Night Pics Triumph 1
tr6nitjulius General TR NW ATDI 8/10-13/2017 vid/pics Triumph 0
G TR4/4A Under Dash Pics Triumph 2
tr6nitjulius General TR TRIUMPH Fireworks Pool Party Video & Pics Triumph 2
C TR6 Frame Pics, some bad news Triumph 9
tr6nitjulius Woodley Park 4/23/17 video & pics British Motor Corp 0
tr6nitjulius Woodley Park All British 4/23/17 video & pics Jaguar 0
tr6nitjulius General MG Woodley Park All British 4/23/17 video & pics MG 3
tr6nitjulius Woodley Park All British 4/23/17 video & Pics Austin Healey 0

Similar threads

Top